The vital app on our mobile is Keyboard. We can use any app on our phone, But all of the Apps depend on the Inputs. That Inputs can only happen with the Keyboard Apps. So, We should choose the App that should be flexible with a lot of features. SwiftKey Keyboard has a lot of in-built features like Voice input, Gestures, and Clipboard. That makes this app one of the best keyboard apps available in the Playstore. Here I am going to tell the Top Ten Tips on SwiftKey Keyboard. I excluded the less useful features and tried to give meaningful and helpful Tips. This app is not only exclusive to Android. It is also available for iPhones. So, the tips below will work both on Android and iOS. But, Due to Android flexibility, this keyboard app can work better on Android compared with iOS.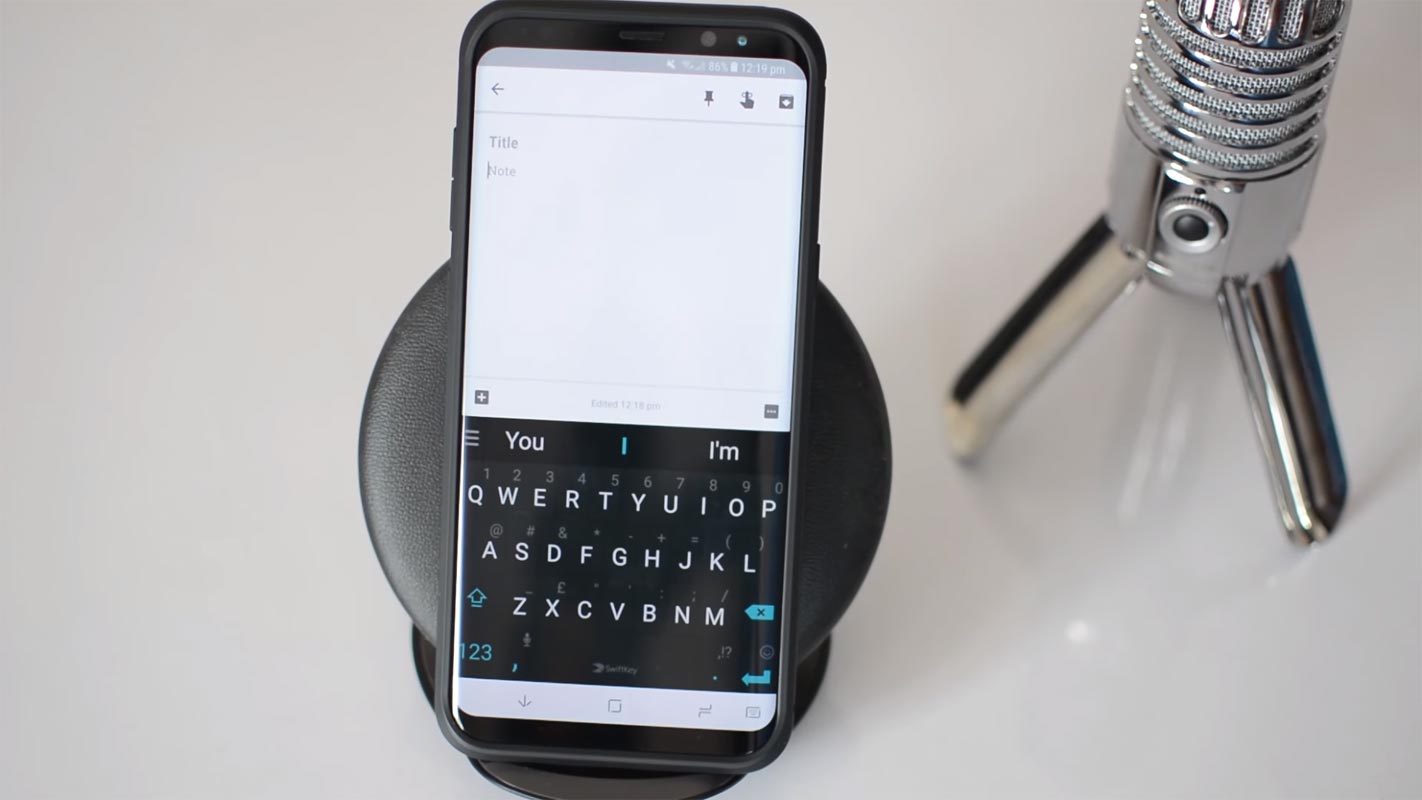
Android is a very free mobile OS with a lot of flexible features. It is possible to customize every aspect of your Android device using a mobile app. Today, we’ll see about the SwiftKey keyboard mobile app for Android devices. SwiftKey keyboard app is one of the best Android keyboard apps you will find at this time. It supports a lot of features and settings that are highly customizable. Also, SwiftKey is one of the best alternative keyboard apps to Gboard and the default keyboard preinstalled on any Android device. This article will focus on some tips on how to activate and use most features of the SwiftKey keyboard. Interestingly, SwiftKey works flawlessly on both Android smartphones and Tablets.
Ten Tips on How to use SwiftKey Keyboard on Android and iOS
As I mentioned earlier, there are a lot of features available in this app. I try to cover Important and exclusive features that are not available in the other keyboard apps.
1. Sign in and set up to access the full features
When you install the SwiftKey keyboard app on an Android device, it prompts you to follow a setup SwiftKey. It will ask permission as your default typing keyboard. As well as asks you to sign in using your Google account or Microsoft account so that you can access the full features of the app. After the sign in, you’ll ask to customize the look and feel of your keyboard. The sign-in is not required compulsory. But, when you sign in, your data will sync with your account. So, that even if you installed on other devices, you will get a unique style for your keyboard app.
1.1 Initial Setup
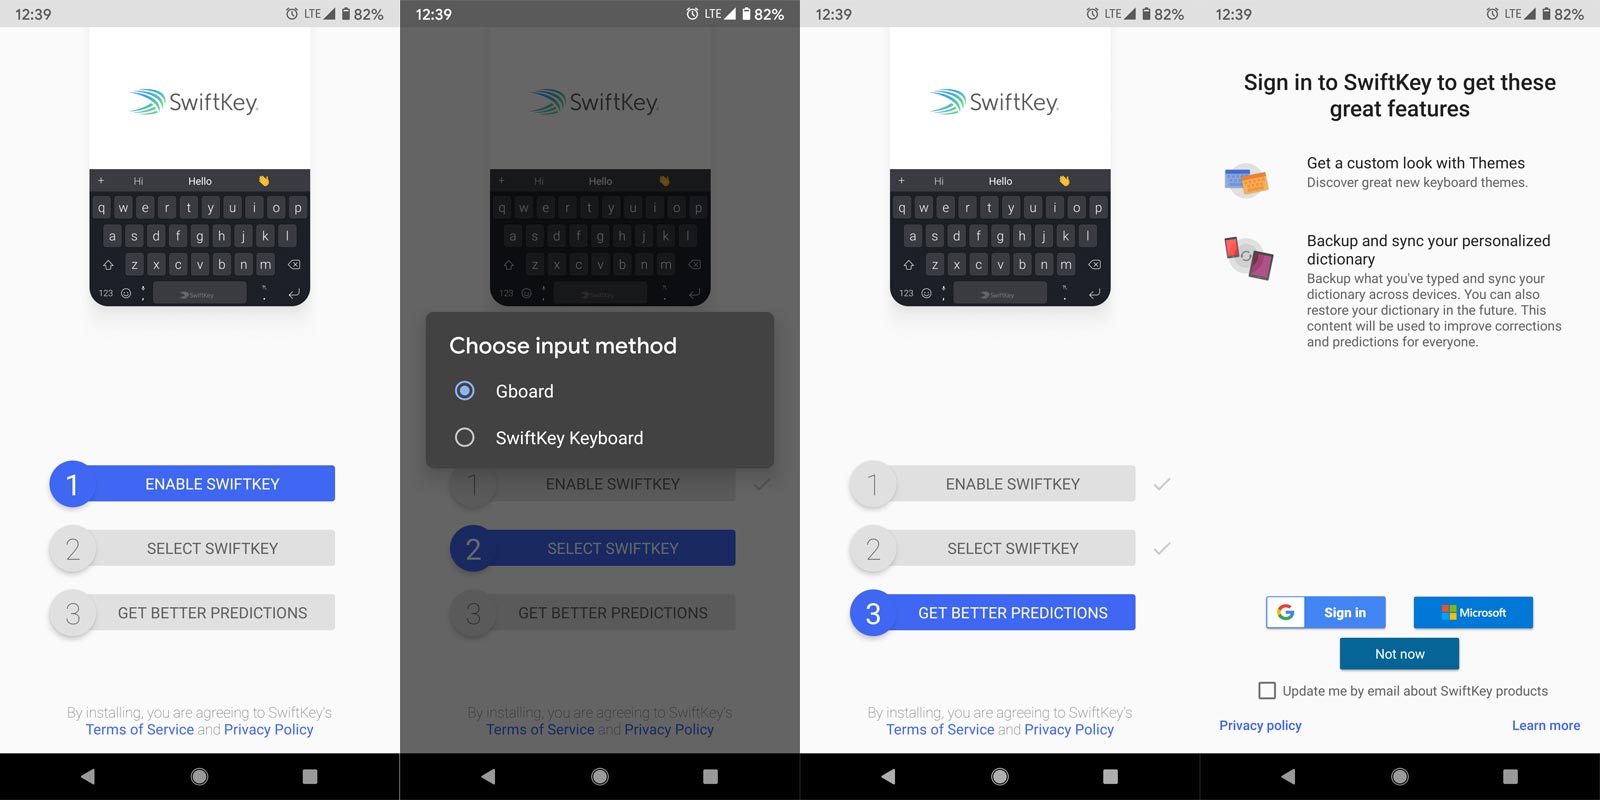
- Download SwiftKey Keyboard from PlayStore/ Apple App Store.
- Install it on your mobile.
- Give the necessary permissions to make inputs.
- Choose the SwiftKey Keyboard as your default input app.
- Sign in with your Google/Microsoft account. That’s all. We did the initial setup.
2. Use keyboard, gesture, or voice to type
SwiftKey allows you to choose between using the native keyboard to type, or you can switch to voice typing. In the same way, there’s a gesture typing mode known as SwiftKey Flow. This gesture typing mode works very well; you’ll have to slide across letters to form a word. Also, the voice typing mode means that you won’t have to touch your phone; instead, you’ll talk, and the keyboard recognizes your voice and turns them into written words. Google Assistant and this vice input are different.
2.1 Gesture Input Setup
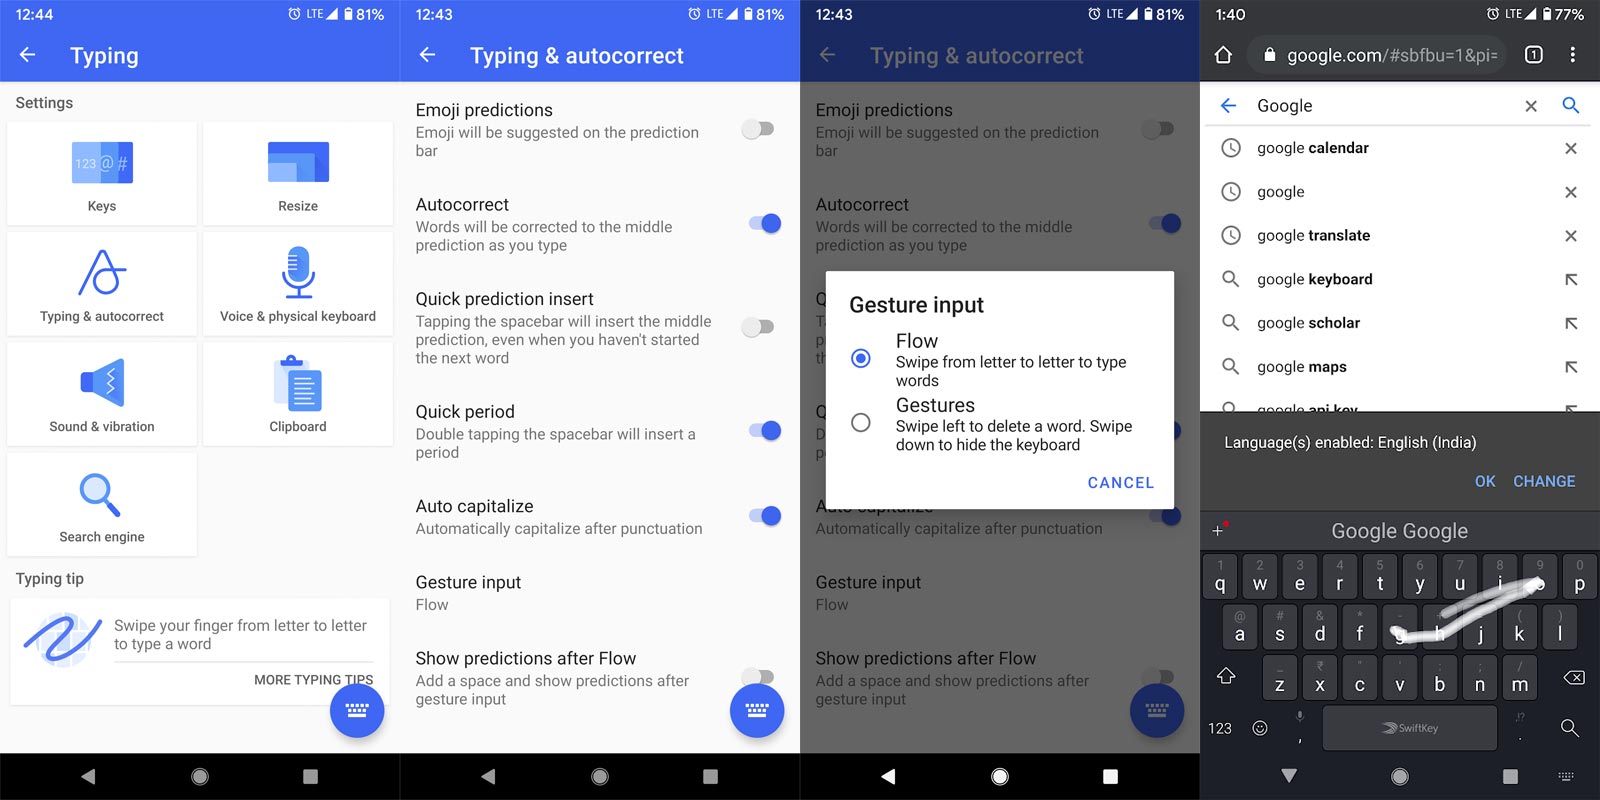
- The Gesture input is already available in the app. To customize further, You can go to the Keyboard App> Typing> Typing and Autocorrect> Gesture Inout> Flow/Gestures.
2.1 Voice Input Setup
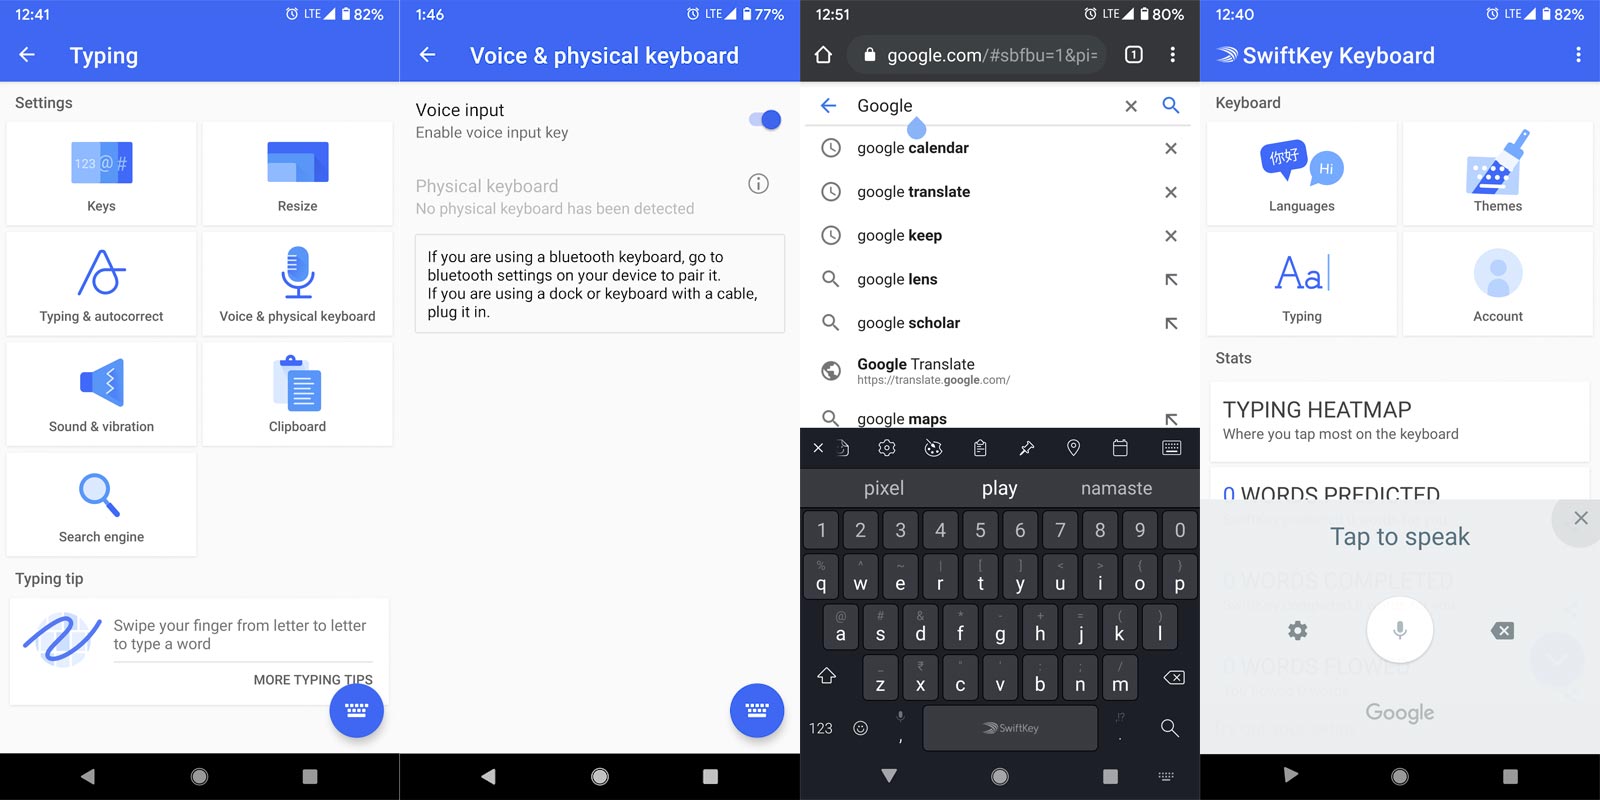
- Google’s Text handles voice Input to Speech. If you disable this app, enable it to use the voice input feature. To enable these features in Swiftkey, Go to the Keyboard App> Typing> Voice and Physical Keyboard> Enable.
- To trigger the Voice Input, swipe up the comma key with the mic symbol.
3. Resize your keyboard
Swiftkey allows you to resize your keyboard to any size you want. You can make the keyboard to be very tall or very short. Use the nudges at the left, right, top, and bottom edges to adjust the size of your keyboard until it suits your convenience. Click Okay once you set up a comfortable size that will allow you type fast. You can access the “Resize” option when installing the app. However, if you’re already using the app, go to the settings to access this feature.
3.1 Resize Keyboard using Settings
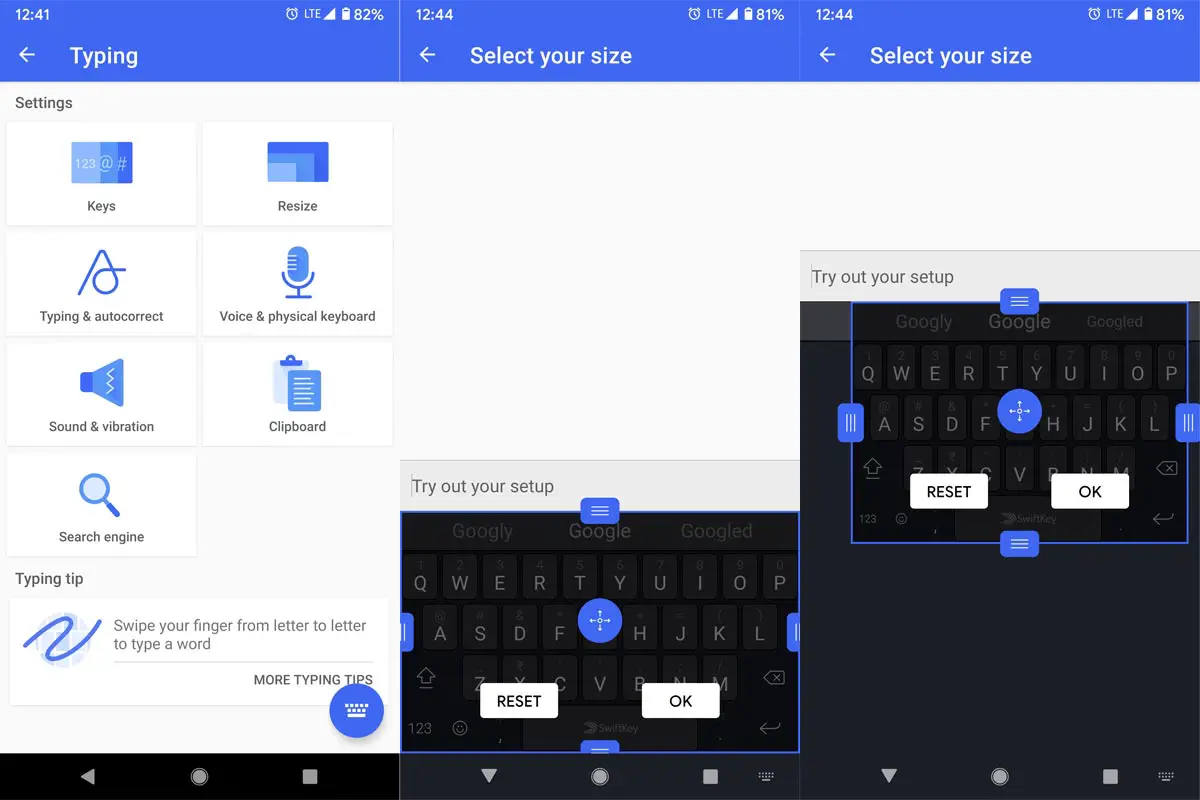
- This feature will be handy when you are using a Tablet. Sometimes you have to handle your tablet with the one hand; You can Resize the keyboard into one side for easy navigation. To Resize Swiftkey, Go to the Keyboard App> Typing> Resize. Use Centered Navigation to change position. Use Border navigations to reduce and Increase the size of the keyboard. You can change the location and Overall size.
4. Add Number Row
This feature activates “Numbers” on top of your keyboard letters; hence, making it easier for you to type numbers without having to switch keyboard panels. Also, the option to activate “Number Row” is shown at the wizard setup page after freshly installing this keyboard on your Android smartphone. However, you can still enable this feature from the settings menu.
4.1 Enable Number Row
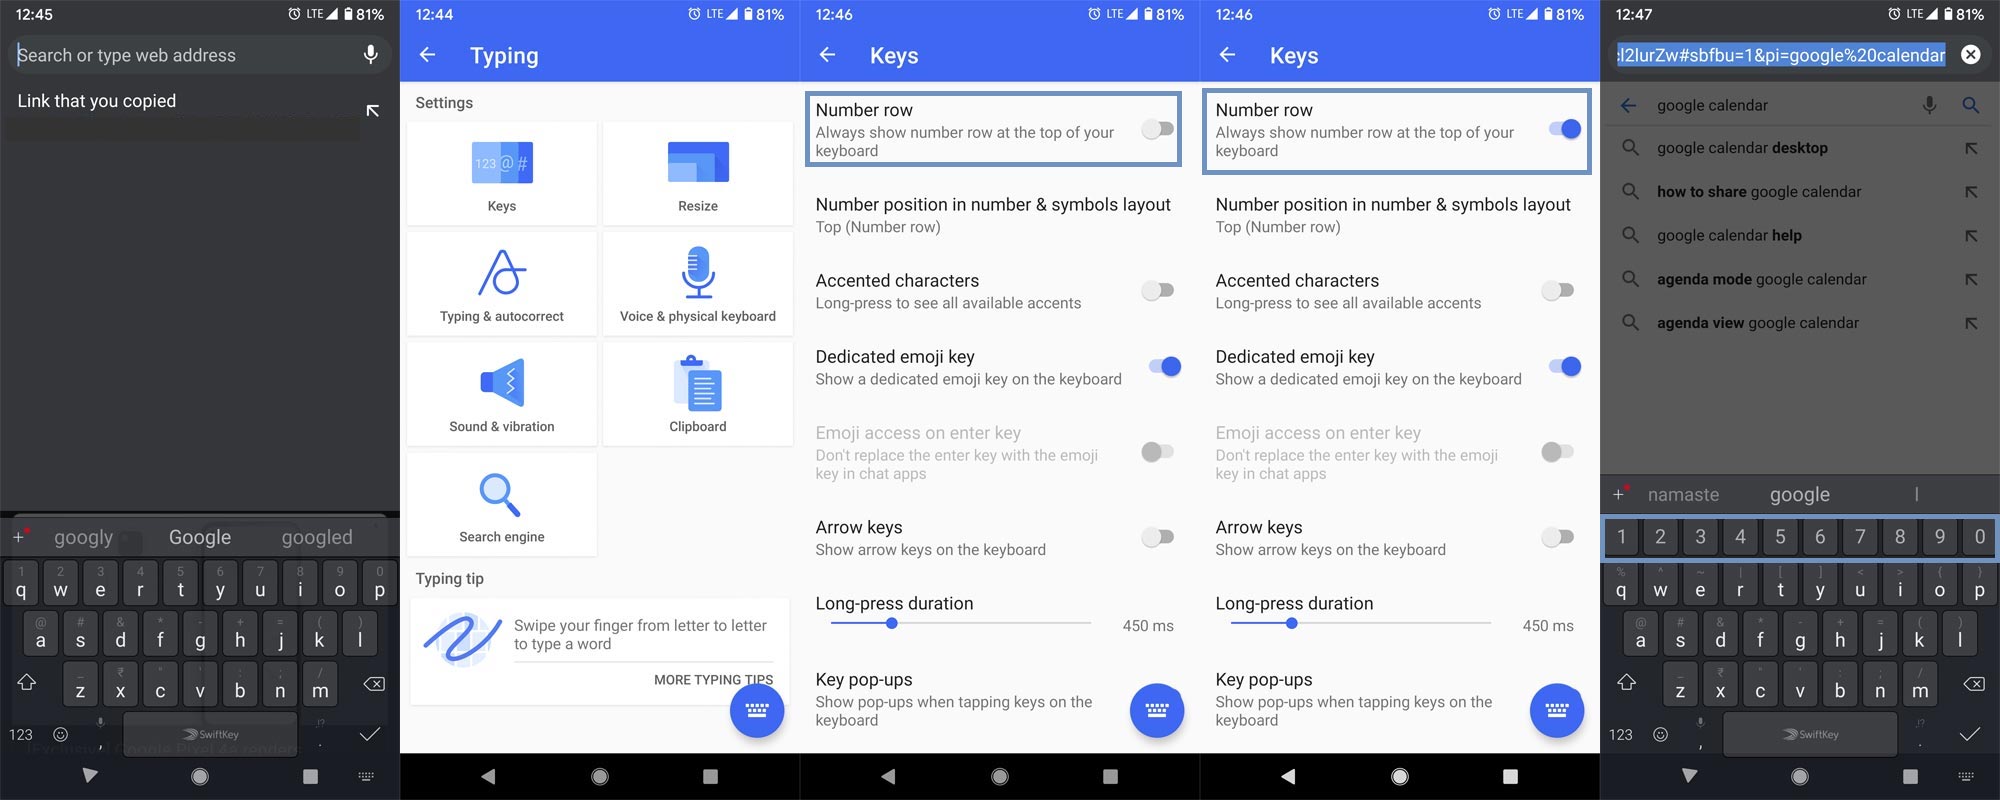
- Number Row will add an extra row on the keyboard. Some users always input a lot of numbers. If you are one, you can enable this feature. Like Separate Numbers in the PC Keyboard, after enabled, we can access numbers in the separate Row. To enable these features in Swiftkey, Go to the Keyboard App> Typing> Keys> Number Row> Enable.
5. Choose a language and keyboard type
Interestingly, SwiftKey supports multiple languages, as well as numerous keyboard styles/layouts. After you have picked a language (e.g., English, Spanish, or any other language), proceed to choose a design; that’s deciding between QWERTY, AZERTY, Colemak, Dvorak, QWERTZ, or QZERTY. Also, you can access this option in the keyboard settings.
5.1 Change Language and Keyboard Type
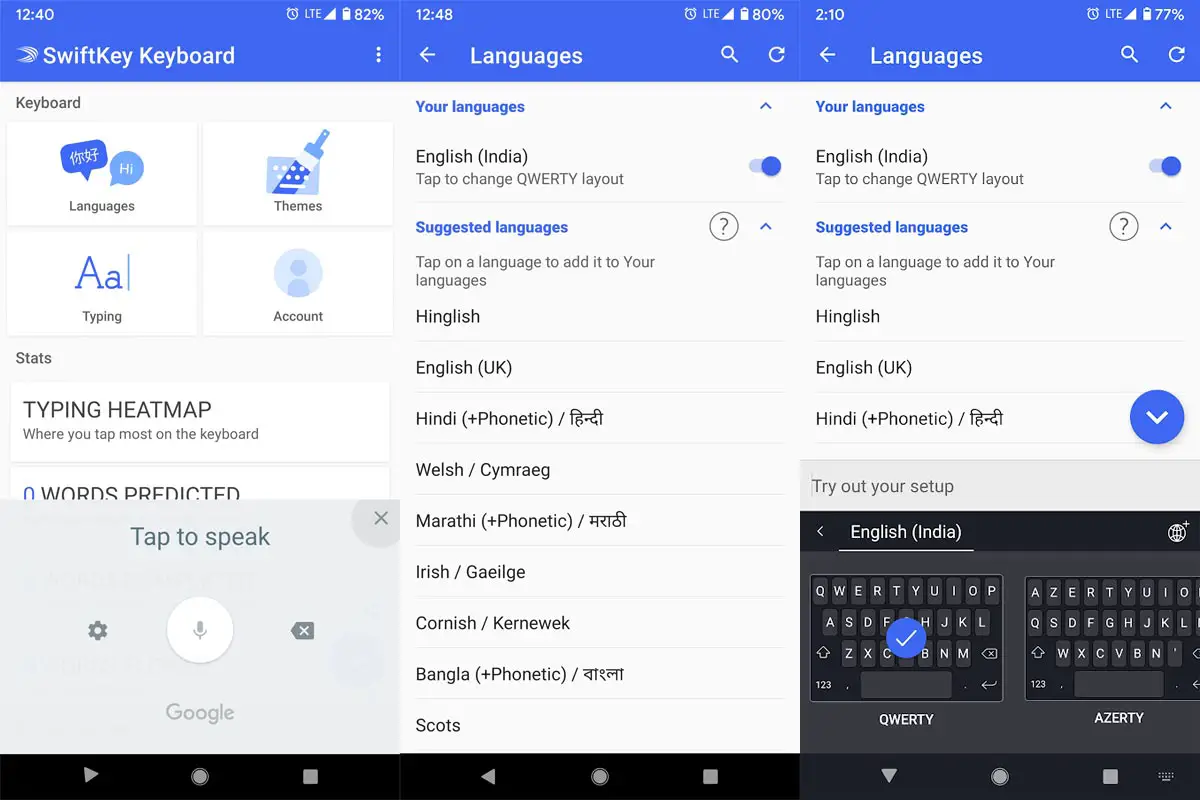
- To change the language in Swiftkey, Go to the Keyboard App> Languages> Your Languages.
- To change the Input Type from Qwerty to other Types, Go to the Keyboard App> Languages> Your Languages> Tap on the Selected Language. You will get a variety of keyboard types.
6. Activating and using the translator feature
More so, the SwiftKey keyboard comes with a translator feature, although Microsoft Translator powers this feature. The feature allows you to translate words from one language to another, just like Google Gboard does.
6.1 Enable Translator Feature
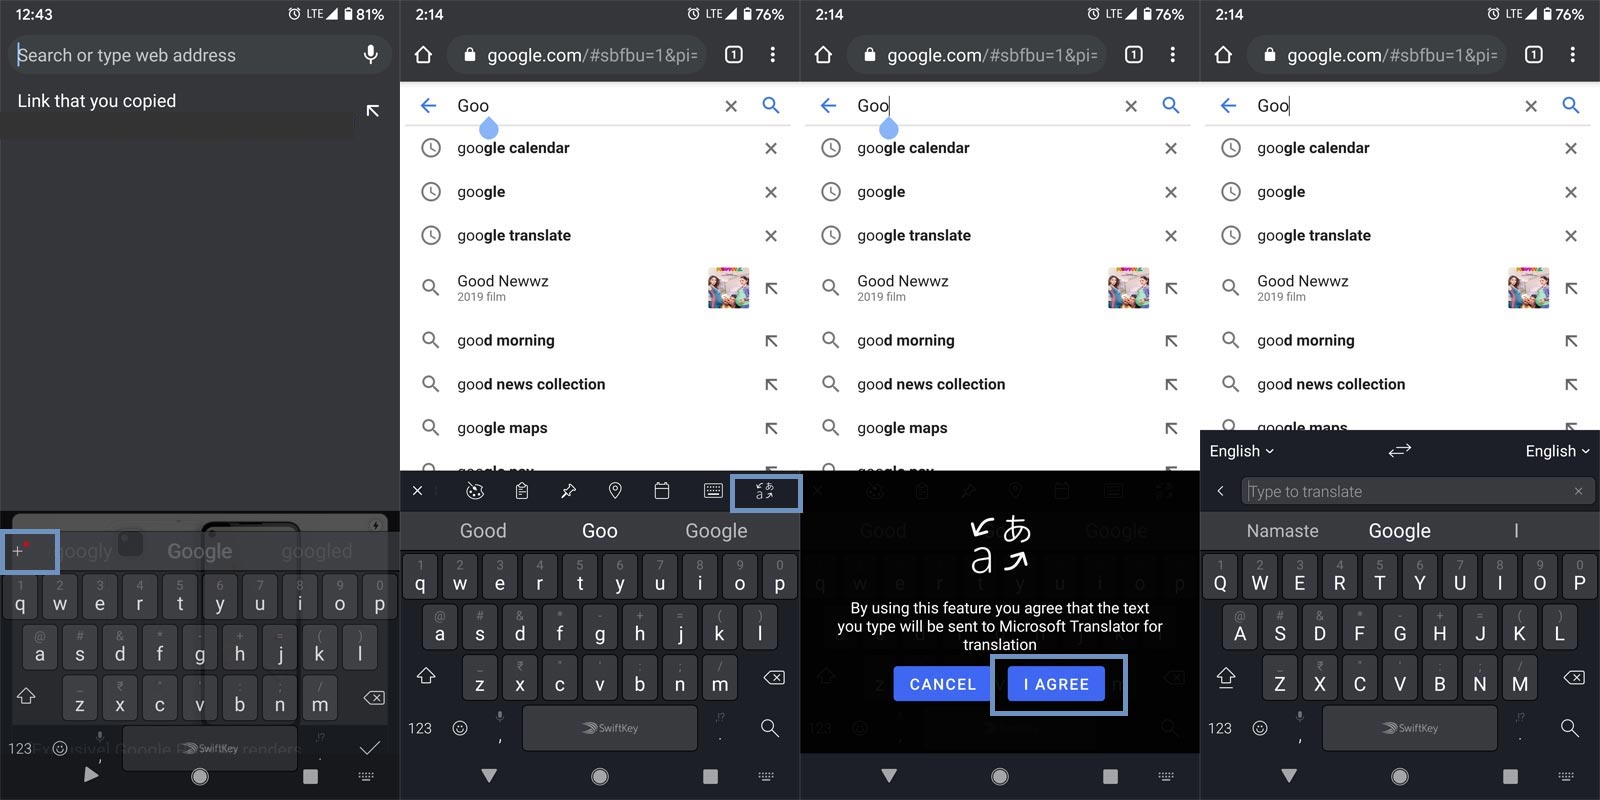
- To activate this translator feature, you have to click on the plus “+” sign seen on the top-left edge of the keyboard, slide and click on the more button represented with three horizontal dots “…” then select “a forward and reverse direction icon (Translator).” You’ll be asked to consent to the usage of this feature, which you’re to click on “Allow.” The Swiftkey app uses Microsoft Translator. It may not be best, like Google Translator. But it will be useful in a lot of situations.
7. Access your calendar and events
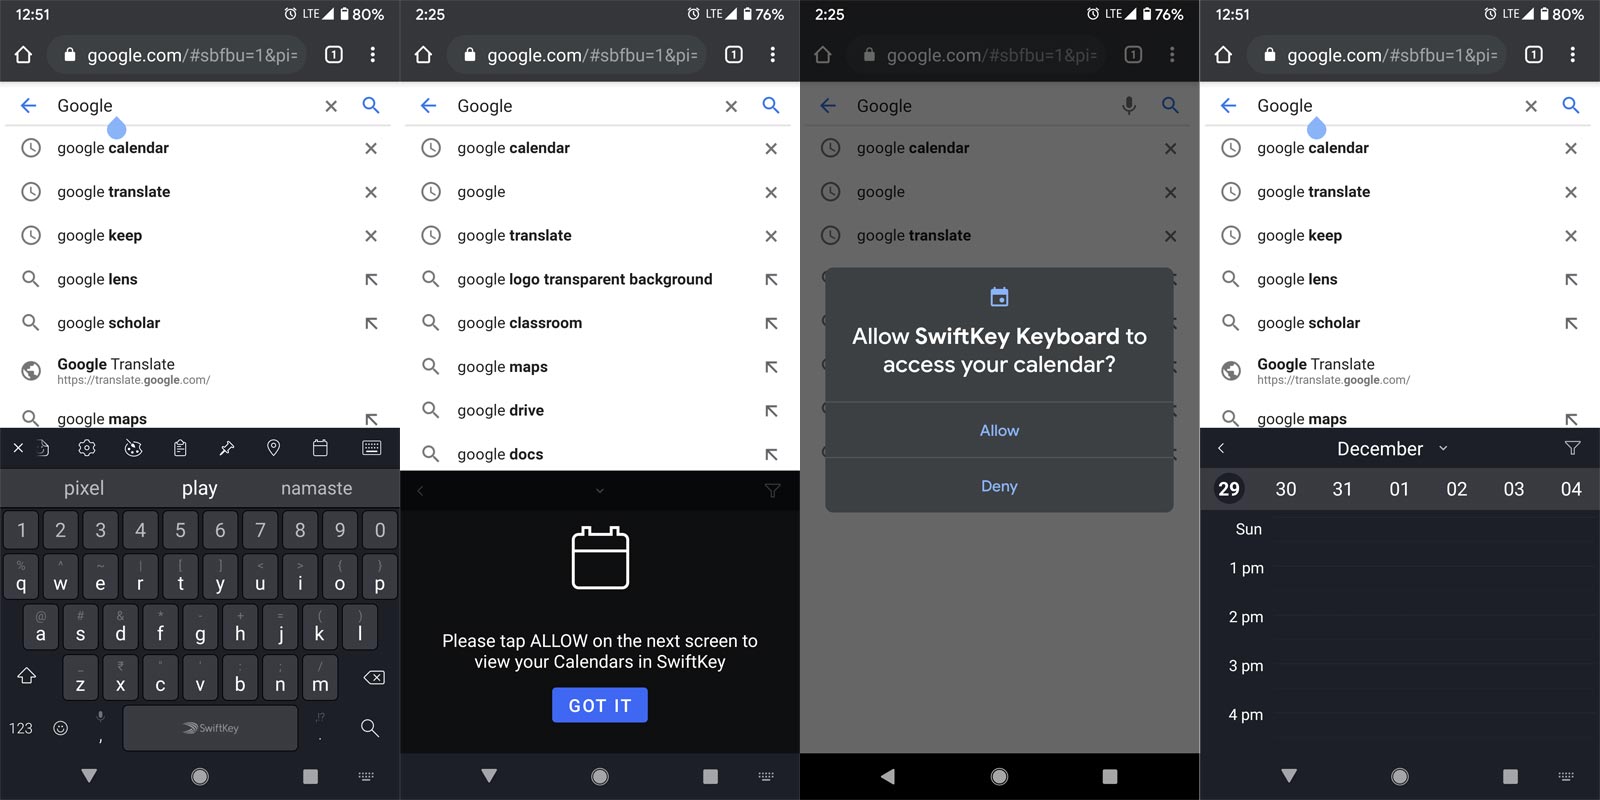
Also, you can easily access your calendar events as you type using the SwiftKey keyboard. This feature is also accessible when you click on the “+” button and then further click on the calendar icon. If you have events for a day, you can easily add the details and send them to a friend. SwiftKey offers excellent convenience in sharing calendar events. Based on your Default Calendar, It fetches the details. It will work well with Google Calendar also. Using Reminder and Calendar Events is a great habit. Additional to this Calendar App, I covered the topic on the Must-have things on your mobile.
8. Advanced clipboard
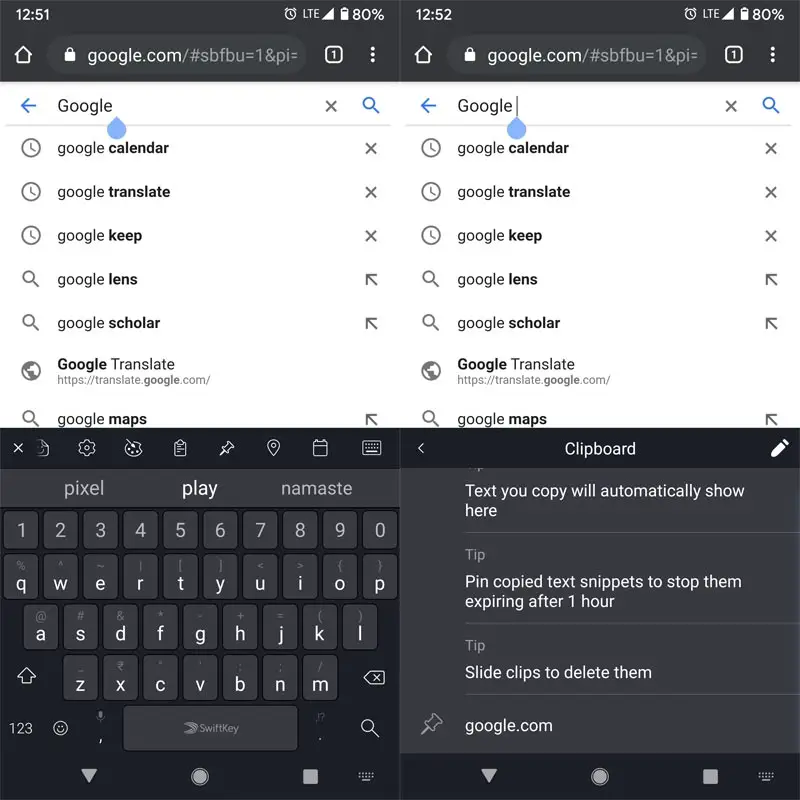
You must have seen and used this feature if you have used Gboard. This feature is quite helpful and needful. The Clipboard will save the word or sentences, so you can easily paste them anywhere when you’re typing with SwiftKey. More interestingly, you can pin some copied contents so that they don’t get deleted, and you can access them at any time. To pin a clipboard item, click on the “Pin” button beside the word or sentence. You can’t delete Pinned clips; unless you unpin them, they’ll remain available on the clipboard forever. This feature is also accessible when you click on the “+” button and then further click on the clipboard icon.
9. Choosing a custom theme
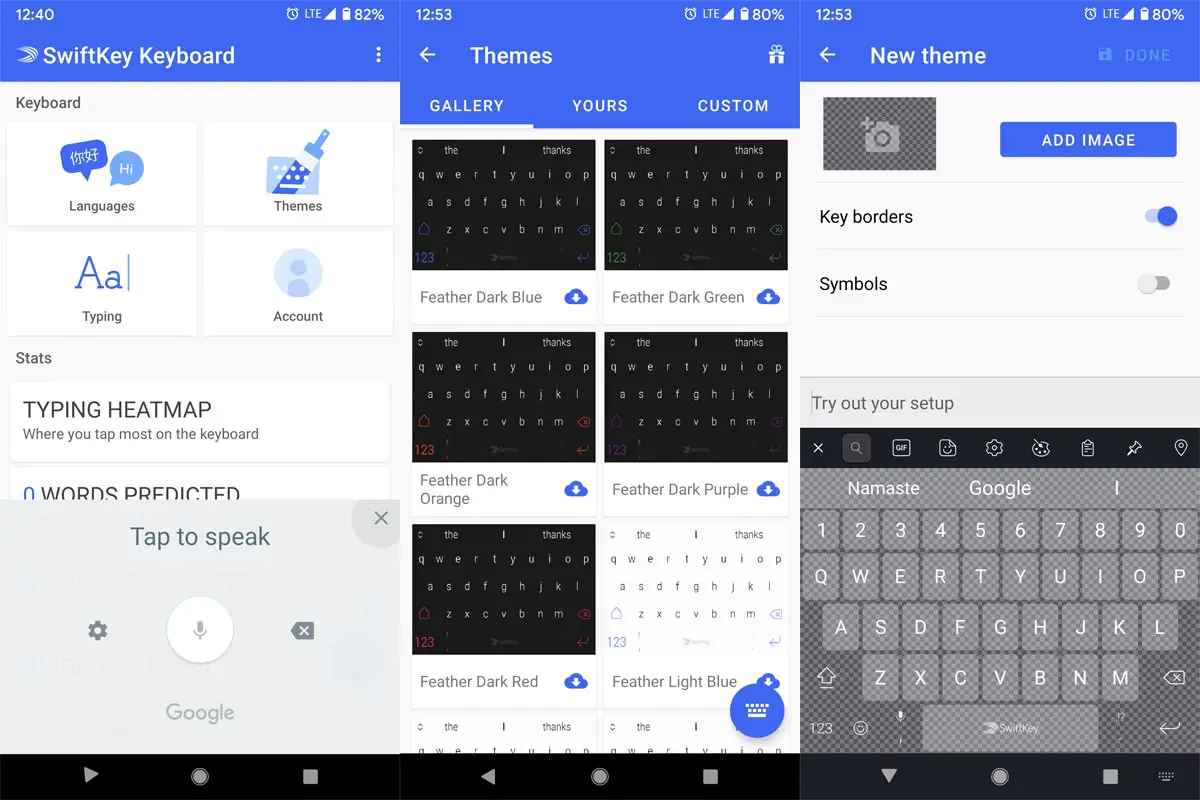
Almost all Android keyboard apps let you do this; you can use your photo as your keyboard’s theme or choose from the vast array of cloud themes offered by SwiftKey. Setting up a custom theme helps to beautify the look and feel of your keyboard.
9.1 Access Themes
You can access themes in two ways.
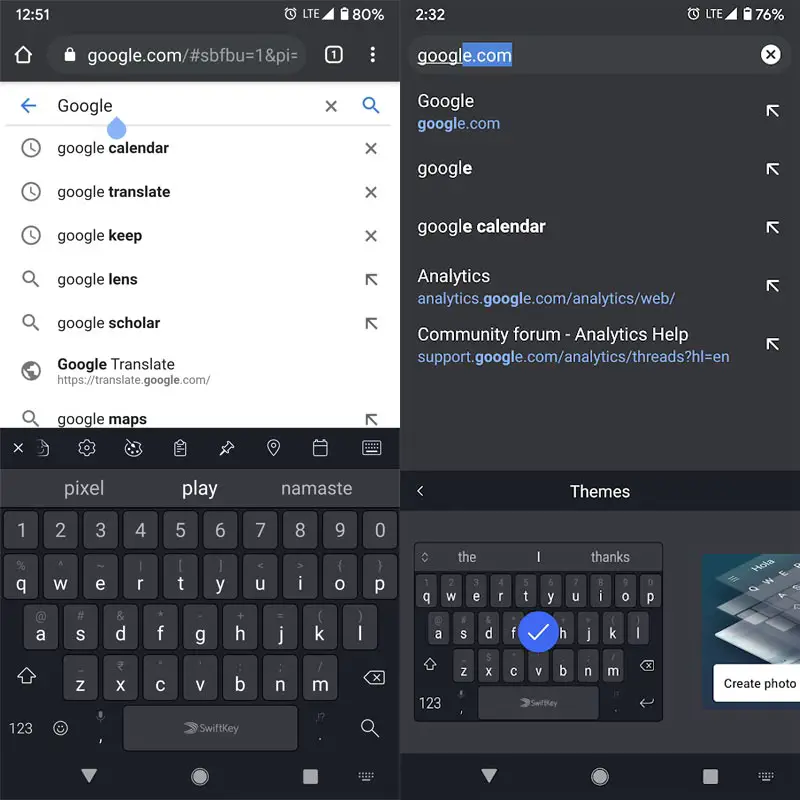
- To access this feature, click on the “+” icon, and further click on the palette icon. There are tons of awesome themes available for SwiftKey users; however, most of the skins need to be downloaded from Swiftkey’s cloud.
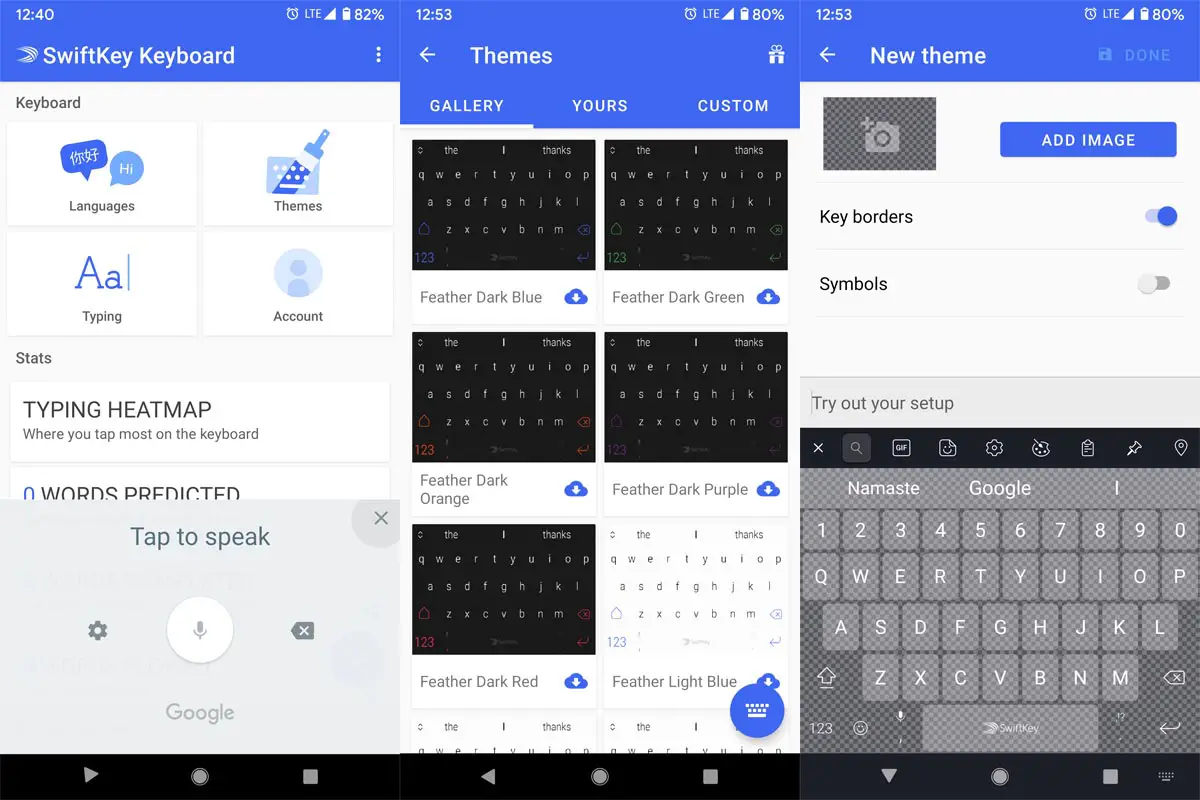
- Another way is Go to the Keyboard App> Themes> Gallery, Yours, and Custom Theme. Yes, you can also create your theme.
10. Access your typing heatmap
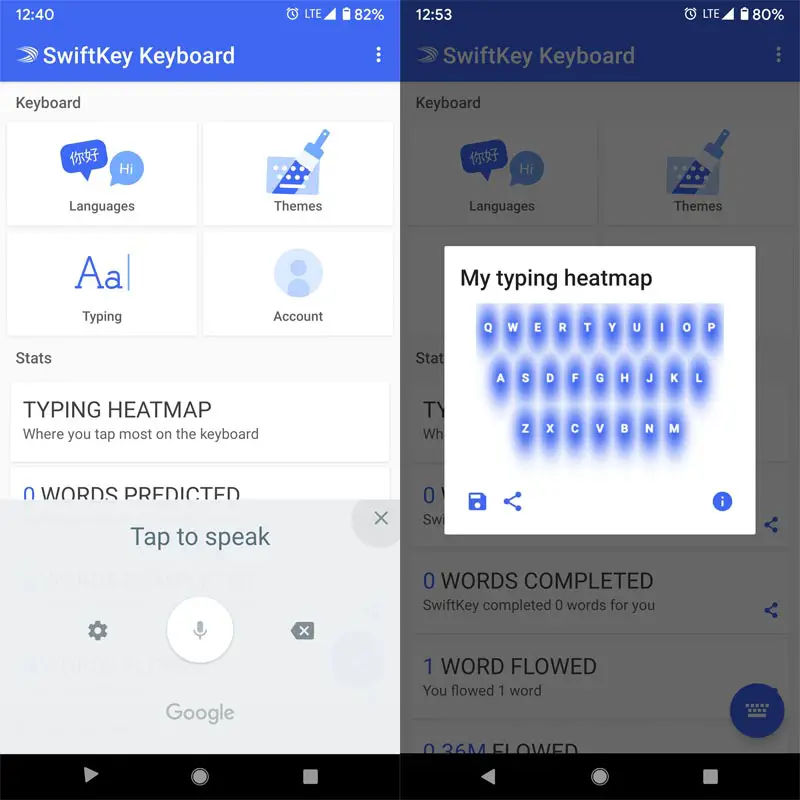
This is one of the coolest features of this app loved by many people. The heatmap feature shows you the area of the keyboard where you tap the most. You may not see any particular reason to access your heatmap, but it’s a cool feature, after all. To access your heatmap and view your typing efficiency, go to your app drawer and click on the SwiftKey app icon. You can view your heatmap in the Keyboard App> Typing Heatmap.
What more?
There are other features and settings offered by SwiftKey, such as a dedicated “emoji” key, arrow keys, and more. All these features are accessible in the settings menu. To activate Number Row, Arrow Keys, Accented Characters, and more, click on typing >>> keys.
Finally, the SwiftKey keyboard app allows you to choose between Bing and Google as a default search engine for its “Search” feature. It is a comprehensive keyboard app for Google and a perfect alternative to Gboard and other similar apps. Since it is a crucial input type app, other than play store, Don’t download this app in third-party sites. I think I covered most of the essential features and how to access them. If you think I missed any feature, comment them below.

Selva Ganesh is the Chief Editor of this Blog. He is a Computer Science Engineer, An experienced Android Developer, Professional Blogger with 8+ years in the field. He completed courses about Google News Initiative. He runs Android Infotech which offers Problem Solving Articles around the globe.


Leave a Reply