People don’t hate Ads. The formats and contents that make them hate Ads. I can say in confidence. In your life, you have at least one favorite Ad. We can’t control the contents. But We can manage the Ads that are showing in our Android Mobiles. Without Ads, the visiting websites and apps can’t survive. Everything is ok until they cross their limits. The most annoying AD format on the Internet is Pop-Up Ads. Whenever you visit the Website or App without your knowledge, they redirect you to third-party sites. It can go from a single tab opening to multiple. It affects the user experience. Here I mentioned various ways to Stop Pop-Up Ads Completely in Android Mobiles. We can’t disable the Pop-Up Ads with single settings. I start with basic settings to Advanced Root require methods. You don’t have to root your mobile to Disable the Ads.

Regular Ads vs. Pop-Up Ads Differences
Yes, there is a difference between Ad-Formats. I don’t want to make deep you confuse. All you need to know is Pop-Up Ads are different. Nobody likes this type of Ad-Formats.
Regular Ads
Regular Ads are Display Ads. You can distinguish this type of Ads from the contents. When you want to access the Ads, you intentionally select them and go to the respective site. So, you know what you are doing, and you know your intention. Google Adsense (Website/Blog) and Admob (Apps) ads are examples in this type. You can also control your interest-based Ads and your data in Google Ads Settings.
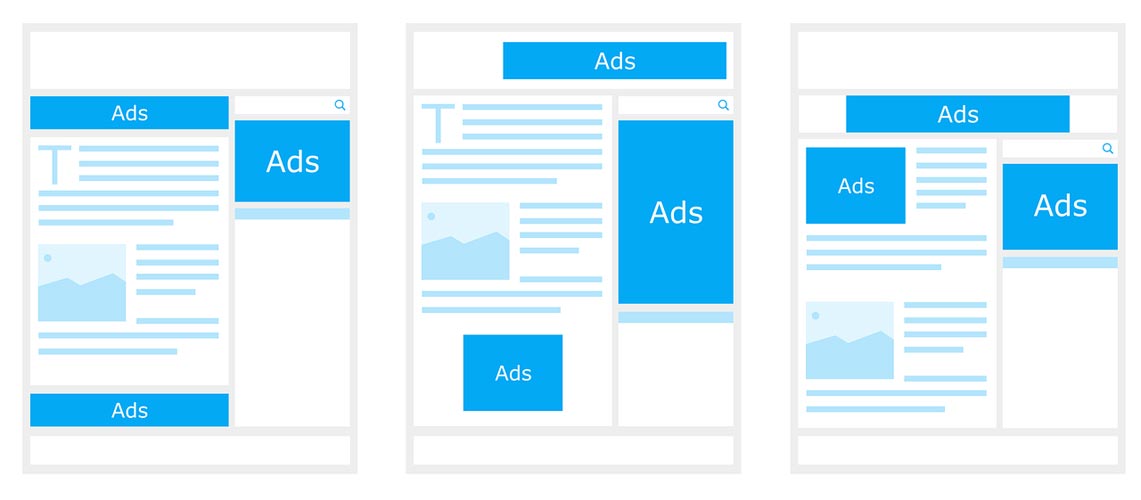
These Ads are well managed. The advertiser allows you to disable the Ads and you have full control of these types. They are legit. You will go to the website or app you want to go by selecting the Ad.
Pop-Up Ads
You can’t differentiate the contents and the Ads. They are hidden. Whenever you select the link or touch the website, they blindly redirect you to the websites that you do not intend to go to. Most of the time, there is no use to going to those unwanted websites, because of the unmatched results with your current interaction with your visited website. In the worst case, when you scroll down the webpage, they can redirect you to some sites frequently. It affects the user experience. Due to the unavailable content on other websites, sometimes we have to deal with the websites.
Why are Pop-Up Ads annoying?
As I said earlier, without your intention, it will open the Ads in a few tabs and throw you out from the website you visited. Sometimes you can’t use the back button to get back into the visited website. When the website does the unwanted things, we hate the Ads. Also, It will redirect you to the Play Store and ask you to download unwanted apps.
Stop Pop-Up Ads Completely in Android Mobile Browsers
Most of the time, these Pop-Up Ads rise in our browsers. So, We start from the browsers. Based on your default browser, choose the steps. We already covered the best browsers for Android mobiles and tablets. You can also choose the one from that list.
Stop Pop-Up Ads in Google Chrome
Unlike the Desktop version, we can’t add-ons from chrome store in the mobile version of Chrome. So, Compare with other browsers, Google Chrome affects most with this type of Ads. But, With the latest features and security measures, you can disable Pop-Up Ads within the settings available in Chrome. To do this, follow the below steps.
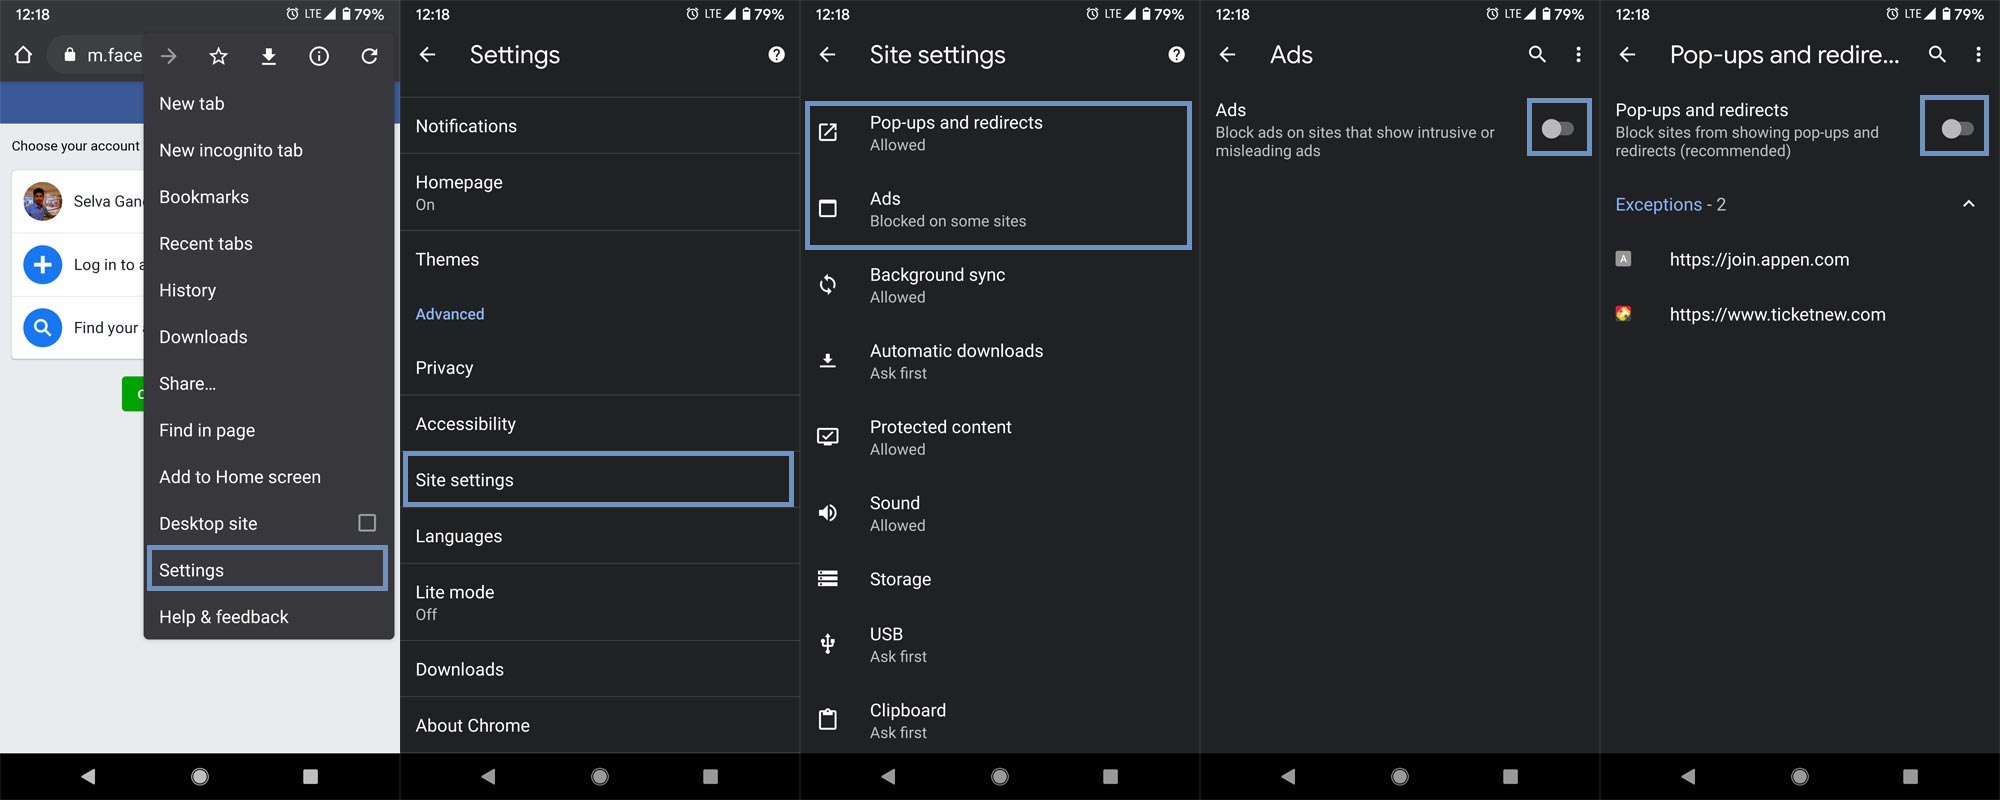
- Update to the latest version of Google Chrome.
- Open the Chrome browser and select the three-dot icon.
- You will get the menu. From that menu, select “Settings.”
- Scroll down to the bottom and select “Site settings.”
- Again scroll down and select “Ads.” Disable “Ads.” Hereafter you will not redirect you to the misleading ads.
- Back to the site settings again and select “Pop-ups and redirects.” Disable the option.
- That’s all now; most of the Pop-ups can be blocked. But, In some situations, you have to allow the Pop-up screen. Some bank Apps doesn’t want to enable the regular windows. In those situations, you can add a particular website as an exception in the settings.
Disable Pop-Up Ads in Samsung Browser
Samsung browsers allow you to install Ad-Block Add-ons. If you don’t want to disable all ads, you can use the block option in settings.
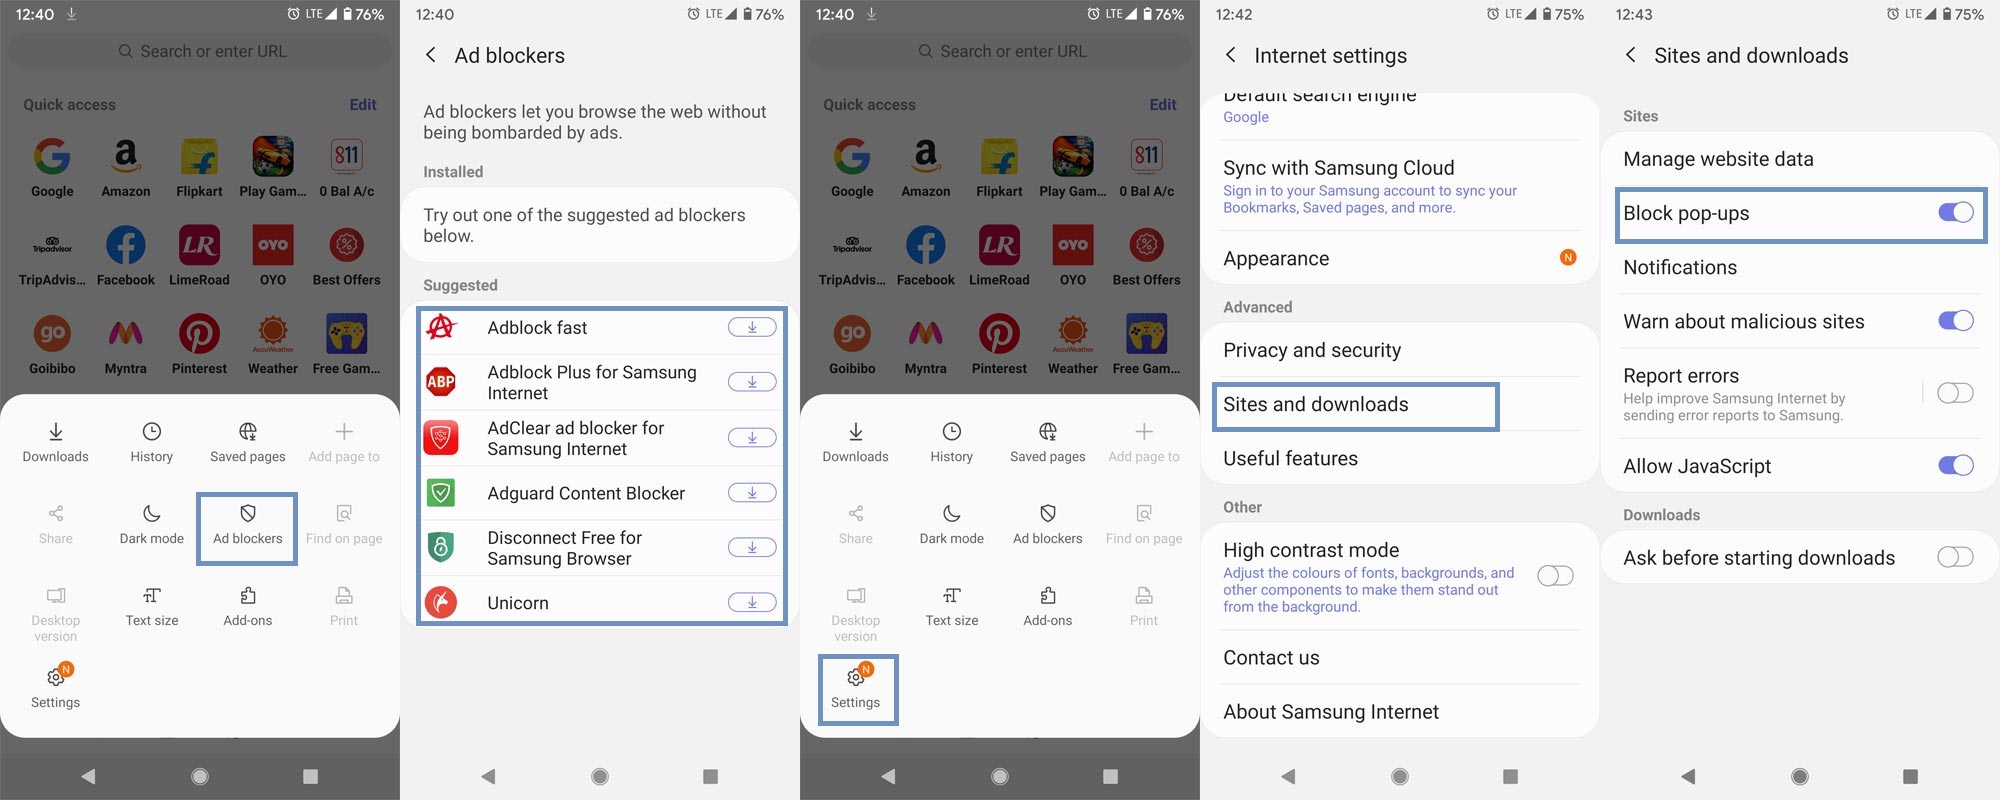
- Update to the latest version of the Samsung Browser.
- Open the browser and select the hamburger menu.
- Select “Ad-blockers.” You can install the add-on from suggested. Don’t install all the add-ons. Install one as your choice.
- After the installation of the add-on, Back to the menu, select “Settings.”
- Choose “Sites and downloads.” Select “Block pop-ups” and enable the option.
- Compare with the Chrome browser; you can make an exception in Pop-ups. That may be uncomfortable when you want to open some form filling sites.
Block Pop-Up Ads in UC Browser
UC browser itself with full of Ads. We are going to disable both notifications and Pop-ups in the UC browser.
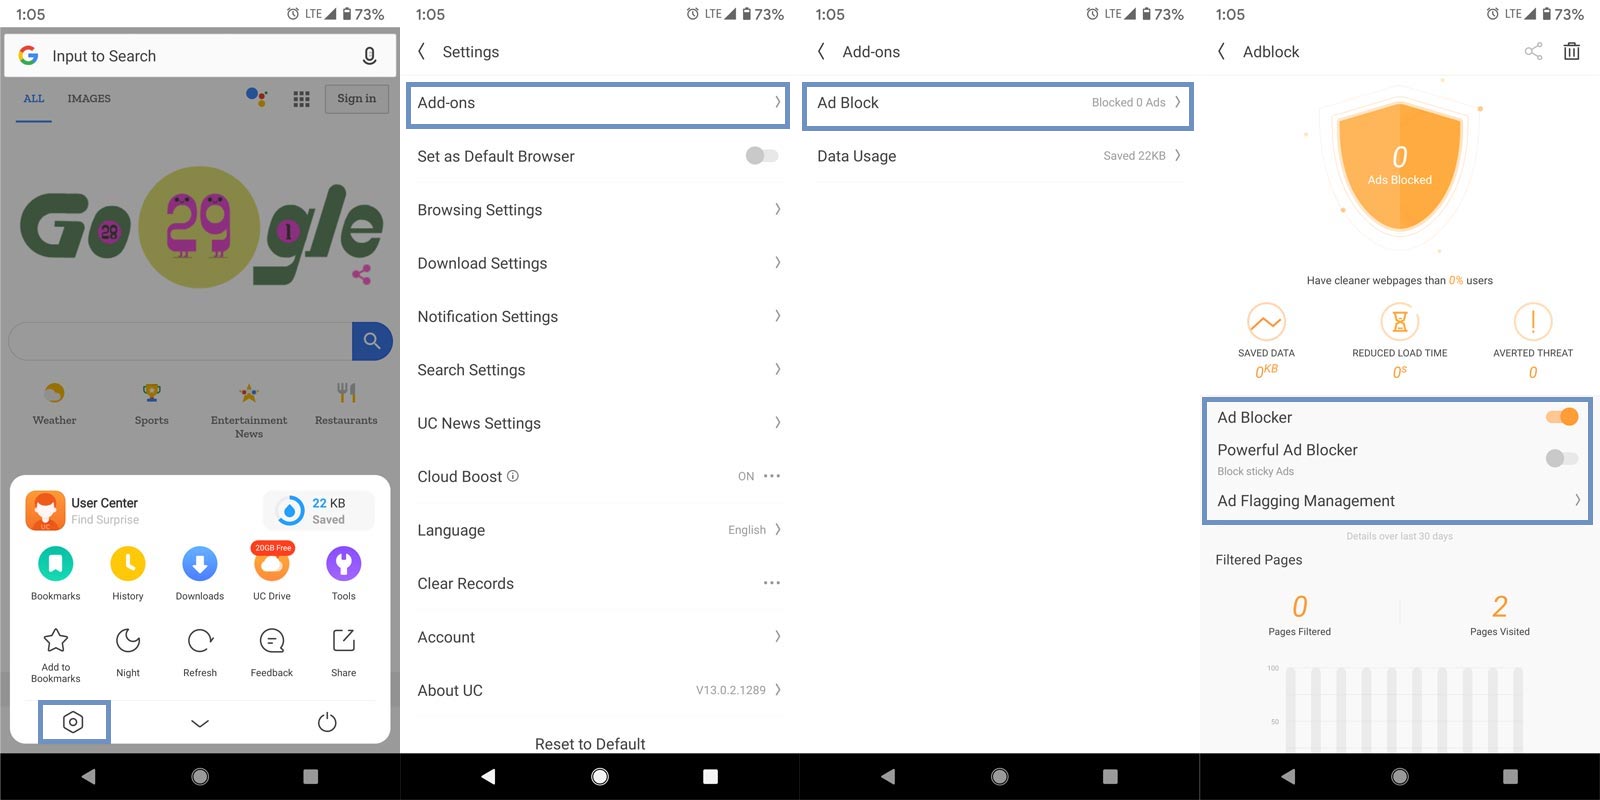
- Update to the latest version of the UC Browser.
- Open the browser and select the hamburger menu.
- Select “Add-ons,” then choose “AD Block.” Enable Ad Blocker. If you want to add exceptions to the sites, you can manage them in “Ad Flagging Management.”
- After enabling the add-on, Now we want to disable the notifications from UC Browser. Yes, they are annoying too.
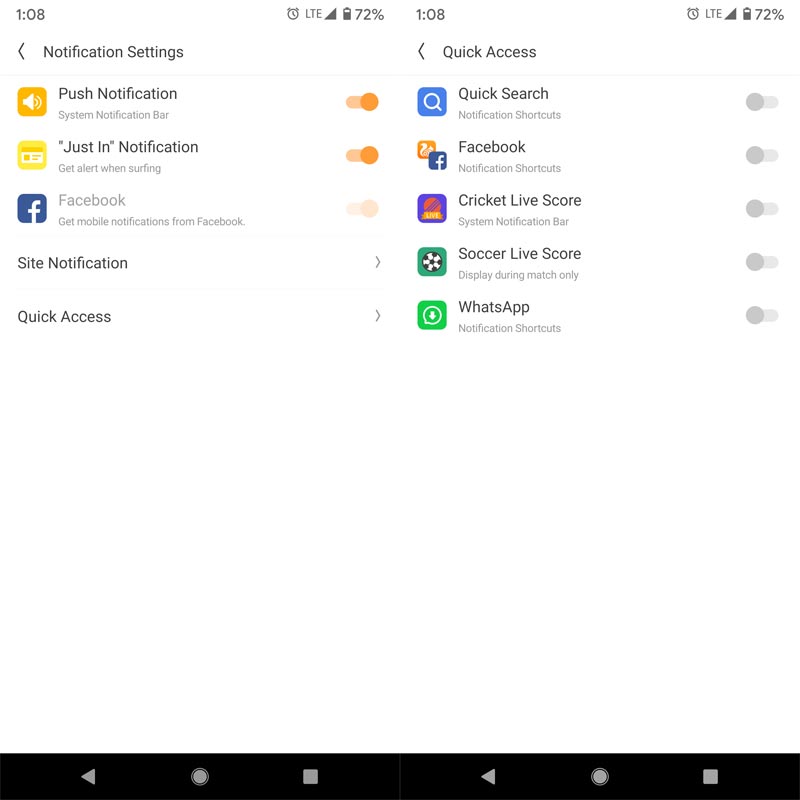
- Return to Settings. Choose “Notification Settings.” Disable all notifications, including Quick access.
- Compare with all browsers Ad blocking in the UC browser is aggressive because they show their Ads in every way as possible.
Remove Pop-Up Ads in Mozilla Firefox
Mozilla Firefox allows us to install the official Add-ons from the Mozilla add-ons. So, you can install the AdBlocker officially like the Desktop version.
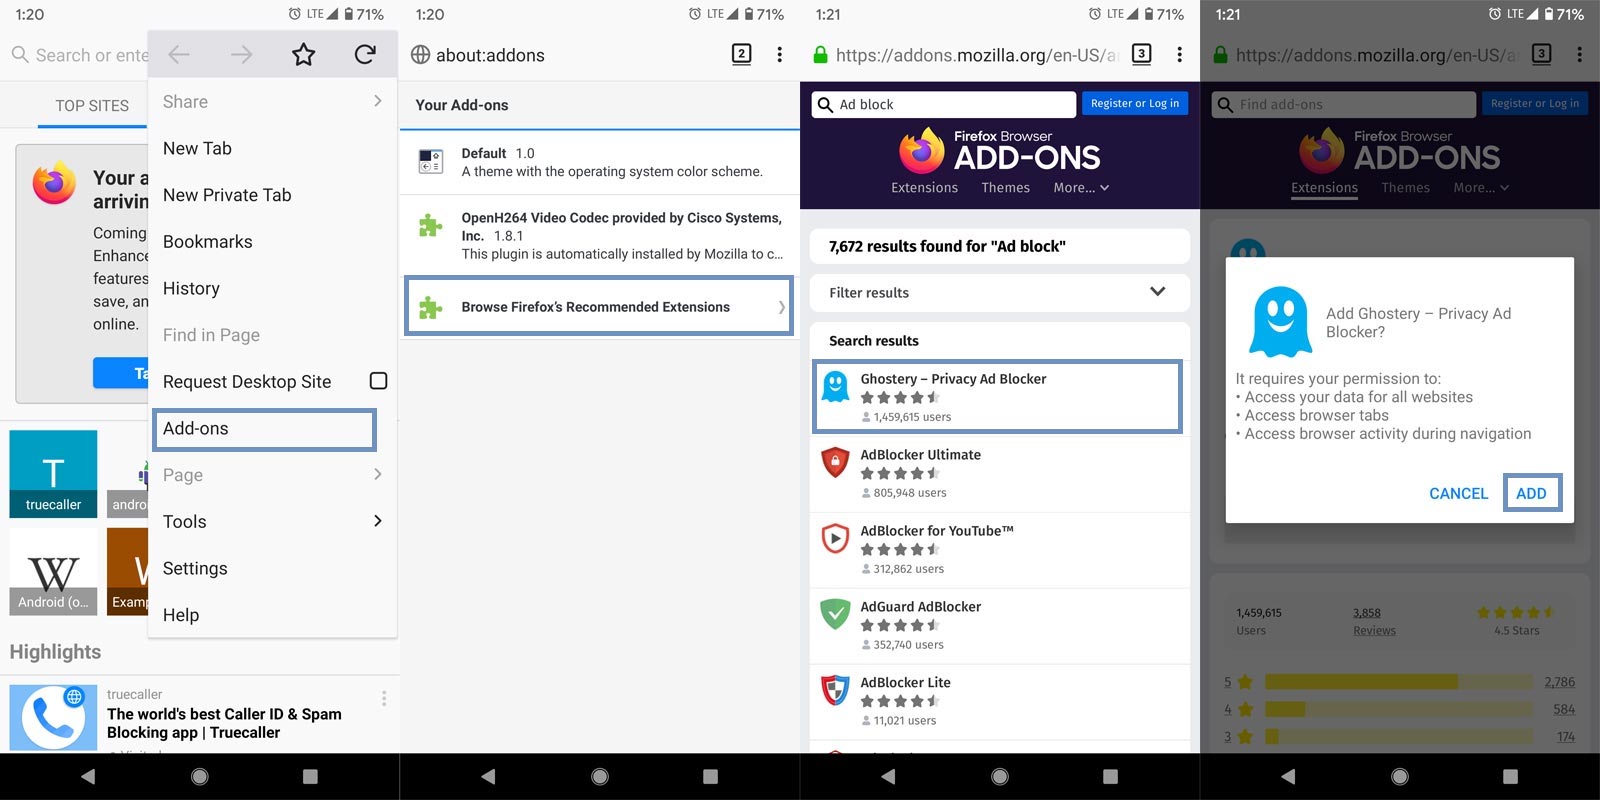
- Update to the latest version of the Mozilla Firefox.
- Open the browser and select the three-dot icon.
- Select “Add-ons” then choose “Browse Firefox’s Recommended Extensions.” Search for the Ad Blocker and install it in your browser. Enable Ad Blocker. If you want to add exceptions to the sites, you can manage them in “Ad Flagging Management” based on the Add-on options.
Installing Privacy Browsers
Instead of configuring manually in every browser, you can use default privacy browsers like Brave and some other apps that comes with pre-configured settings.
Restrict Display over other apps permission
When you receive the full page Ads outside of the browsers or in default system apps. It is time to check the Display over other apps. When you enabled this option, it means you allow other apps to run over the screen of your current apps. Eye protector filter apps are an example of this. To disable the app permission, follow the below steps.
Stock Android Mobiles (Asus, Moto, Nexus) (Versions- Marshmallow, Nougat, and Oreo)
You can easily find your mobile is Stock Android or not with UI and App icons. If you are using third-party launchers, disable them also.
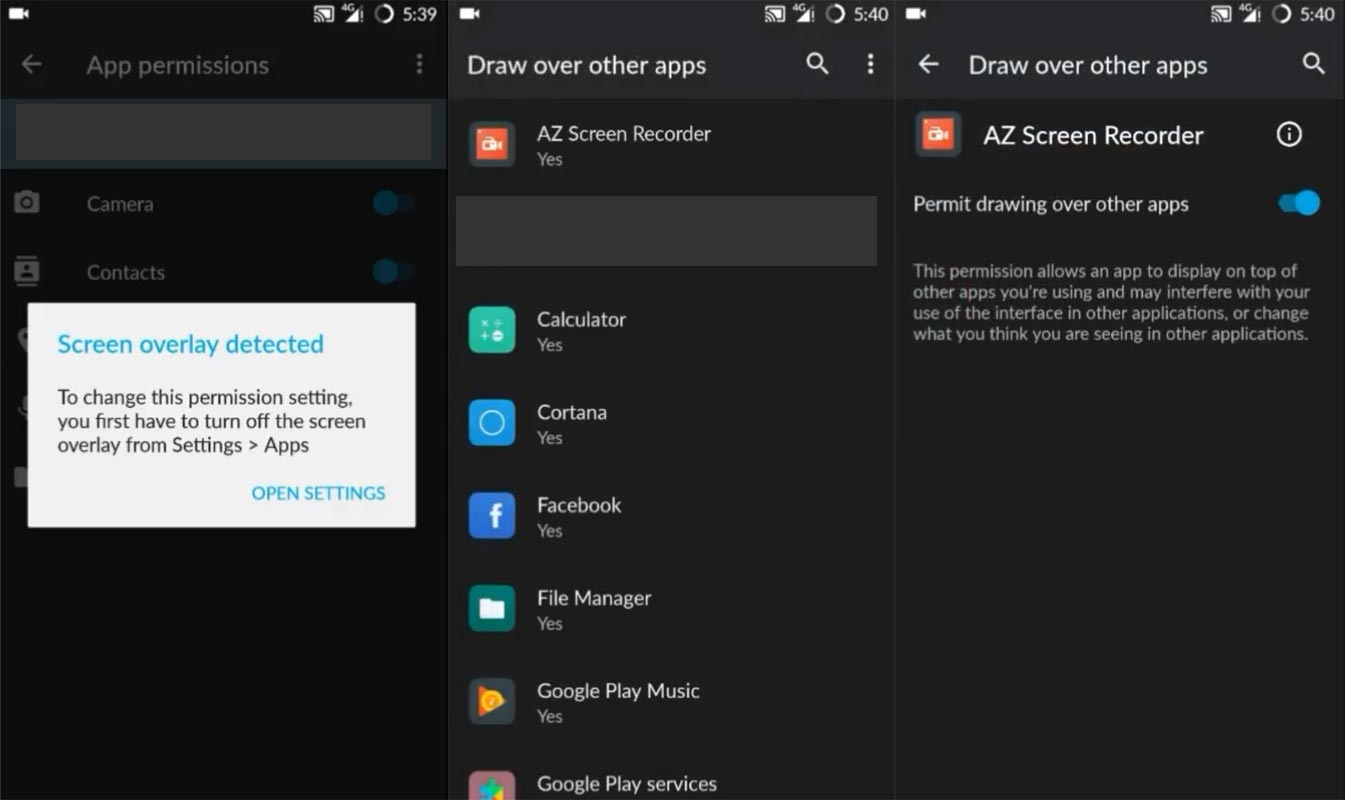
- Open Settings. Search for the term “Over other.”
- You will get a “Draw over other apps” option if you are in Marshmallow and Nougat version. “Display over other apps,” if you are in the Oreo version.
- Select the option and disable the permission to your installed new app or browsers.
Samsung Galaxy mobiles
Most of the Samsung Old mobiles faced this issue. Nowadays, they are updated a lot of features, and most of the time, your device can resolve this kind of problem. But when you are using Oreo and below Android versions, you may still face this issue. Fortunately, we can fix the error like stock Android mobiles. But, the steps may vary.
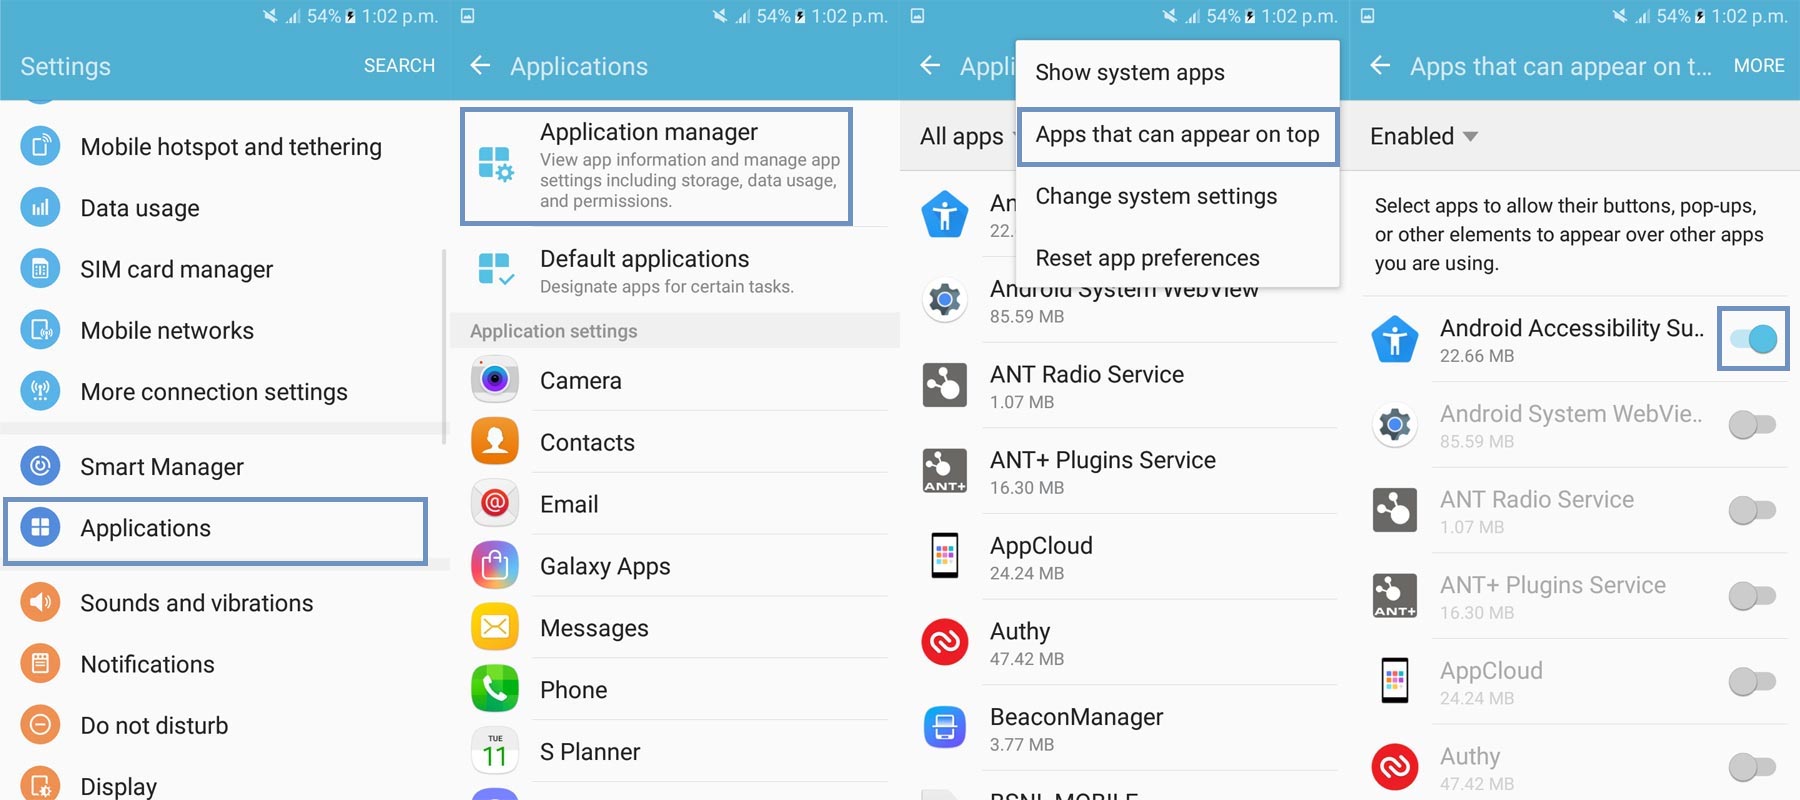
- Open Settings. Select Applications> Application manager.
- After opening the Application manager, select “more.” You will receive further options from the menu.
- Select the option “Apps that can appear on the top.” You will receive a lot of installed applications with the enable button choice. Disable the permission to your installed new app or browsers. Now you can use your mobile without any issues.
LG Mobiles
LG mobile’s settings lightly vary, compare with other above settings. Most of the carrier-locked Old LG mobiles like LG G5, G4, G3 are many mobiles in this category.
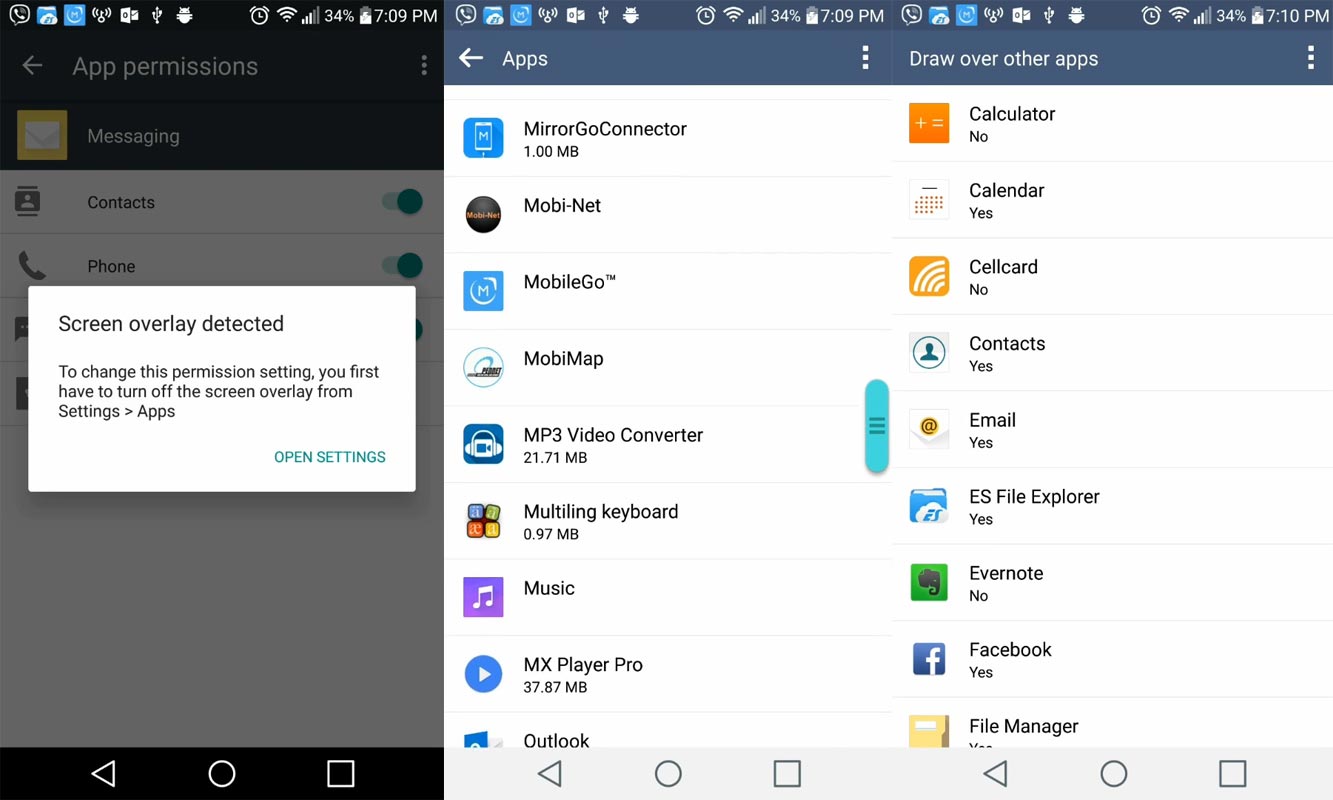
- Open Settings. Select Applications> Select the three-dot icon on the top right side then select “Configure apps.”
- You can see the option “Draw over other apps.”
- You will receive a lot of installed applications with the enable button choice. Select the “No” option for your installed new app. Now you can use your new app without any issues.
Enable Google Play Protect
Don’t download third-party apps from outside Play Store. Even if the apps look legit, the chances of the other developers add some scripts to your app. Beyond this, When you receive suspicious Ads in every app, you installed to enable the Google Play Protect. It is like an Antivirus program that can check your installed apps for protection. To enable Play Protect to follow the below steps.
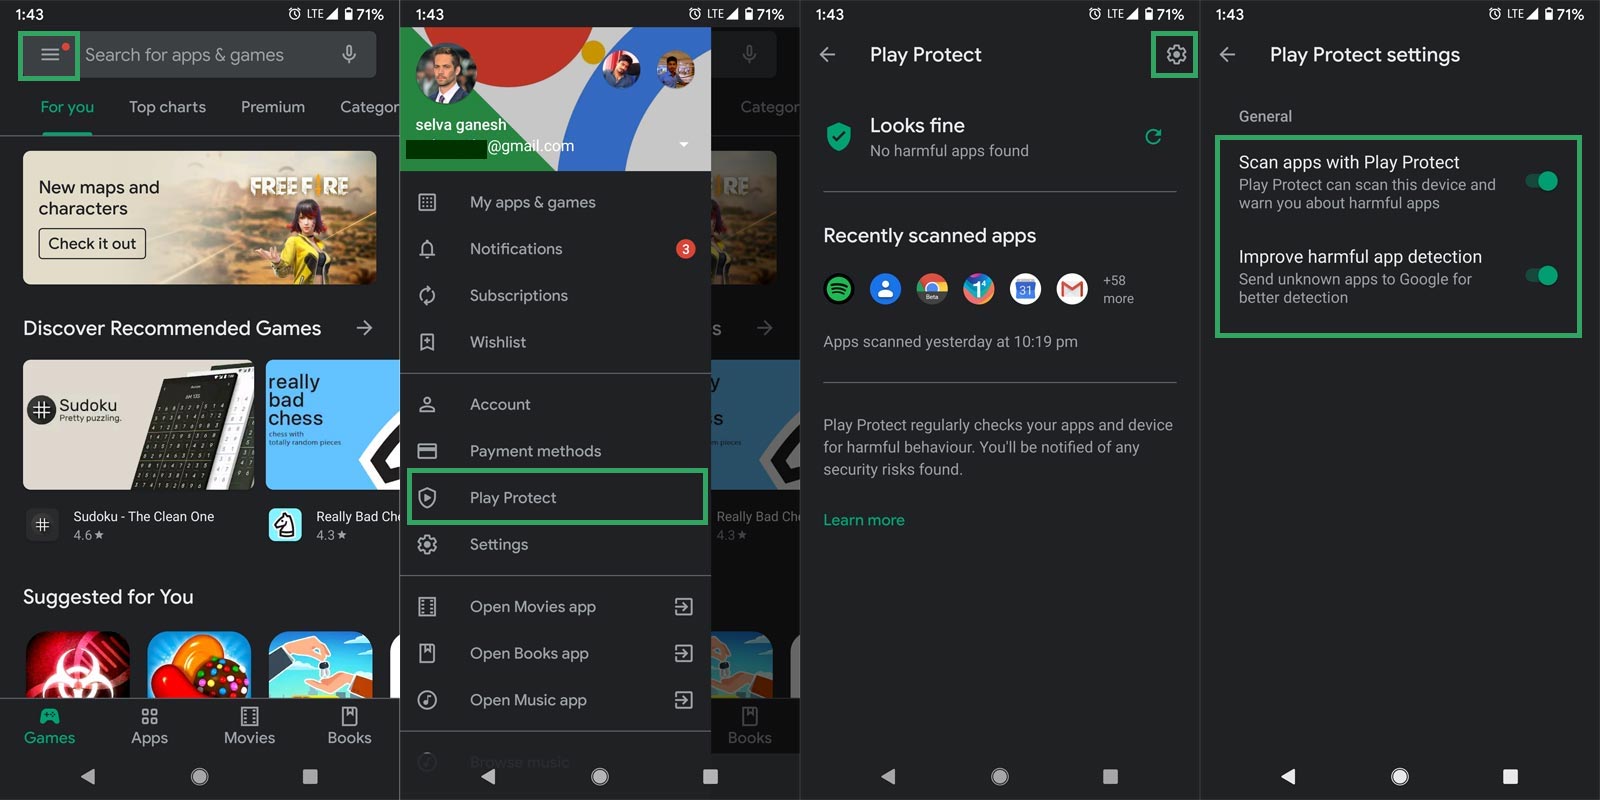
- Open Play Store.
- Select the hamburger menu and choose Google Play Protect.
- Based on the last scan on your mobile, It will show some notification.
- Select the Gear icon and enable “Scan apps with Play Protect” and “Improve harmful app detection.”
Remove third-party apps
When Google Play Protect can’t scan the problem, causing a third-party app, You have to check the app in settings manually. Go to Settings> Apps. Check the suspicious app that you installed using browsers or sideload methods. Uninstall those apps.
Did you need an Antivirus App?
No. As I said earlier, Google Play Protect can protect you from a lot of trouble making apps. But, After enabling Play Protect and Un-installed the third-party apps, still, you receive the Pop-Up Ads everywhere, It is time to install the Antivirus and do the one time check. After the scan and detection, you can uninstall the app. There are plenty of apps that can do the job. Here I chose Malware Bytes security. You can select any app that can do the job properly.
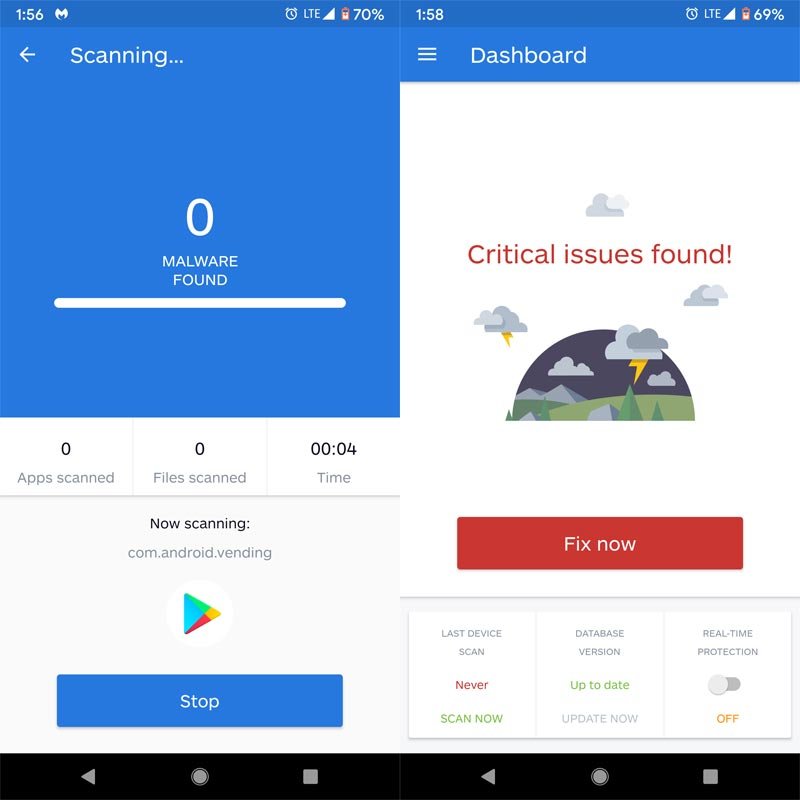
- Open the installed app and run the full scan in the installed apps.
- Based on the results, uninstall the app and take further actions.
Reset Your Mobile
It should be your final choice. When you can’t deal with the Pop-Up Ads and can’t find the source by trying all available methods, You can do this Reset process.
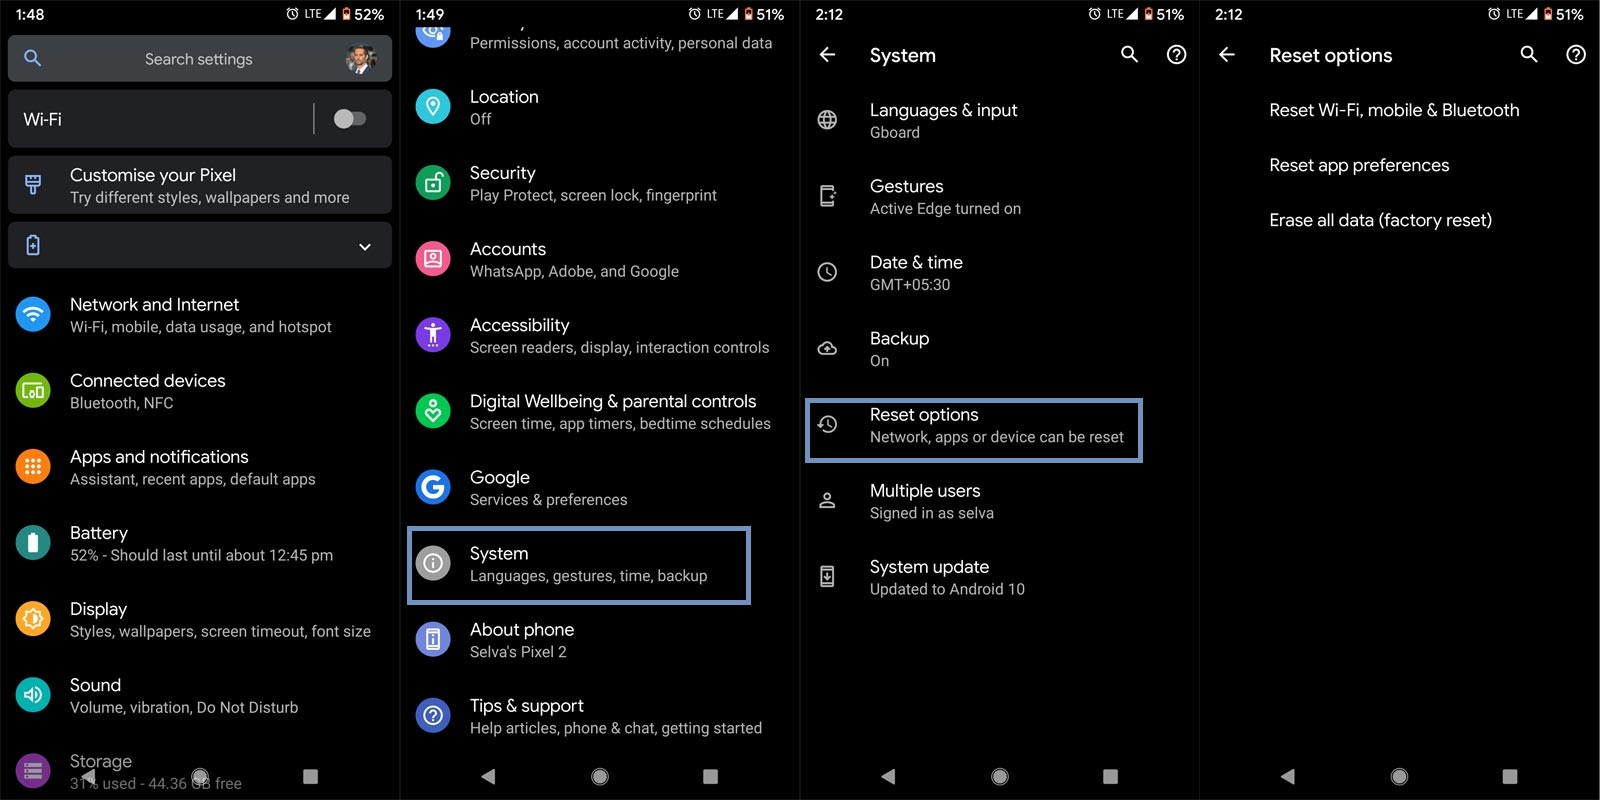
Take complete Backup on your mobile. You can do a soft reset or hard reset. To Reset your mobile, Go to settings> System>Reset Options> Reset app preferences/ Factory Reset.
- Soft Reset/App Preference Reset– This option will remove all the custom settings we made and return to the default settings. It will not delete user data.
- Hard Reset/Factory Reset– It will remove all user data. Your mobile OS will become new, like when you purchased. You have to set up everything from the beginning.
Initially start with the Soft Reset. When you can’t get rid of the Pop-Ups, You can do the Hard reset.
Stock Recovery method
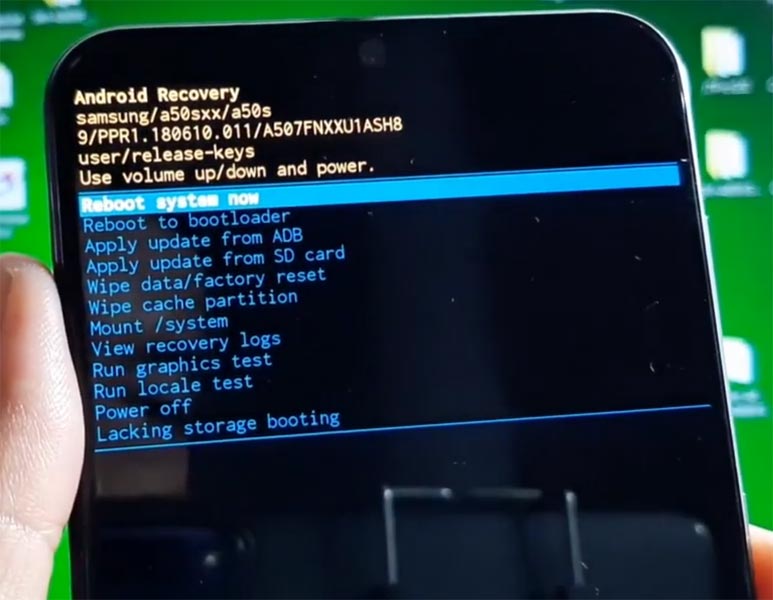
- Switch off your device. Then, enter into the Stock Recovery mode. To do this- Press and hold down the Volume Up + Power buttons at the same time for some time. It will boot your mobile into Recovery mode.
- If you didn’t use Rooted mobiles, most of the time, you have Stock Recovery, which is provided by your official mobile manufacturer. If you have a stock recovery, you have the direct option as “Wipe Data/Factory Reset.” Navigate to this option and confirm it using the power key button. Remember, It will delete your entire mobile data. So, Backup first before the process.
TWRP Recovery method
When you use Rooted mobiles, you either use Stock Recovery or TWRP custom recovery. If you have Stock Recovery, you can use the above process. When you installed TWRP on your mobile, follow the steps below.
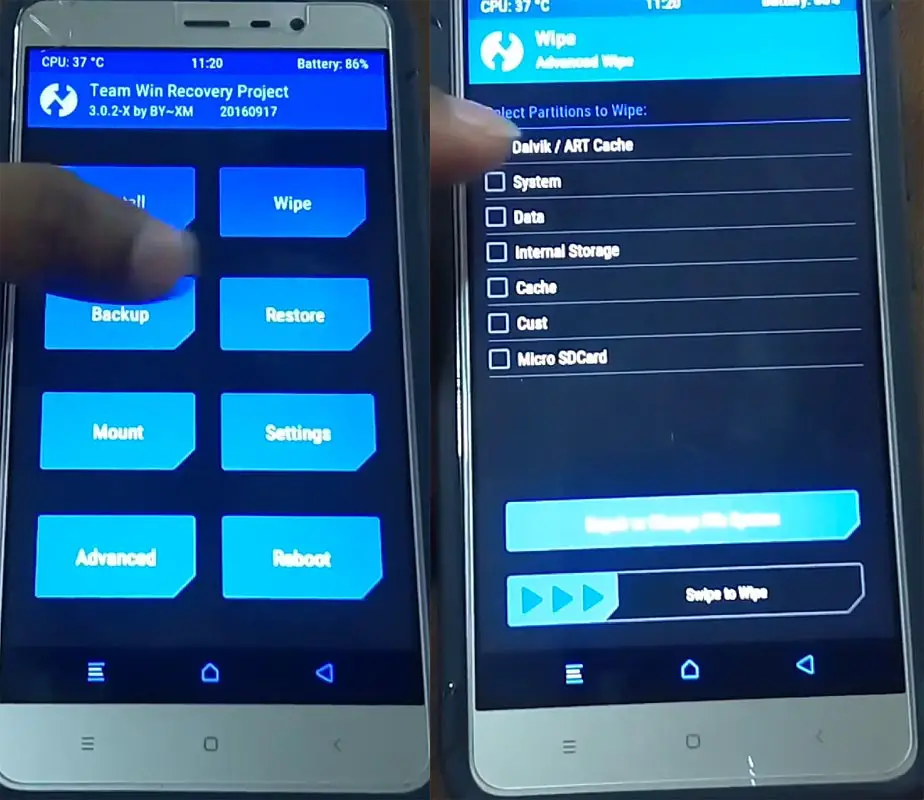
- The Keycombinations will boot your mobile into TWRP Recovery mode.
- On the Home screen, you can find the option as “Wipe.” Select the wipe option; you will receive further details. Select “Dalvik, Data, and Internal Storage.” Don’t select the System. It will wipe your OS. After selecting other choices, swipe to erase the data. When the process completes, return to home and boot into OS.
Wrap Up
As a user, you should know, without providing Ads, the developers and site owners can’t run the services. Google and other large companies have their standard to give the ads a lot of terms and conditions. But, some sites break the rules and do the harm things to users like Pop-Up Ads. I hope I listed most of the working methods to disable the Pop-Up Ads in your Android mobile. Don’t rest your mobile until you try all the possible ways. Good ads are those are the ones who allow you to disable. Xiaomi and Realme devices show the System Ads in their in-built apps. But, you can disable Xiaomi Ads and Realme Ads.
If you receive multiple tabs open with the Ads, your mobile may freeze or not responding to your input. In those situations, you may need to follow other steps to recover your mobile. When you tested working methods that are not in this list, comment below.

Selva Ganesh is a Computer Science Engineer, Android Developer, and Tech Enthusiast. As the Chief Editor of this blog, he brings over 10 years of experience in Android development and professional blogging. He has completed multiple courses under the Google News Initiative, enhancing his expertise in digital journalism and content accuracy. Selva also manages Android Infotech, a globally recognized platform known for its practical, solution-focused articles that help users resolve Android-related issues.


Leave a Reply