When you have an Android mobile, Adding Google account, make your device go to another level. When you add the Google Account, you don’t have to worry about the contacts lost, Gmail Sync, and other features. It is not necessary to configure your mobile or tablet with an account, But, It will enhance the features. But, there are some situations where you want to remove your Google account from your Android device like you want to resell your mobile or you don’t want to track data and want to stay private. But, the problem here is, Android mobiles don’t allow us to Remove the Primary Default Google Account. You will not get the remove option in this account. You don’t have to worry; by using different methods, we can remove your account.
Google’s One Account for all services
You can see these words in most of Google’s services. It is true. With one Google account, you can use Gmail, YouTube, Maps, Google Photos, Play Movies, Calendar, Google Keep..etc. So, When you remove your account, the sync between this service and your mobile activities will be removed. So, you can’t access these services. Also, the Backup and restore option to restore your app data, contacts will no longer be available for you. If you are confident enough about what you are going to do, you can follow the below steps to remove your account.
Remove Primary Default Google Account on Android Mobiles
When you want to remove your account, you will be in different situations. I will list different methods. Based on your needs, you can choose one.
Note
- This method will work on Samsung, LG, Xiaomi, Moto, Sony mobiles with different Custom skin UI and Android versions. Based on your mobile manufacturers and version, the UI may vary. But, the options and steps will remain the same.
- All of these methods use only to remove your Google Account from your Android device, not from the Google server. When you want to close or delete the account, you can do that within your Google account web version.
1. Use Guest Mode or Add user
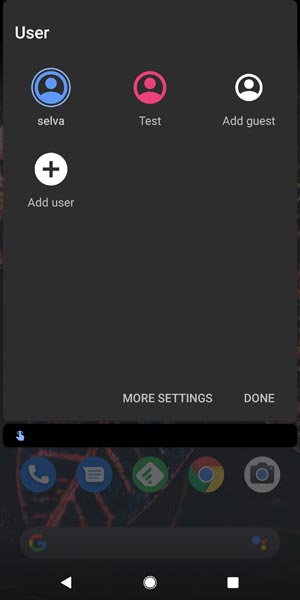
This method will help you when you don’t want to sync and track your data to Google Accounts. You can easily manage and remove your Google services activities in Google My Activity. When you don’t want to track you complete and want to use different services, you can use Guest mode. If you want to configure with various apps, you can use the “Add user” options in accounts. It is like using two phone profiles in a single mobile. When you don’t want people to browse in your files, when you give them to making calls, you can also use this method to secure your data for a specific time.
1.1 Steps to add new users in Android Mobiles
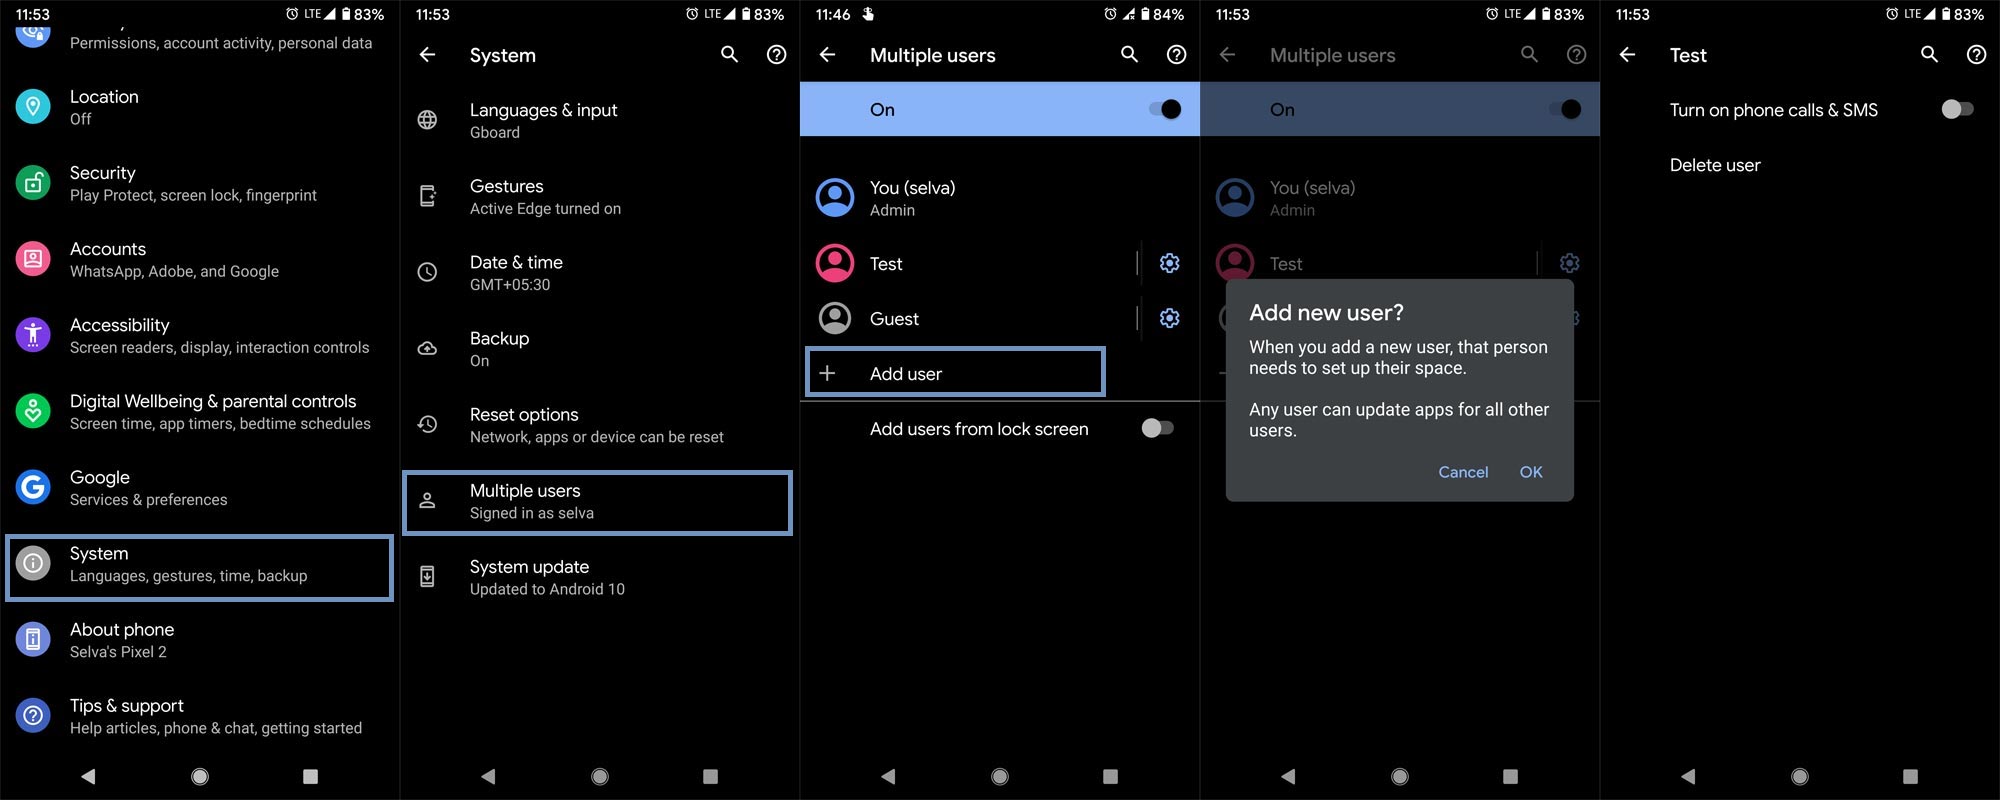
- Go to Settings and Choose System.
- You will get the details about your System data. Select Advanced>Multiple users.
- Choose “Add user” and configure your new user account. This account will act as a secondary account, Where you can use your mobile without Google Account unless you add-in settings. In most of the mobiles, there will be a Guest mode with pre-configured settings.
- When you want to enable the calls and messages facility in the secondary account, you have to set up this option in the Admin account.
- You can switch between the users in the notification bar.
2. Disable sync between your mobile and Google Accounts
When you don’t want to sync the data between your mobile and Google Account, But, you want to use the Play Store services, you can use this process. Your mobile data remain on your mobile-only. It will not sync with the cloud.
2.1 Steps to disable sync between Accounts in Android Mobiles
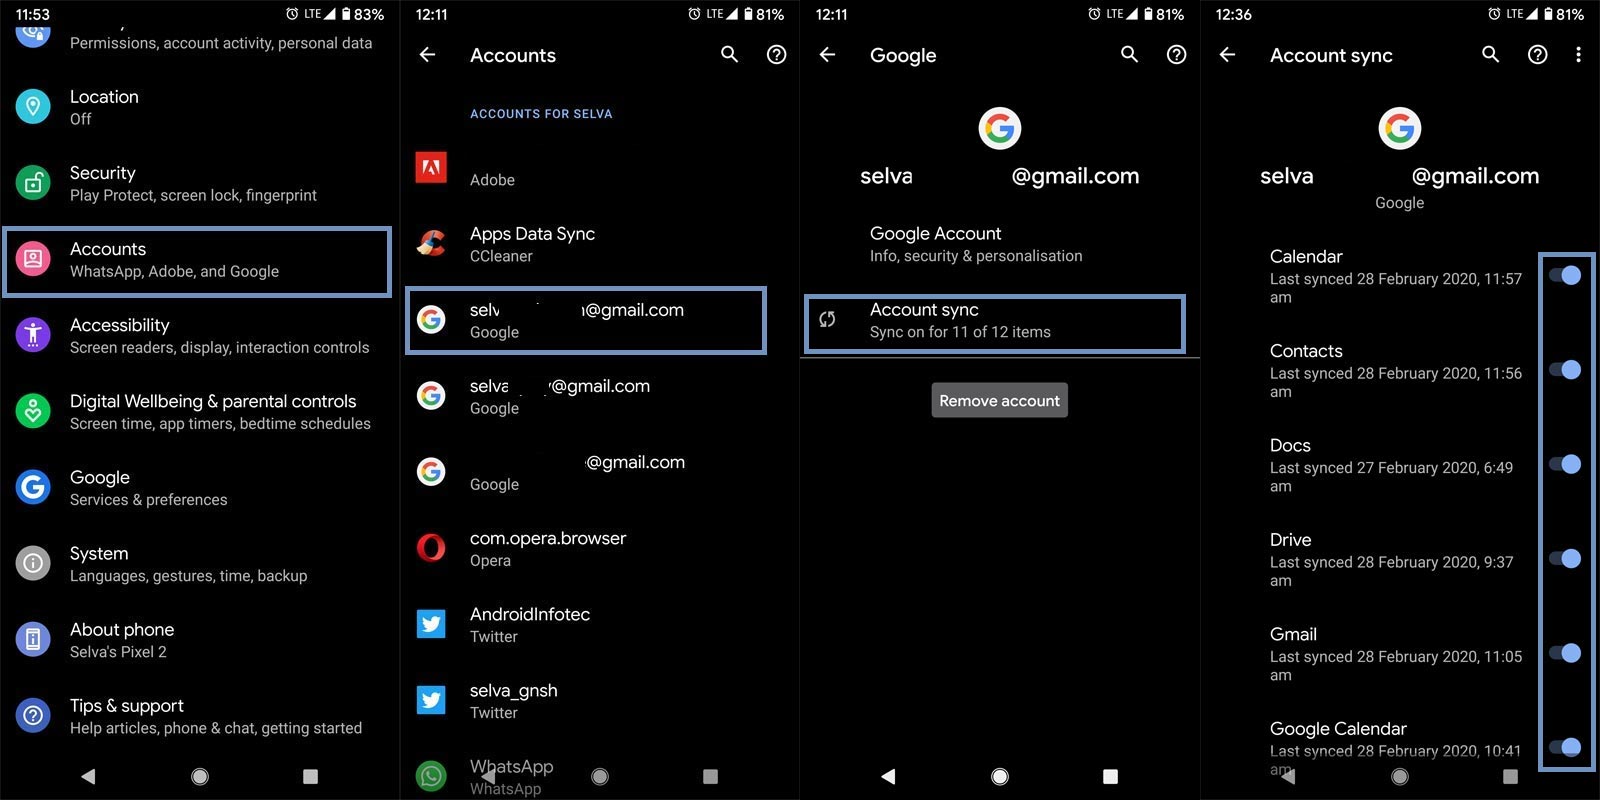
- Go to Settings and Choose Accounts.
- You will get the multiple signed-in accounts. Choose the Google account in which you want to stop the sync from your mobile.
- After the selection, chose “Account sync.”
- Disable the sync one by one.
3. Remove Primary Google Account from your Android in Settings
Use this method. When you want to sell your mobile or when you are going to give your mobile to others permanently. Some Stock Android mobiles allow us to directly remove the primary Google Account even if you have only one account signed in.
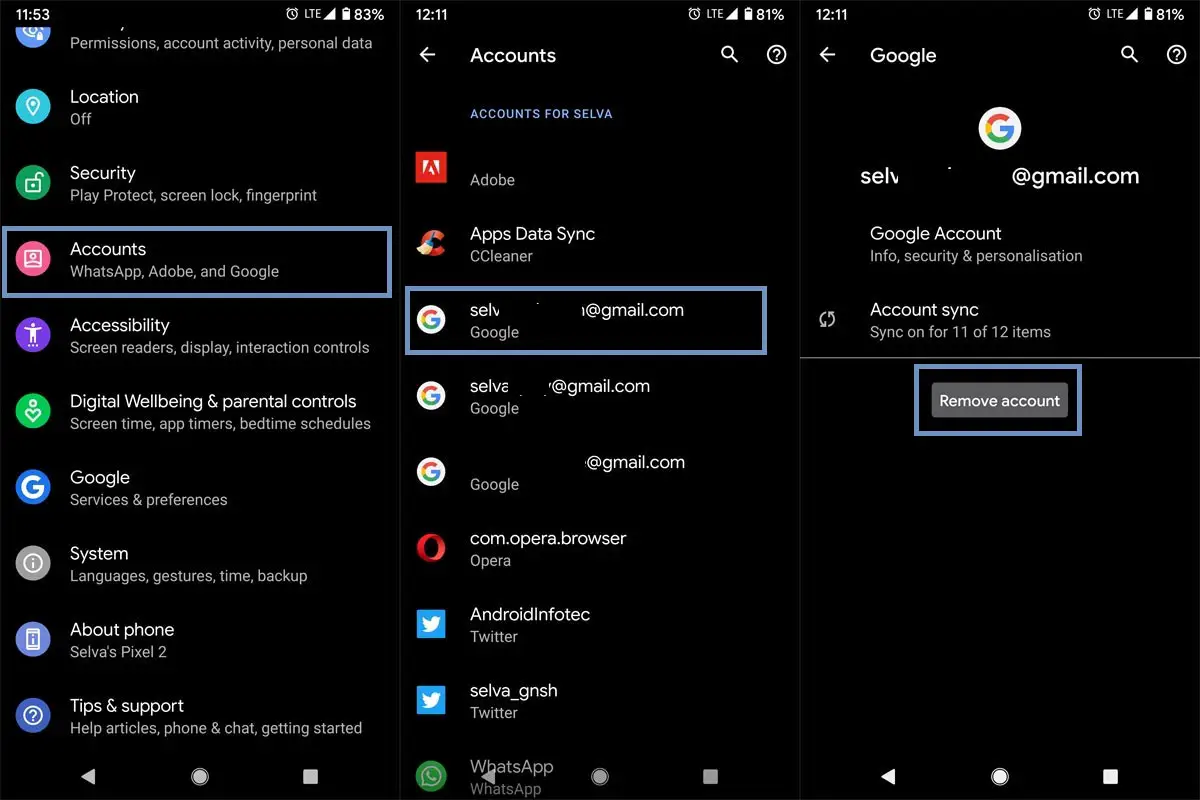
- Go to Settings and Choose Accounts.
- You will get the multiple signed-in accounts. Choose the Google account which you want to remove from your mobile.
- You can find the Remove option after you select the account. Select “Remove account.”
4. Add secondary Google Account to remove the default one
Some mobile manufacturers don’t allow us to remove the default Google account from our mobile. It can happen when you have only one account signed on your mobile. In those situations, you can add a secondary less priority account and make this as a default and remove another account.
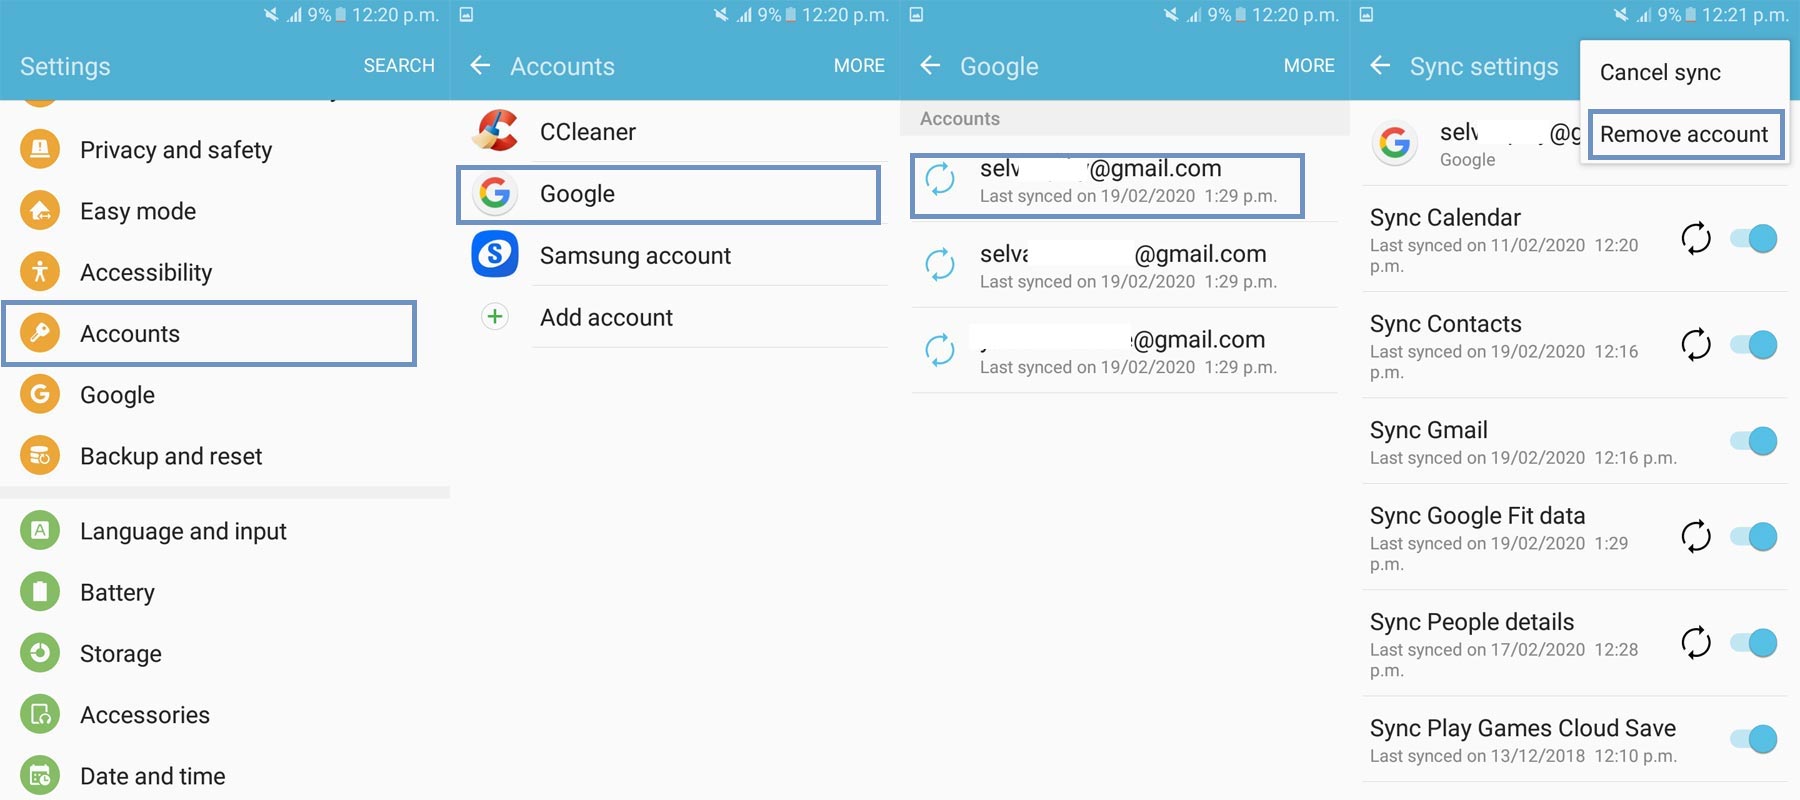
- Go to Settings and Choose Accounts.
- You will get the multiple signed-in accounts.
- First, add a new Google account with the correct credentials after you signed in Choose the Google account which you want to remove from your mobile.
- You can find the Remove option after you select the account. Select “Remove account.”
5. Reset Your Mobile
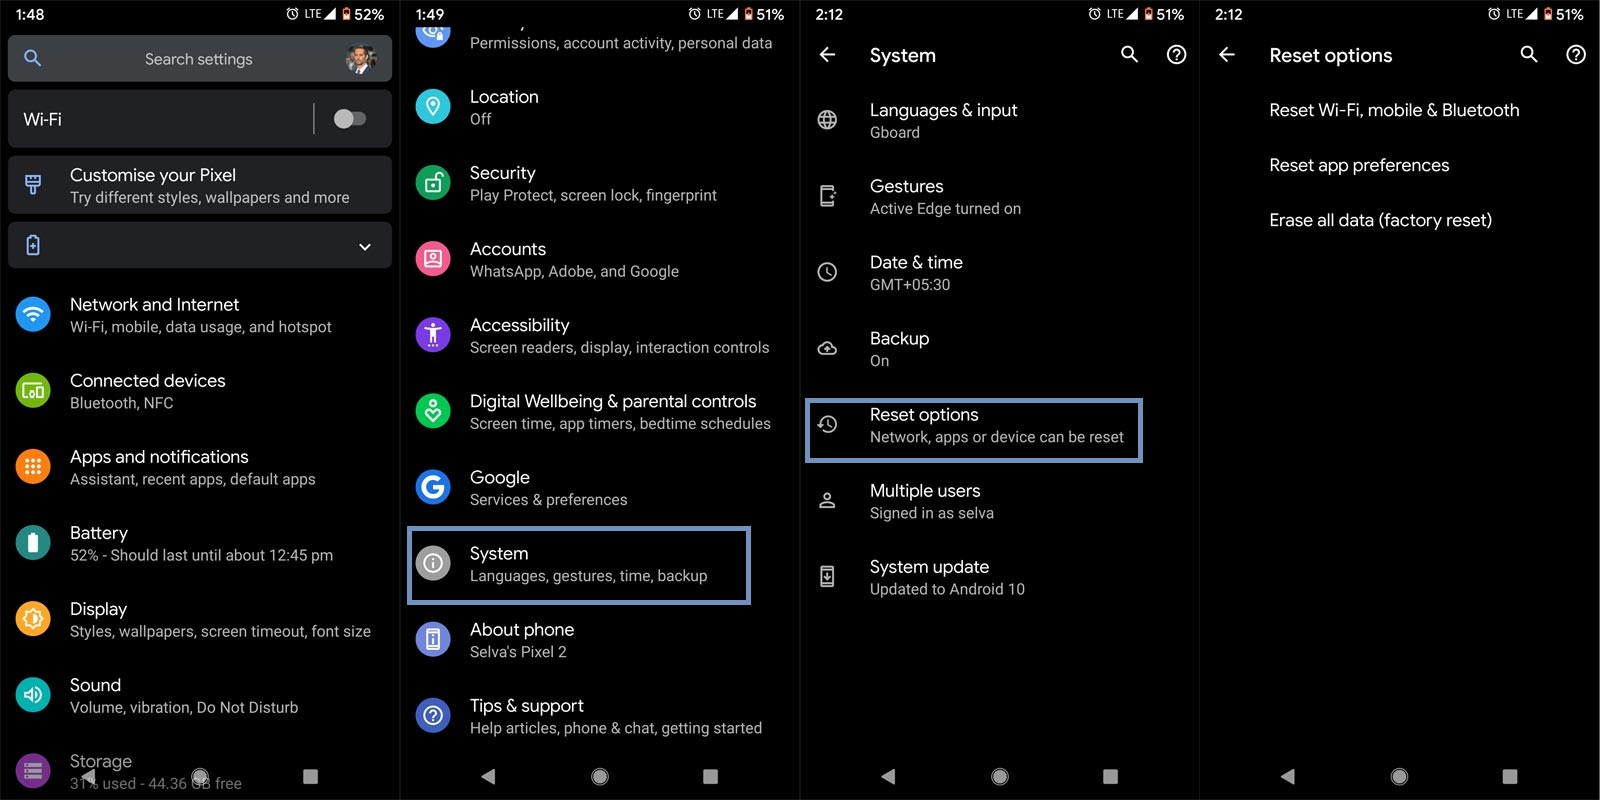
You can use this method when you want to give your mobile to others permanently. Take complete Backup on your mobile. You can do a soft reset or hard reset. To Reset your mobile, Go to settings> System>Reset Options> Reset app preferences/ Factory Reset.
- Soft Reset/App Preference Reset– This option will remove all the custom settings we made and return to the default settings. It will not delete user data.
- Hard Reset/Factory Reset– It will remove all user data. Your mobile OS will become new, like when you purchased. You have to set up everything from the beginning.
You have to choose the Hard Reset method to remove the account and data from your mobile. You can also use your mobile recovery to do the reset process. When you can’t boot into your Mobile OS.
5.1 Stock Recovery method
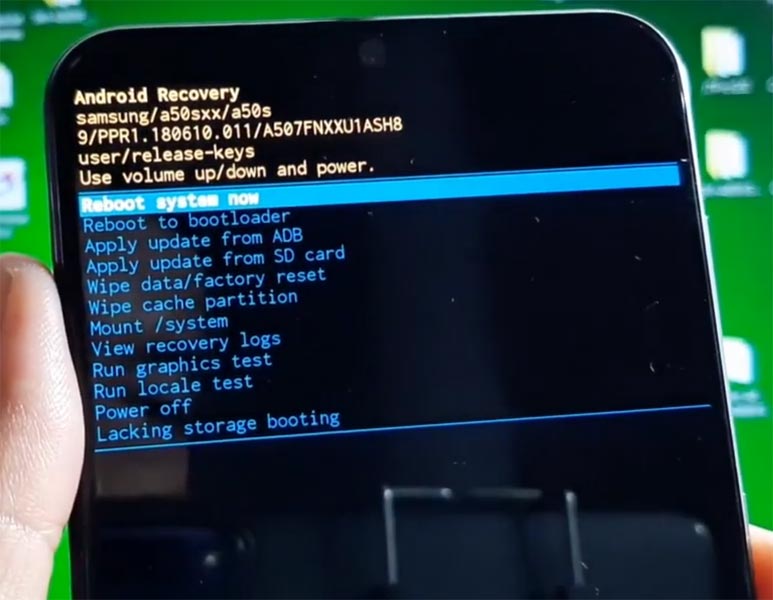
- Switch off your device. Then, enter into the Stock Recovery mode. To do this- Press and hold down the Volume Up + Power buttons at the same time for some time. It will boot your mobile into Recovery mode.
- If you didn’t use Rooted mobiles, most of the time, you have Stock Recovery, which is provided by your official mobile manufacturer. If you have a stock recovery, you have the direct option as “Wipe Data/Factory Reset.” Navigate to this option and confirm it using the power key button. Remember, It will delete your entire mobile data. So, Backup first before the process.
5.2 TWRP Recovery method
When you use Rooted mobiles, you either use Stock Recovery or TWRP custom recovery. If you have Stock Recovery, you can use the above process. When you installed TWRP on your mobile, follow the steps below.
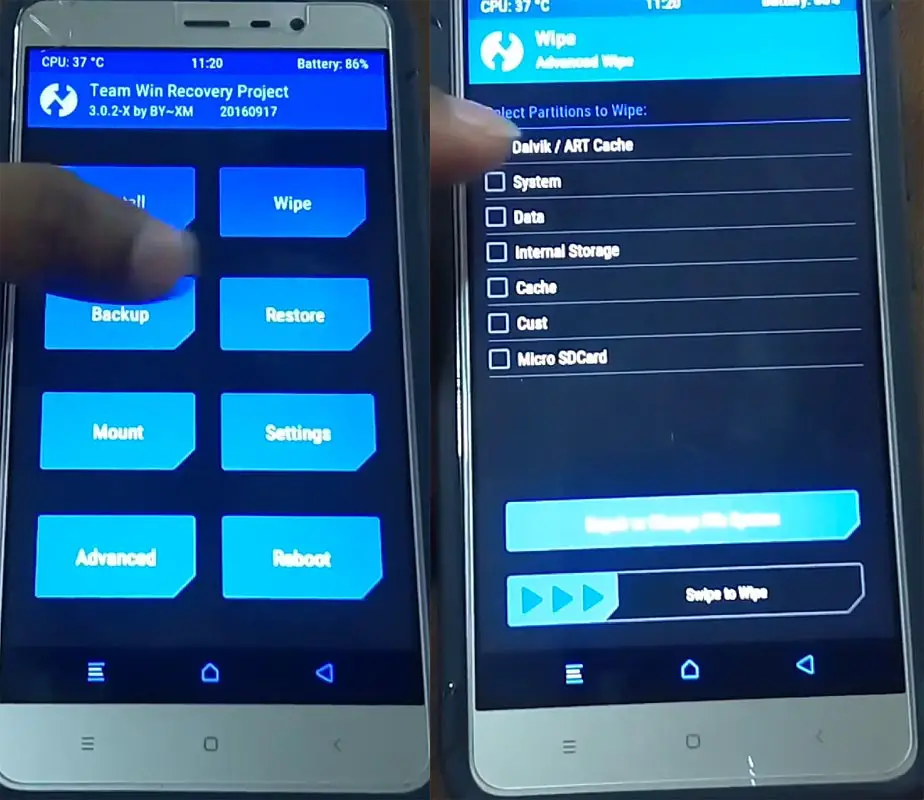
- The Keycombinations will boot your mobile into TWRP Recovery mode.
- On the Home screen, you can find the option as “Wipe.” Select the wipe option; you will receive further details. Select “Dalvik, Data, and Internal Storage.” Don’t select the System. It will wipe your OS. After selecting other choices, swipe to erase the data. When the process completes, return to home and boot into OS.
Wrap Up
Unlike other Email and service providers, Google allows us to manage our user data properly. Whenever you don’t need your data to stay on the Google server, you can remove Google Assistant and Home data too in the Google My Activity. When you didn’t use the Play Store, you can’t use the Play Protect- The service that protects you from the un-trust apps. So, when installing third-party apps, always download from the safe websites.
I listed the methods based on our needs from basic to advanced. Always use Guest mode and secondary mobile number when you give your mobile to strangers for making calls to protect your private data. If you are going to sell your mobile, It is wise to do the Stock/TWRP Recovery based reset. In new Android versions, Mobile manufacturers easily allow us to add or remove accounts, and that is great when you are using different methods to manage your accounts, comment below.

Selva Ganesh is the Chief Editor of this Blog. He is a Computer Science Engineer, An experienced Android Developer, Professional Blogger with 8+ years in the field. He completed courses about Google News Initiative. He runs Android Infotech which offers Problem Solving Articles around the globe.


Leave a Reply