Android Mobiles are slowly moving to no external storage option. Thus we are limited in the storage space available on our mobile. Even if you have external storage, When you have Low Internal Storage space, that also can’t help you much. Whenever you try to free up some specs on your mobile, Even if you didn’t open the file for years, you feel everything is essential for you and can’t make decisions to delete it or not. So, Without deleting critical files on your mobile, here we are going to fix the insufficient storage on your mobile. It doesn’t mean I am going to tell you how to increase the Internal memory, It is not suitable for regular users, and It is not efficient. With simple techniques, We can deal this issue even if you have less than 16 GB Internal memory.
How to Find Which Files are occupying your Internal Memory?
When you got the notification “Android Storage space running out,” the first thing you should do is check which files are occupying your Internal memory. You can do this in the storage option in Settings. Most of the time, the default in-built option is enough to differentiate the files based on the types. If you want deep analysis, you can use third-party apps. It will give you clear ideas about what you have on your mobile. Based on the stats, we can organize and free up space.
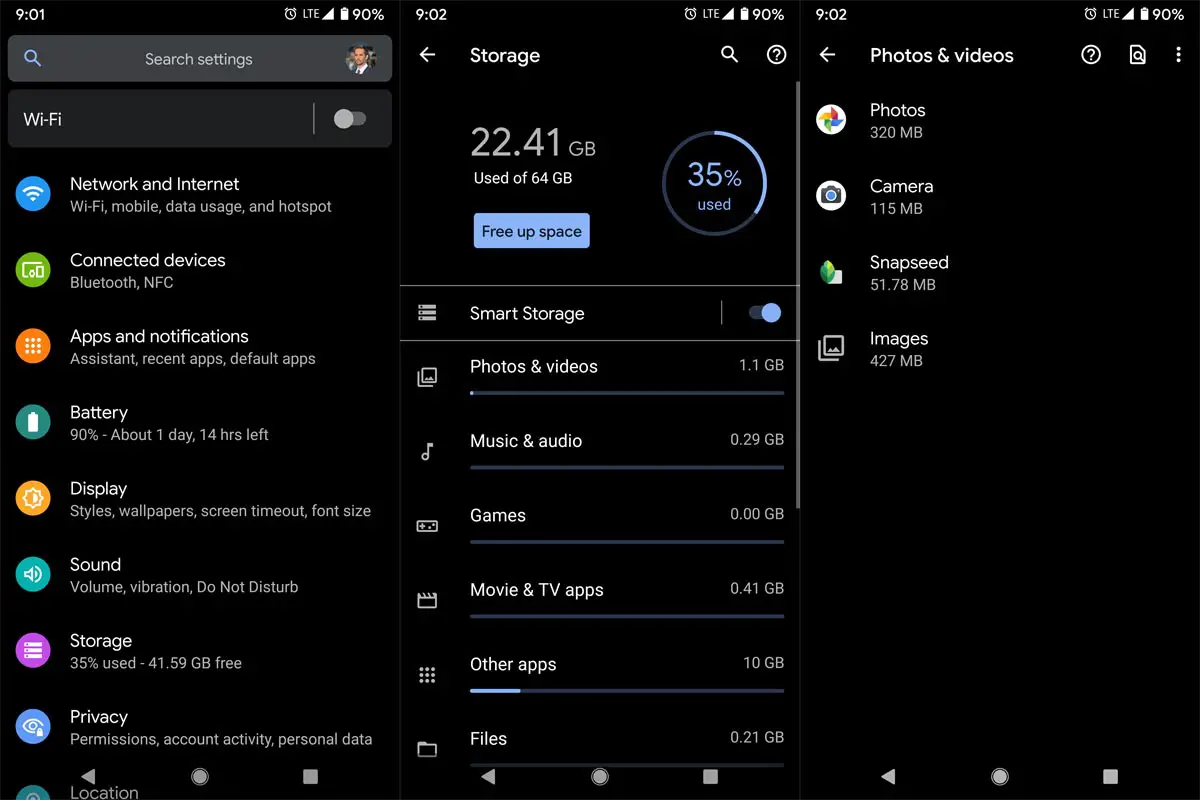
Most of our memory occupied by Media files such as photos and videos. Other than this, We have Social Media Apps, that will consume more storage, when you download media files. That will show us your app have a lot of storage. So, By Organizing the files, we can surely fix the issue. You can understand your mobile based on storage stats. Based on the information, we can take further action. Your storage occupies in different ways. Thus the fix also should be in different ways. When you follow the below methods, I assure you can free up to 40-60% storage on your mobile. It can vary depending on the services you are already using.
1. Fix Low Internal Storage Issue in Android Mobiles By Deleting Unnecessary users
When you have multiple user profile settings in your Android Mobile, Each user profile can have the same apps clone. Thus the user data between the apps can consume a lot of data. Most of the mobile, like Pixel phones, can use only user data between the different profiles when the apps are the same. But, Some mobiles act as cloners and make the exact copy of the already installed app. So, By deleting unnecessary users, We can get some space in our memory. To do this, follow the below steps.
Steps to Remove System users in Android Mobiles
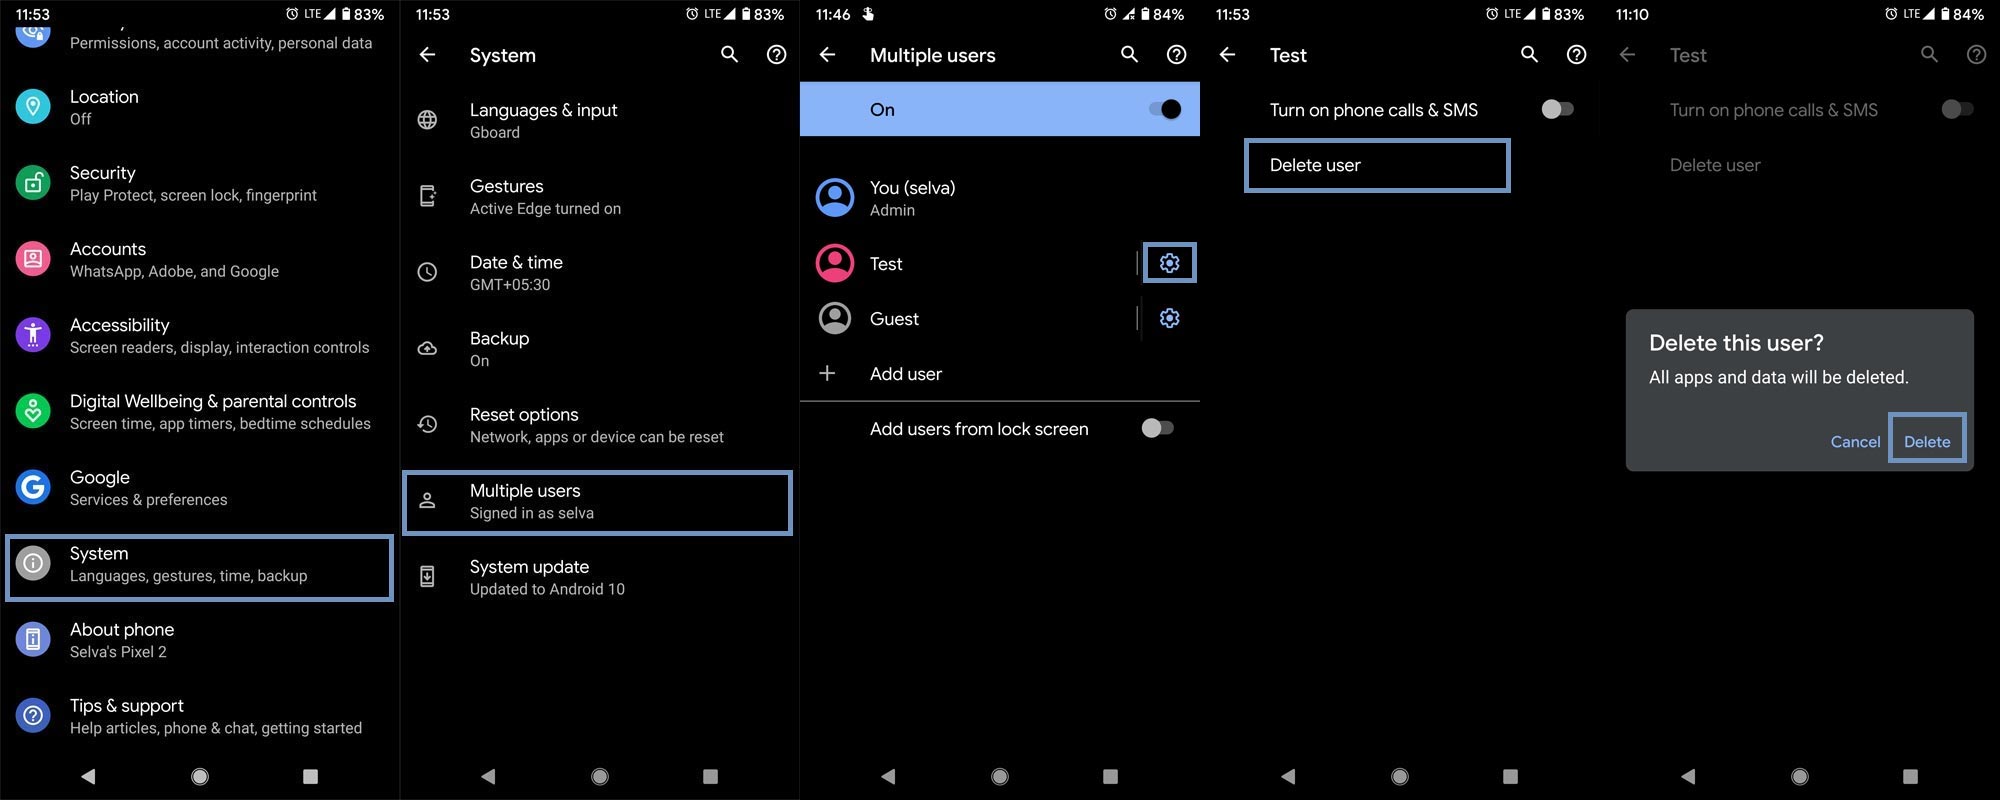
- Go to Settings and Choose System.
- You will get the details about your System data. Select Advanced>Multiple users.
- Choose the user and select the gear icon. You can choose only the secondary account, Where you can use your mobile without Google Account unless you add-in settings. In most of the mobiles, You can’t delete the Guest mode. So, leave Admin and Guest mode.
- After selecting the gear icon, select “Delete user” and choose “Delete.” If you want to maintain privacy without tracking, you can use the guest mode. Don’t add more than two user profiles. It may consume a lot of storage. To maintain privacy, you use guest modes. Thus you can maintain your privacy without removing the Google account.
2. Use External Storage if you can
If there is a possibility of using external storage like SD card or OTG Cable, you can use it as backup storage. When you have the best camera setup with an AI camera. Most of the time, you avoid DSLR and take photos using your mobile. In those situations, when you find free time, use external storage options to move the media files. Even if you have 128GB or 256 GB storage, when you shoot high-quality images and videos, your memory will run out. When choosing OTG, It is better to buy a micro USB or Type-C inbuilt pen drives. You can also use Wi-Fi enabled Pendrives. Because that’s the way the external storage becomes handy, and you can avoid multiple connections.
Utilize Your SD Card with Adaptive Storage
SD Card support mobiles allow Adaptive Storage If the Internal memory is UFS 2.1 storage or below. Most of the UFS 3.1 type storage mobiles avoid SD card support, which can slow down your mobile. When your mobile has Adaptive storage, you can move your installed apps to the SD card. But, It may be slow compare with your phone memory. You can move your apps using the below methods. It is better to use a minimum of Class 10 SD cards. It is not necessary. But, I recommend using one.
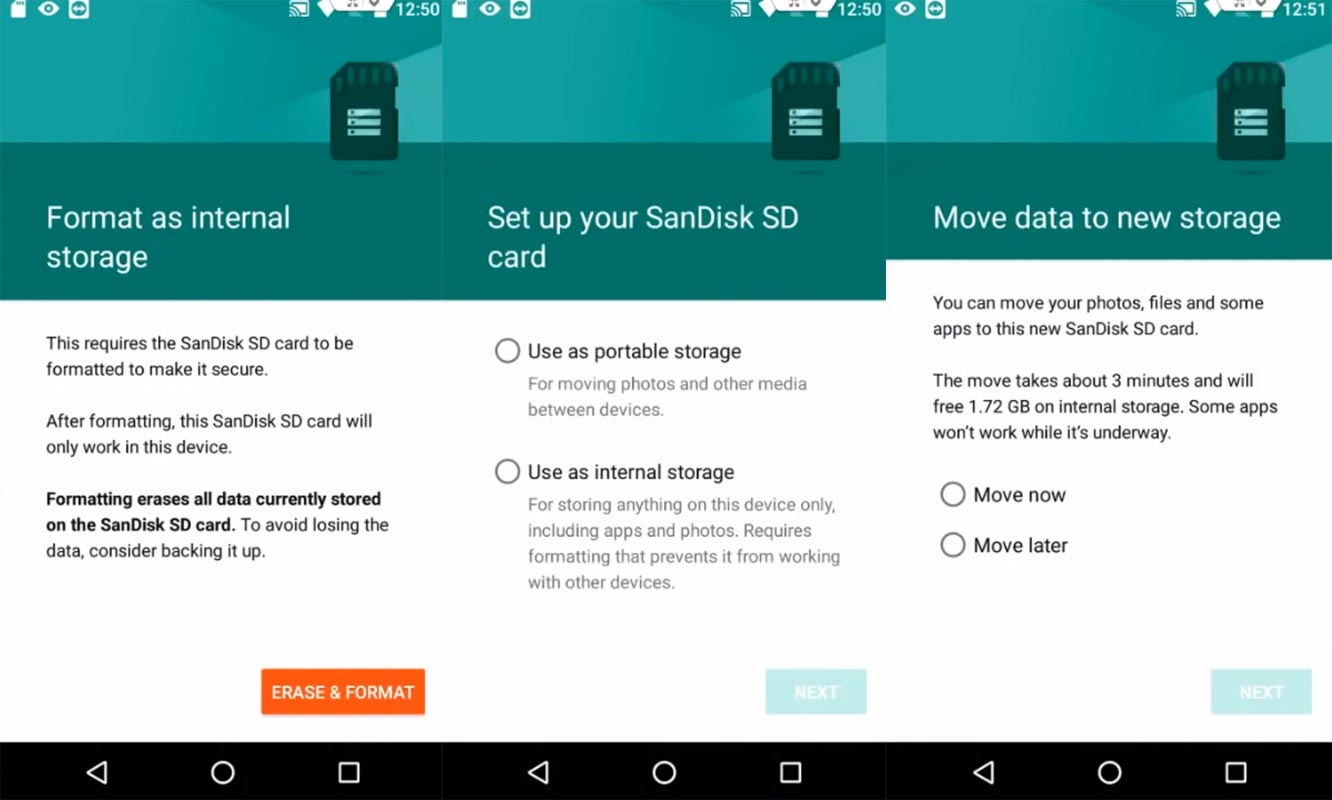
- Remove and Re-Insert your SD Card.
- Your mobile will ask to format the SD card as internal storage and allow the process.
- After successfully formatted the SD card, move internal storage files. You can also move installed apps in Settings>Apps>Selct App>Move to SD card.
- This method is still working on most of the recent Android versions also.
3. Using Google Photos and Google Drive as a Media Backup to Fix Low Internal Memory issue
You should always take a backup of your photos and videos to any Cloud Backup. It is not a precaution. Taking backup with Cloud services like Google photos is necessary. It is free and easy to use.
Why should you use Google Photos to Backup Media files?
If you didn’t use the pricing plans, Google Drive is limited to 15 GB Storage. If you back up all the media files in Google Drive, your storage will become full soon. But, the alternative is, When you use Google Photos, you can get Unlimited standard quality photos and videos. When you have pixel phones, you can get limited time full quality images and videos. So, use the backup like this- Use Google Drive to backup text messages and media files to Google Photos. I will explain the steps to do this in the parts below. Text messages, Images, and Documents backup will not get more than 100-200 MB, Even if you have thousands of messages. Because when uploading to the cloud, It will compress the files. But, When you upload videos, It will take more storage.
If you use iOS devices, You can use iCloud to make a backup of text messages and Google Photos to backup media files. When you are using paid service and have a lot of storage, you don’t need alternative storage ideas.
Steps to backup Media files to Google Photos
- Download and Install Google Photos on your Android mobile.
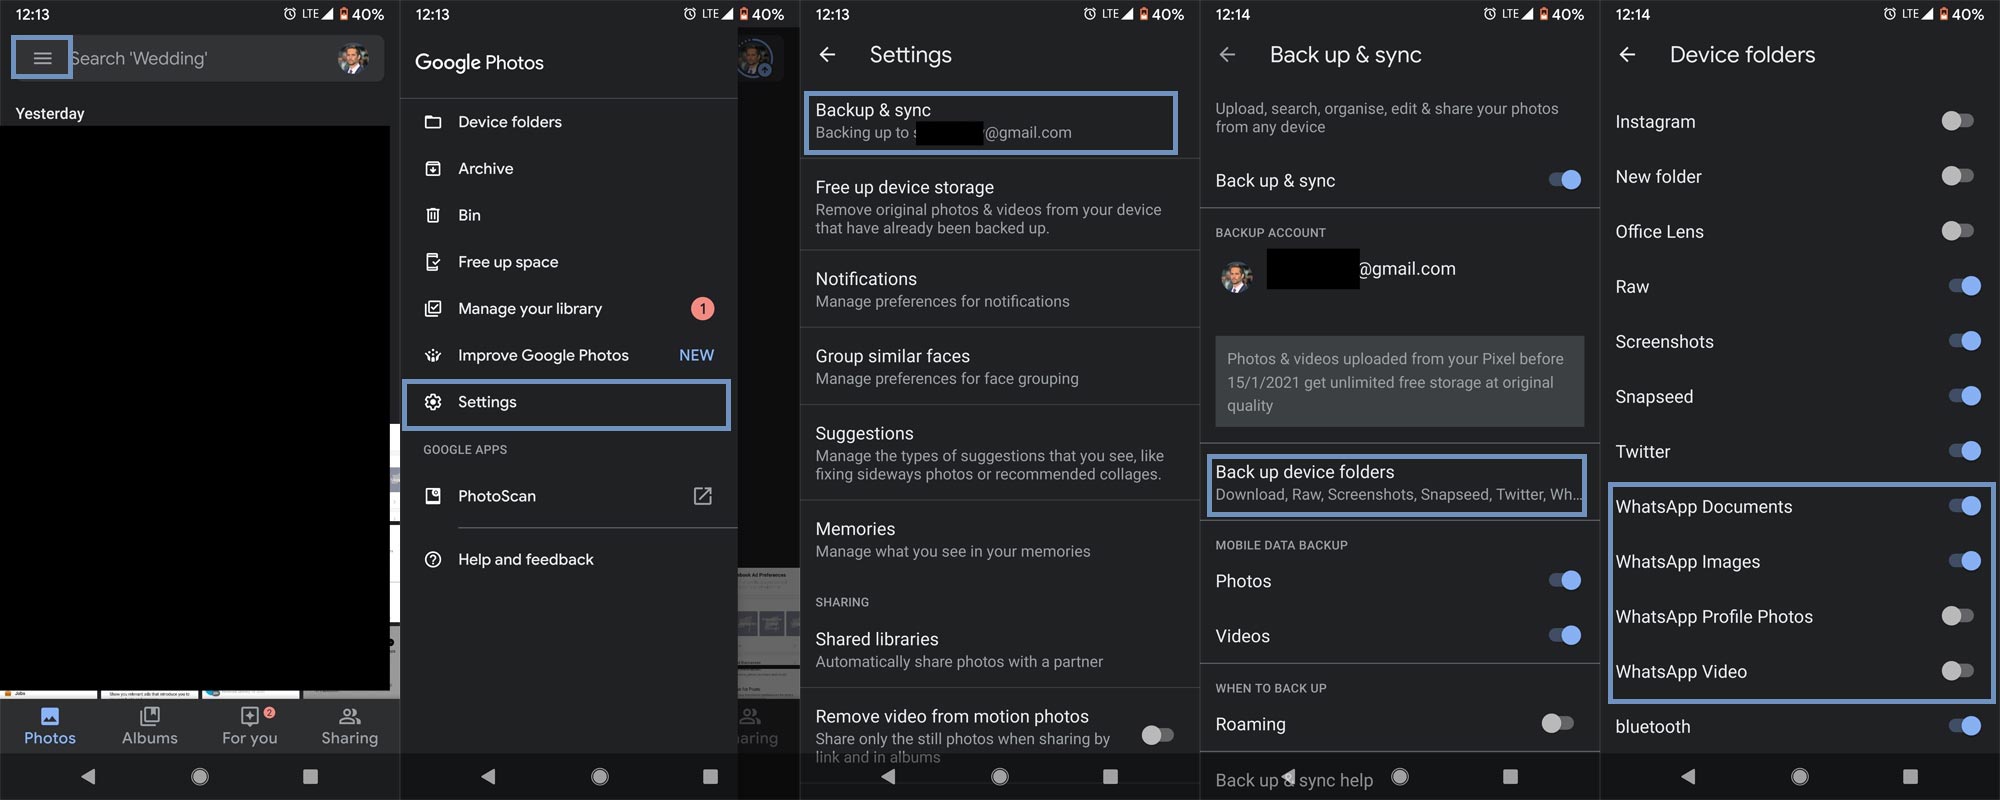
- Open the Google Photos app and select the hamburger menu.
- Select Settings> Backup and sync. Then choose Back up device folders.
- Enable all the folders that detected as media folders like DCIM, WhatsApp Documents, Images, Profile Photos, and Video. That’s all hereafter; the media files will automatically backup to Google Photos. By Backup Whatsapp files alone, you can save a considerable amount of memory.
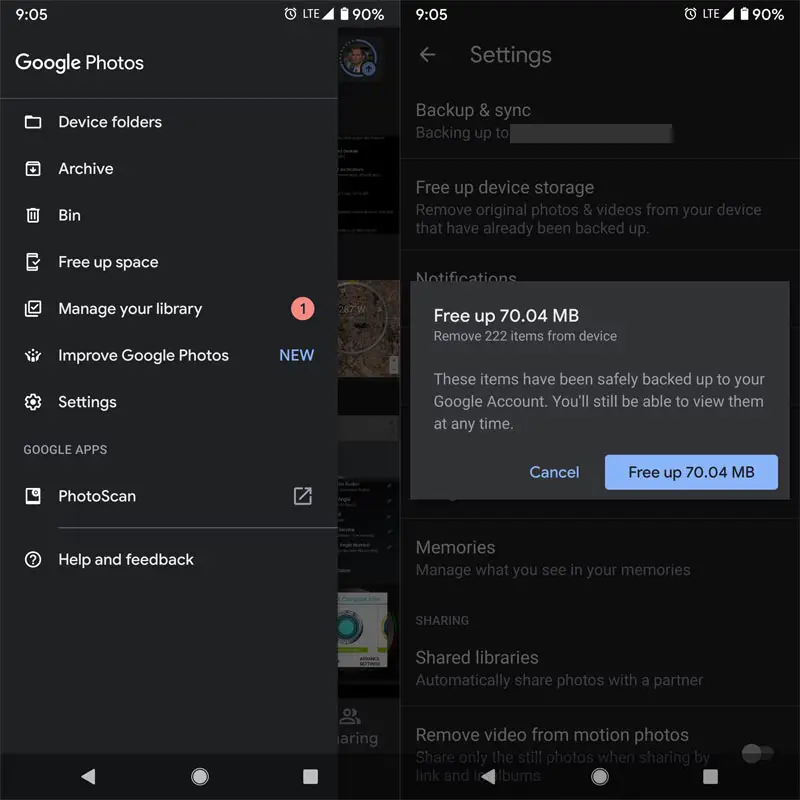
- After the sync completed successfully, you can free up space on your mobile. You don’t have to delete the files manually. Google Photos can take care of this. Select the hamburger menu and choose “Free up space.”
Steps to backup Document and other non-media files to Google Drive
You can only save media files like photos and videos in Google Photos. Other than these files, you can use Google Drive to store different types of files. Unlike Google Photos, you have limited storage capacity when you are using a free plan.
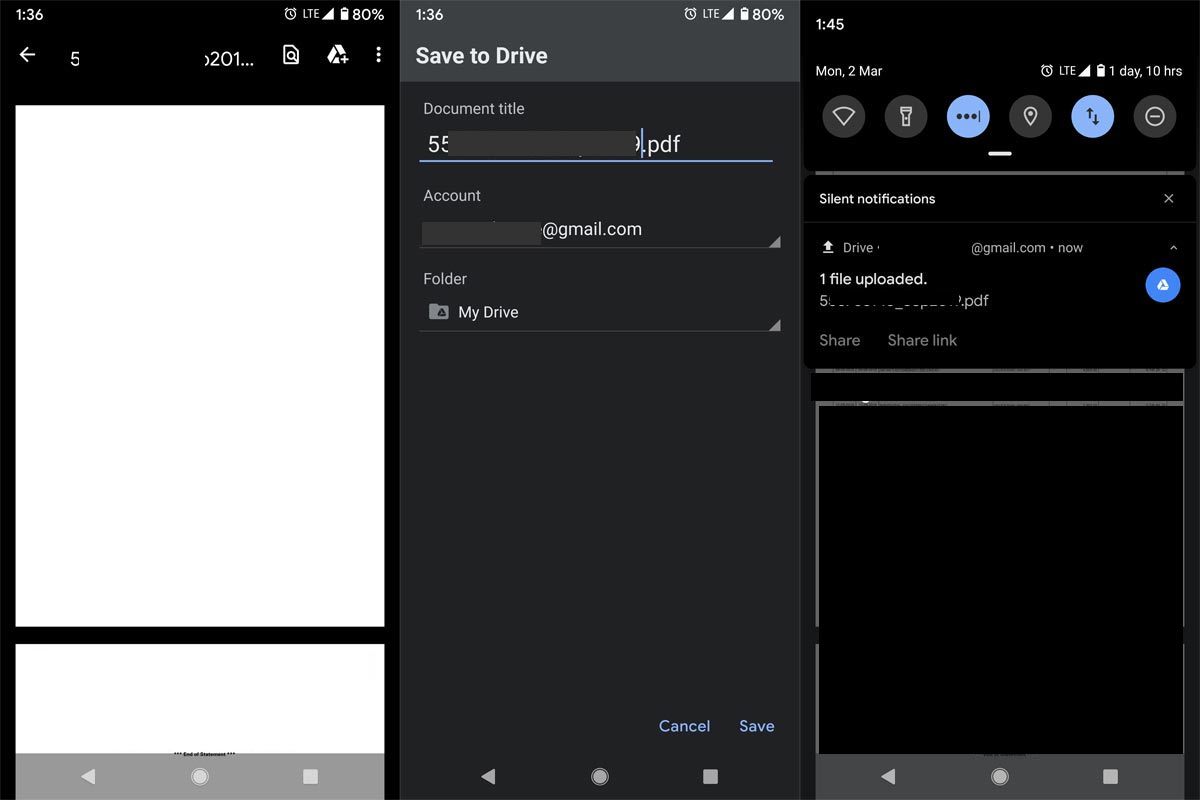
- Download and Install Google Drive on your Android mobile from Play Store.
- Open the file you want to want to move to Google Drive. You can find the Google Drive logo with the “+” icon. Select the icon; It will ask you for the save location and account. Choose further details and select save. Other than essential files you should have in your mobile like ID Documents, don’t use the offline method for all files.
4. Find same and not opened files using Intelligent File managers
Most of the time, there is a chance of the same files can be in multiple folders. We can’t manually find the files every time. Smart file managers can do this process successfully. Here I take Files by Google as an example. You can use any file explorer that can do the job.
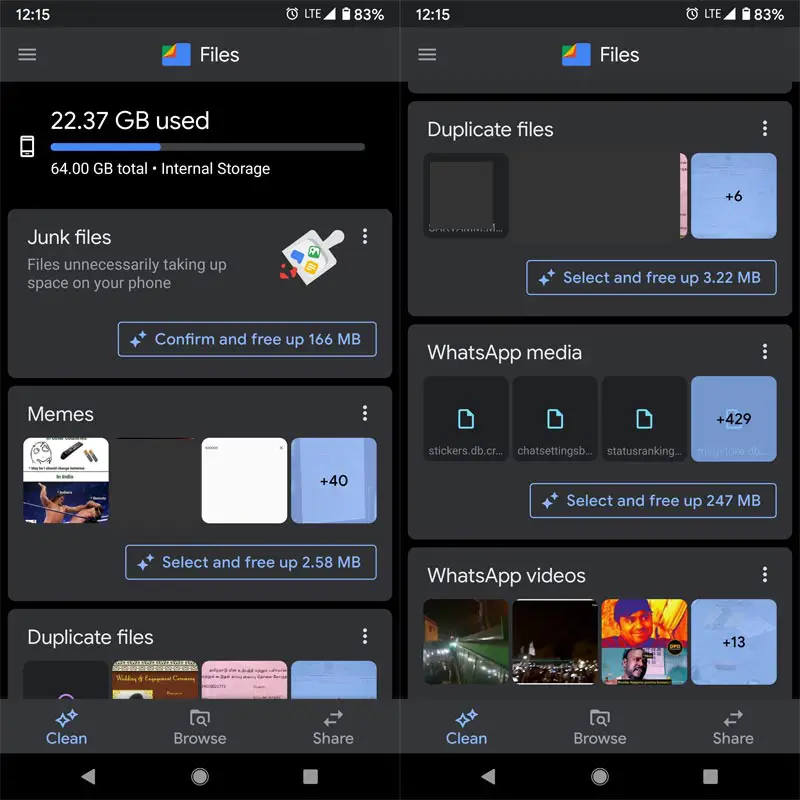
- Download and Install Files By Google on your Android mobile.
- Open the app and review the suggestions. This app can identify the Memes, Duplicate files, Unused Large files for a long period like that. Based on the suggestions, you can remove the files.
5. Using Lite Weight apps to utilize low internal storage
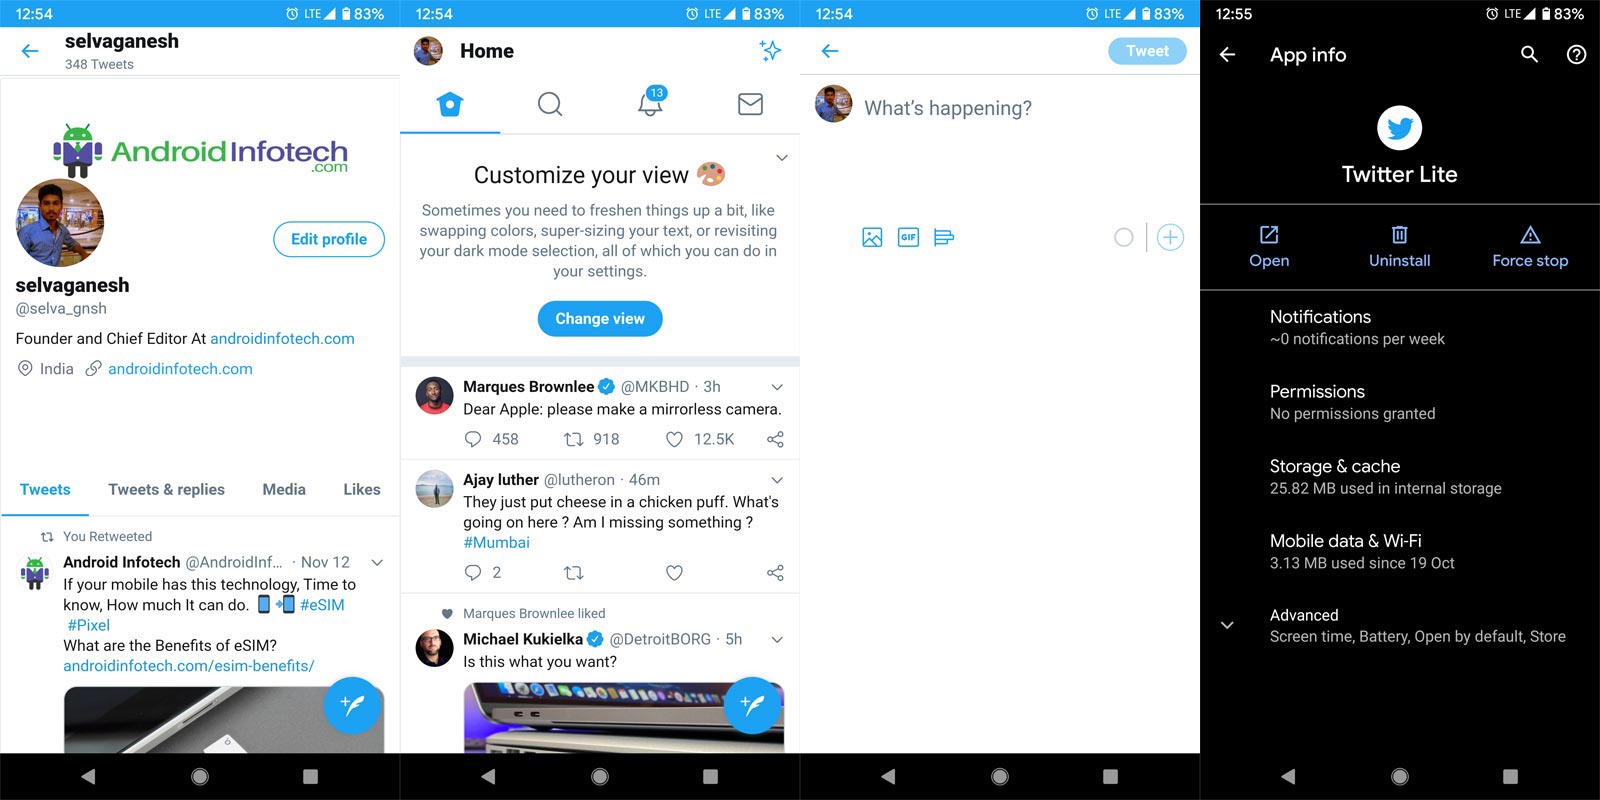
Most of the Big Memory consuming apps have their alternative Lite apps for limited RAM mobiles. So, you don’t have to install the 100 MB+ files. If you worry about the graphic design and UI, you can use the regular version. But, When your preference is to do the job, then you can use lite apps version. I already covered the topic on less RAM consuming lite weight Android apps. Youtube Go, Google Maps Go, Facebook Lite, and Twitter lite are some lite weight apps alternatives for the regular versions.
6. Use Online Streaming Services to Save Internal Storage
Instead of downloading and store audio and video files, You can use Online streaming services like YouTube, Spotify, Amazon Prime, and Netflix. When you use those apps, don’t use offline or download method. It doesn’t make sense when our goal is to save memory on our mobile.
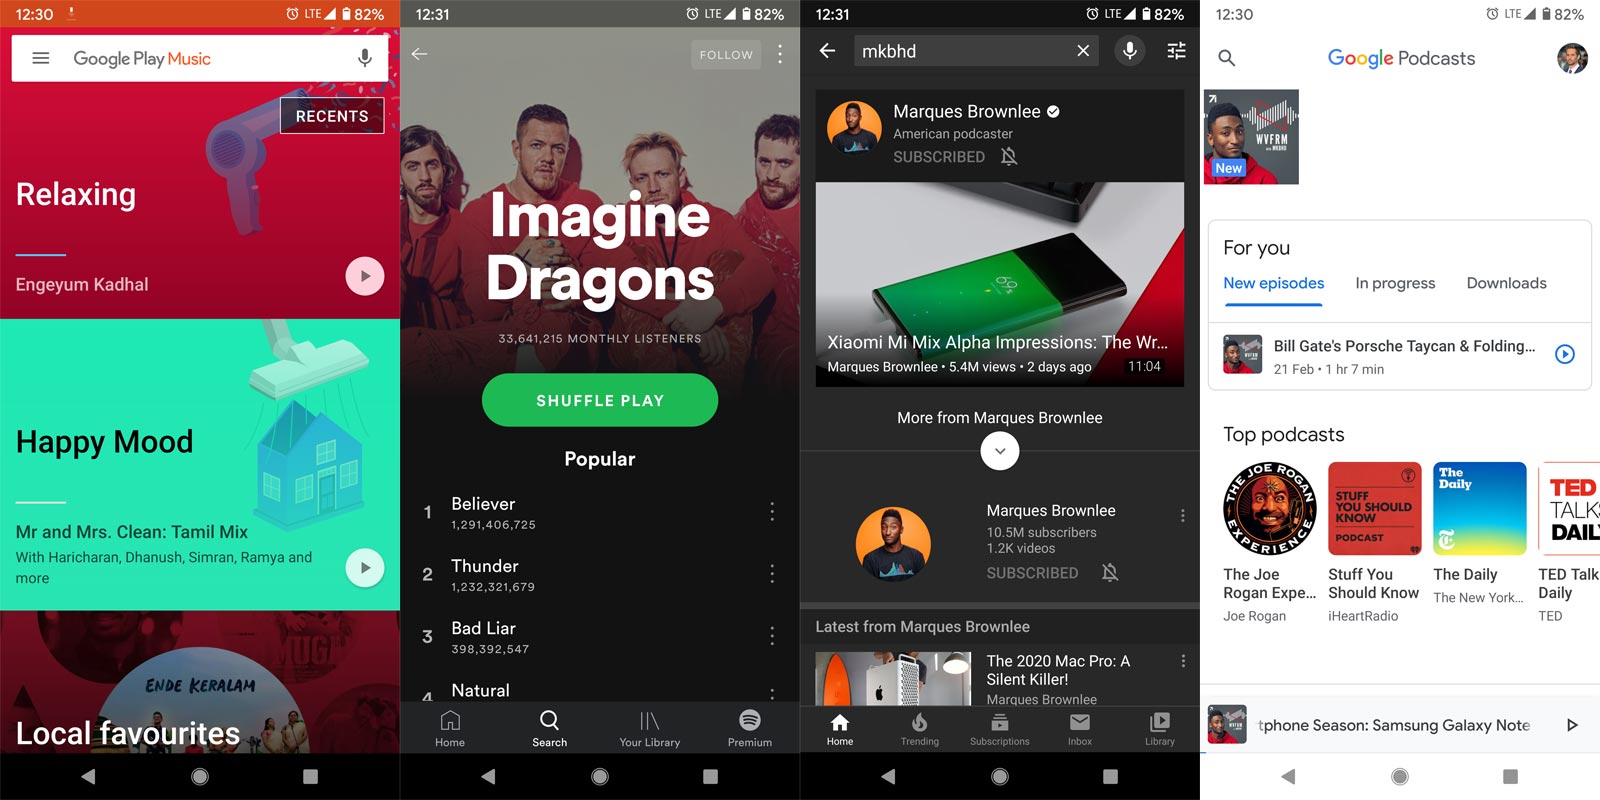
- Songs– Spotify, Saavn, Google Play Music, and Youtube Red.
- Videos– Youtube, Vimeo.
- Podcast– Google Podcasts
- Movies and Web series– Netflix and Amazon Prime.
Further, We can access all of these services through the web version. So, You can use your browser instead of downloading and installing this app. But, the experience will differ. So, based on your priority, use mixed app versions.
7. Clear Cache in your mobile
To access the files quickly, most of the smartphone apps use cache technology. Whenever you use the app, It will first check with the cache to provide fast access to the files you are going to visit. It is a good technology. But, When your app cache more often, it will occupy more space. We cab free up space by clearing those cache files. Don’t Delete App storage. It stores your logged-in information like user name and password. When you clear this storage, you have to set up everything from the beginning in that particular app.
Clear Cache in Installed Apps
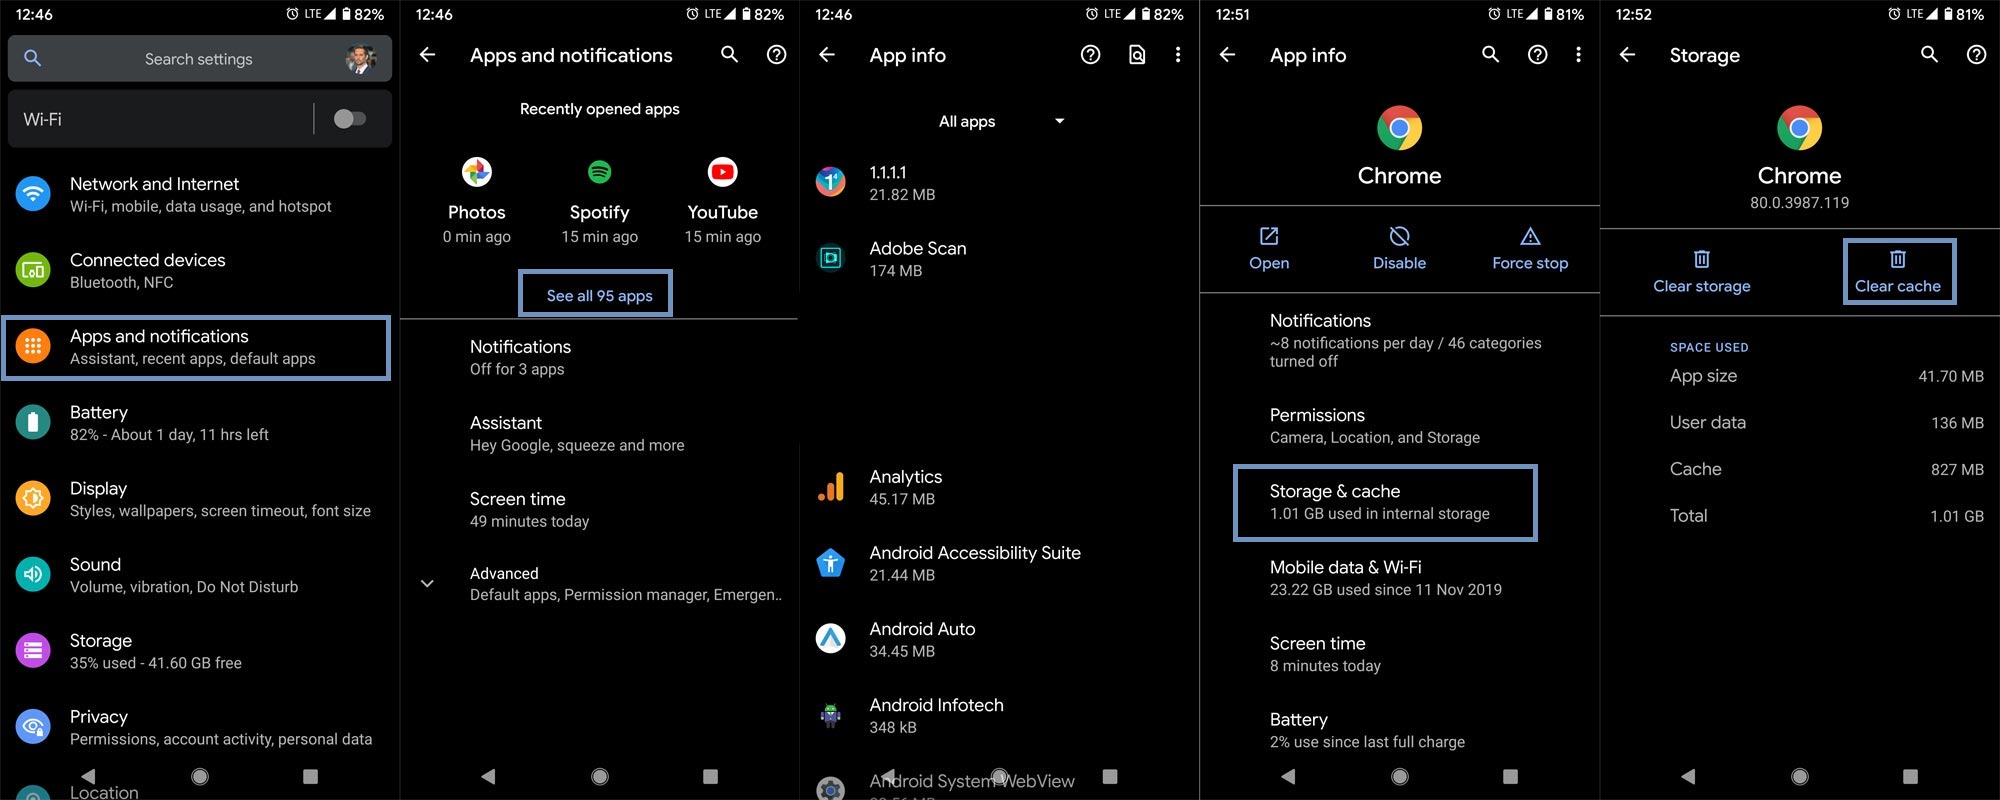
- Go to Settings and Choose “Apps and notifications.”
- Select see all apps. Initially, go with the browser apps. These apps always store a lot of data compare with other installed apps.
- Open the app, select “Storage and Cache.” Clear cache. It will not affect your history and other files. We only delete cache files here. Proceed with this process as much as possible in every app.
Stock Recovery method
Sometimes when you update your mobile, there is a chance of the temporary installing files may persist in the storage. Some storage from your internal memory will disappear. You can’t find the file using your mobile UI. When you have this kind of issue, you can clear the cache partition in the stock recovery.
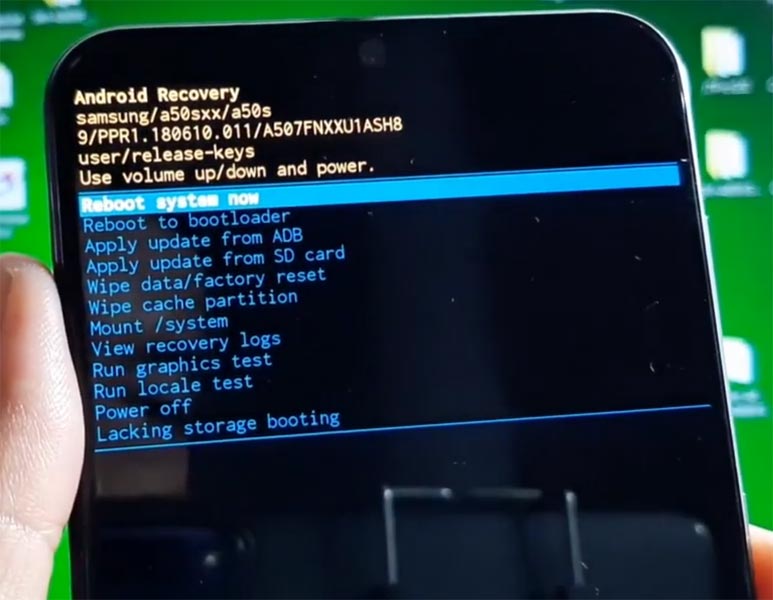
- Switch off your device. Then, enter into the Stock Recovery mode. To do this- Press and hold down the Volume Up + Power buttons at the same time for some time. It will boot your mobile into Recovery mode. The physical key combination may vary depending on the manufacturers.
- If you didn’t use Rooted mobiles, most of the time, you have Stock Recovery, which is provided by your official mobile manufacturer. If you have a stock recovery, you have the direct option as “Wipe cache partition.” Navigate to this option and confirm it using the power key button. Remember, It will not delete your entire mobile data. But as a precaution, backup first before the process.
TWRP Recovery method
When you use Rooted mobiles, you either use Stock Recovery or TWRP custom recovery. If you have Stock Recovery, you can use the above process. When you installed TWRP on your mobile, follow the steps below.
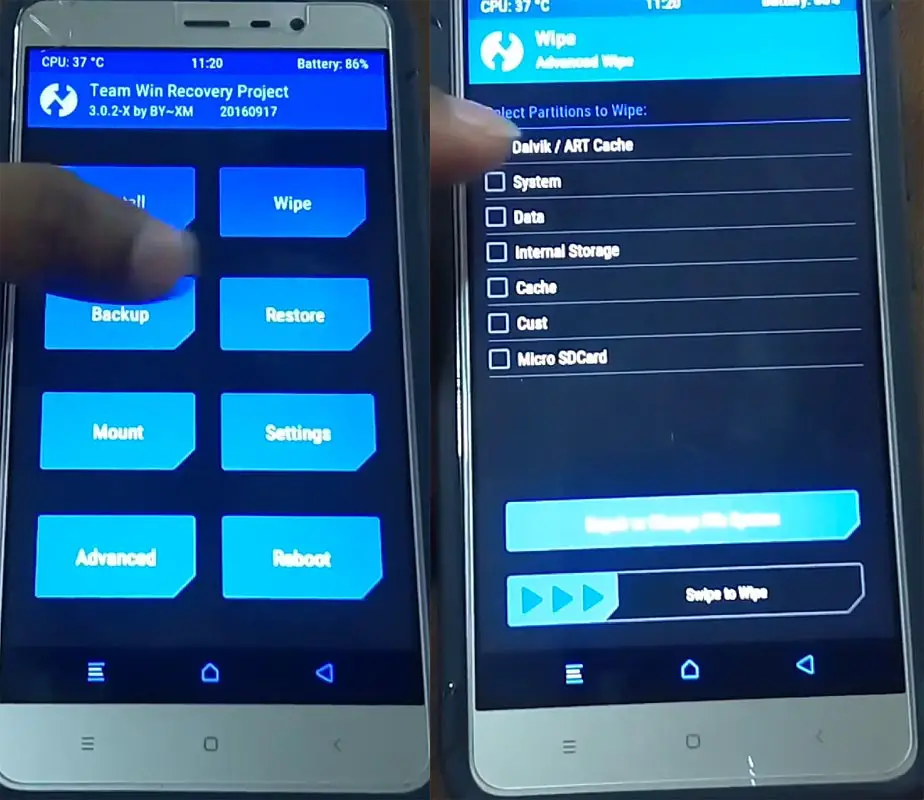
- The Keycombinations will boot your mobile into TWRP Recovery mode.
- On the Home screen, you can find the option as “Wipe.” Select the wipe option; you will receive further details. Select “Cache.” Don’t select the System. It will wipe your OS. After selecting other choices, swipe to erase the data. When the process completes, return to home and boot into OS.
Wrap Up
If you follow the above steps one by one, as I mentioned earlier, you can save up to 40-60% memory. When you have less internal storage by default, You can’t expect huge improvements. Because your Android Mobiles OS alone can occupy 4-15 GB storage based on the Android versions. If your mobile manufacturer using Custom Skin OS, But you have rooted mobile and using a custom recovery, you can use near Stock Android Custom ROMs. Compare with Custom Skin OS; Stock Android ROMs consume less memory. I hope these methods help you to free up some space in your internal memory. When you follow different methods, and it is working great, comment below. It will help our other friends.

Selva Ganesh is the Chief Editor of this Blog. He is a Computer Science Engineer, An experienced Android Developer, Professional Blogger with 8+ years in the field. He completed courses about Google News Initiative. He runs Android Infotech which offers Problem Solving Articles around the globe.


Leave a Reply