The Default font of Android may not be suitable for all. Some of us need to customize our mobile further. It can start from the font. Most of the time, we deal with the Text on our mobile. Also, We love some fonts and want this style in every gadget we use. It will give us some unique experience. Font matters most of the time. Android always has a lot of features that can be customized further. You can install custom fonts on Android mobiles, whether the device is rooted or not. Some Android mobile users prefer to use custom fonts rather than the default fonts supported by their mobile. However, on some Android mobiles, you have to root the device before you can install custom fonts; while on some other Android mobile, you can easily download custom fonts and install them without rooting your device.
While we are trying to get you to root your device, it is essential to say that unrooted devices may not be able to run some custom. But rooted devices can run virtually all custom fonts you wish to use. Thus, this article will include detailed guides on how to install custom fonts on rooted Android mobiles and “never-rooted” devices.
First, we will be starting with devices that have no. Although this method doesn’t work on all devices that have no root access, it will be undoubtedly handy for the few with supportive devices. Typically, devices from these manufacturers allow you to install custom fonts on your Android mobile; HTC, Samsung, Tecno, Infinix, LG, and Google (Pixel).
Install custom font styles on “non-rooted” Samsung and Other Android Mobiles
As said before, some devices allow you to download and install fonts online. If your device supports that, simply go to Settings >>> Display >>> Fonts >>> Download/Online. When you click on the “Download” or “Online” option, you’ll be able to browse a built-in library of fonts and install anyone you prefer. After you have downloaded the font of your choice, select the font and activate it.
That’s how to install and activate custom fonts on some Android mobiles without rooting.
On the other hand, some Android mobiles do not support downloading online font; thus, you need 3rd-party apps to get your preferred custom apps on your device. Examples of 3rd party apps that allow you to install custom fonts on Android without root include, GoLauncher and iFont. These are the most popular apps for installing custom fonts on Android smartphones without root access. But, Unfortunately, All Manufacturers don’t support third-party apps. Samsung, Xiaomi and Huawei mobiles can be modified using these apps. Samsung devices support this font on the System level. So, You can see the same font in all settings and installed apps.
Using iFont
Also, it is essential to note that the iFont app does not work on many smartphones until they are rooted. Using the iFont app below is how to install fonts on supportive smartphones.
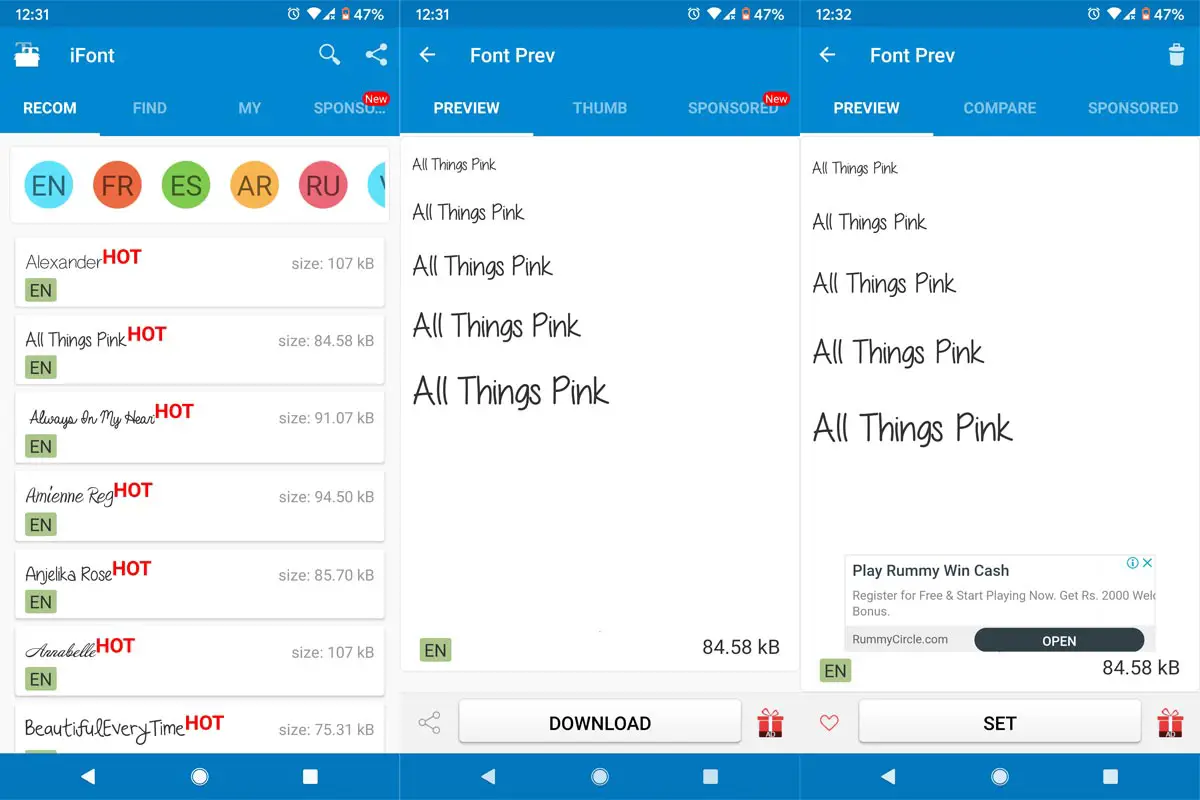
- Download and install iFont from PlayStore
- Run the iFont app and browse through the available fonts
- Click on “Download” to get any font you find exciting and would love to use
- Click on “Set” to start using the font
- No reboot required
It’s quite easy using iFont, but the app does not support a wide range of devices. The app only works well on Samsung Galaxy S7, S8, S9, Note, Note II, XiaoMi (MIUI) devices, Huawei (Emotion UI) devices, and Meizu smartphones.
Similarly, you can use GoLauncher to update your device fonts even though the device is not rooted.
Remove iFont- Return to Stock System Font
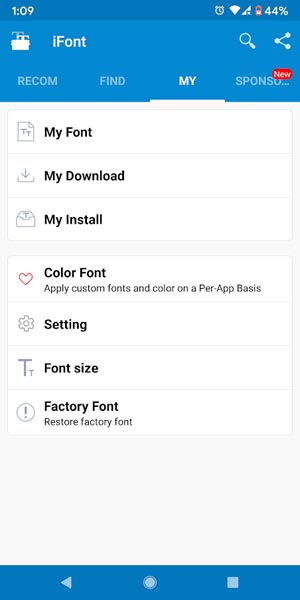
Sometimes you may be bored with the custom font and want to return to your system font. This app has the facility to revert to your system font. Follow the steps below to do the reverse process.
- Open your iFont app.
- Go to My Tab. You will find a lot of options like My Font, My Install. In the below, you will find the option as “Factory Font.” Select this option to restore your Stock System font.
Using Go Launcher
The launcher configurations may not look like Native. You may notice different fonts in the Individual apps, Where IFont can work system level. But, If your mobile is doesn’t support iFont and you don’t want to root your mobile, you can try with the below method.
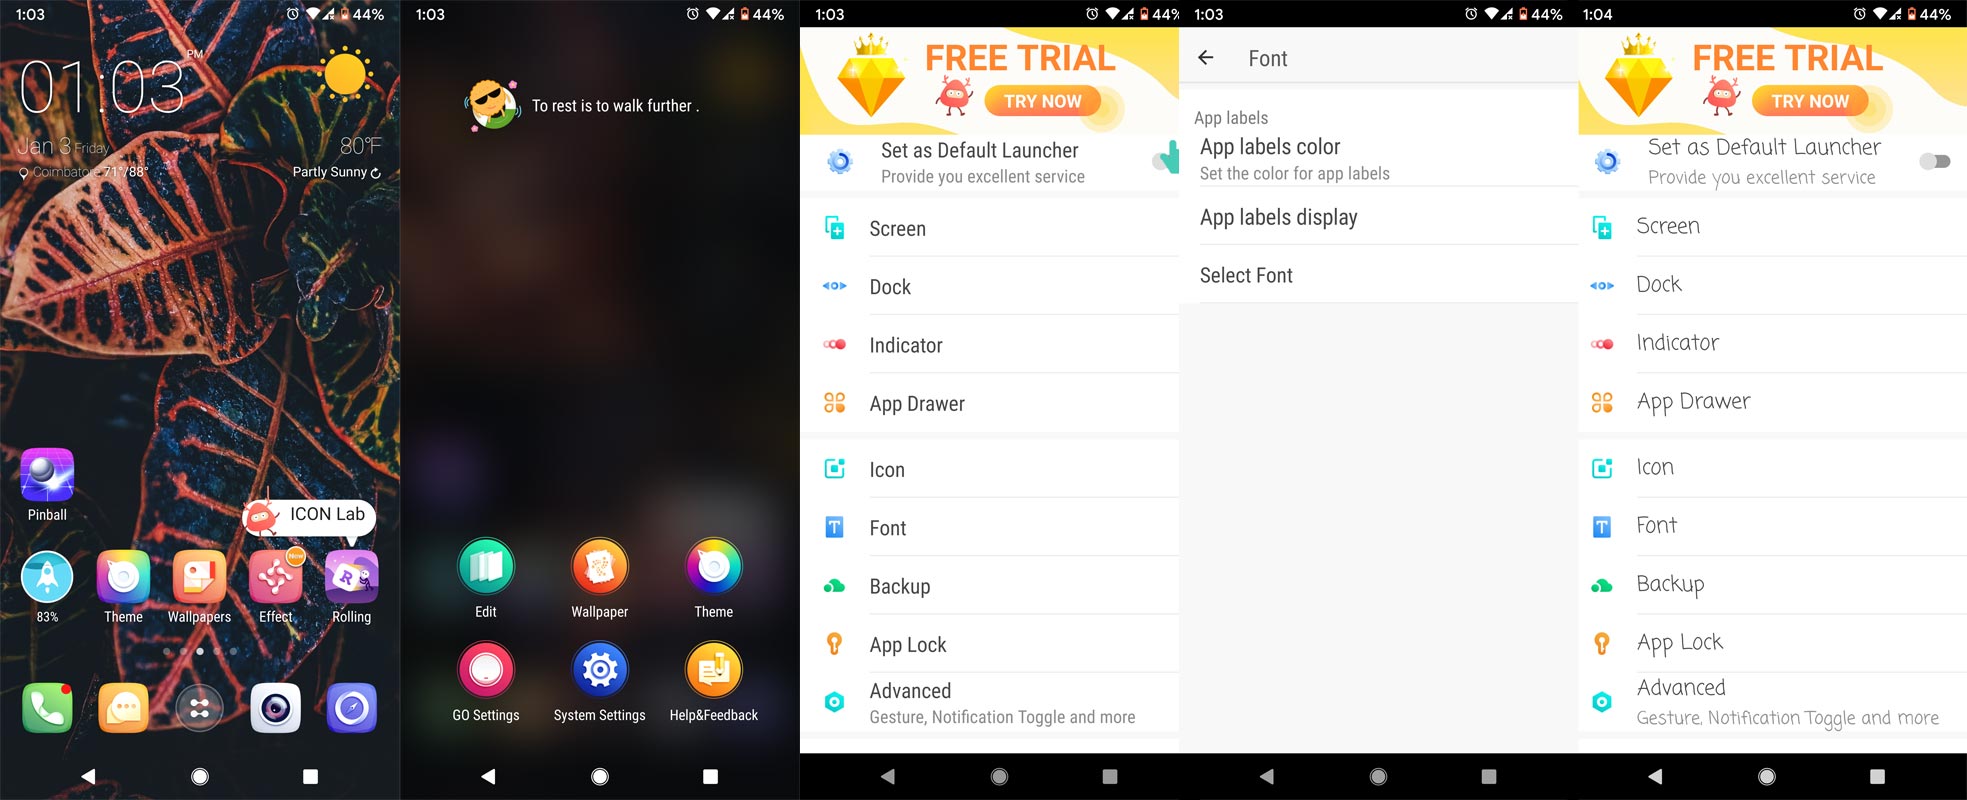
- Download and install GO Launcher from PlayStore
- Long press on the Home Space. You will get the Go Launcher Settings.
- Select Go Settings>Font>Select Font.
- Initially, you will get only a few options in the fonts. Select the scan to get more fonts.
- You will also get the preview when you scroll for the selection. Select your favorite font.
- No reboot required.
As I said earlier, all of the third party and in-built apps may not support this font view. If you want to set up on the overall system, you have to use Root based method.
Return to Stock Font on Go Launcher
Like iFont, you can always return to Stock System font using in-built options. Follow the steps below.
- Long press on the Home Space. You will get the Go Launcher Settings.
- Select Go Settings>Font>Select Font>System Font.
How to install custom fonts on “Rooted” Android devices?
Rooted smartphones give you exclusive access to all the parts of the device, and you can also install any application or Custom ROM of your choice. Nevertheless, rooting is Advanced action, and it can get your smartphone damaged (beyond repair).
While there are many things to gain when your device is rooted, the damages it can cause are much more. Plus, your device’s warranty gets voided the very moment you unlock the bootloader and root the smartphone. Also, rooting requires strict carefulness and using the right software tools.
In all, if you have not rooted your smartphone before, we advise you don’t attempt to root it because of installing custom fonts. But, if your device is already rooted, follow the guide below to install custom fonts.
Also, you can use iFont on rooted Android mobiles to install custom fonts. It is limited when the device is not rooted, but on root smartphones, it is fully functional to use in changing fonts.
You can flash fonts zip file into your rooted Android mobile, or you can copy the .ttf files to a specific folder to install a font file.
Prerequisites
- Rooted Mobile
- SuperSu/Magisk Root managers
- A PC (optional)
- Download FontFix or iFont
Using FontFix mobile app
Since your device has no root access, install the FontFix mobile app and change your phone’s appearance.
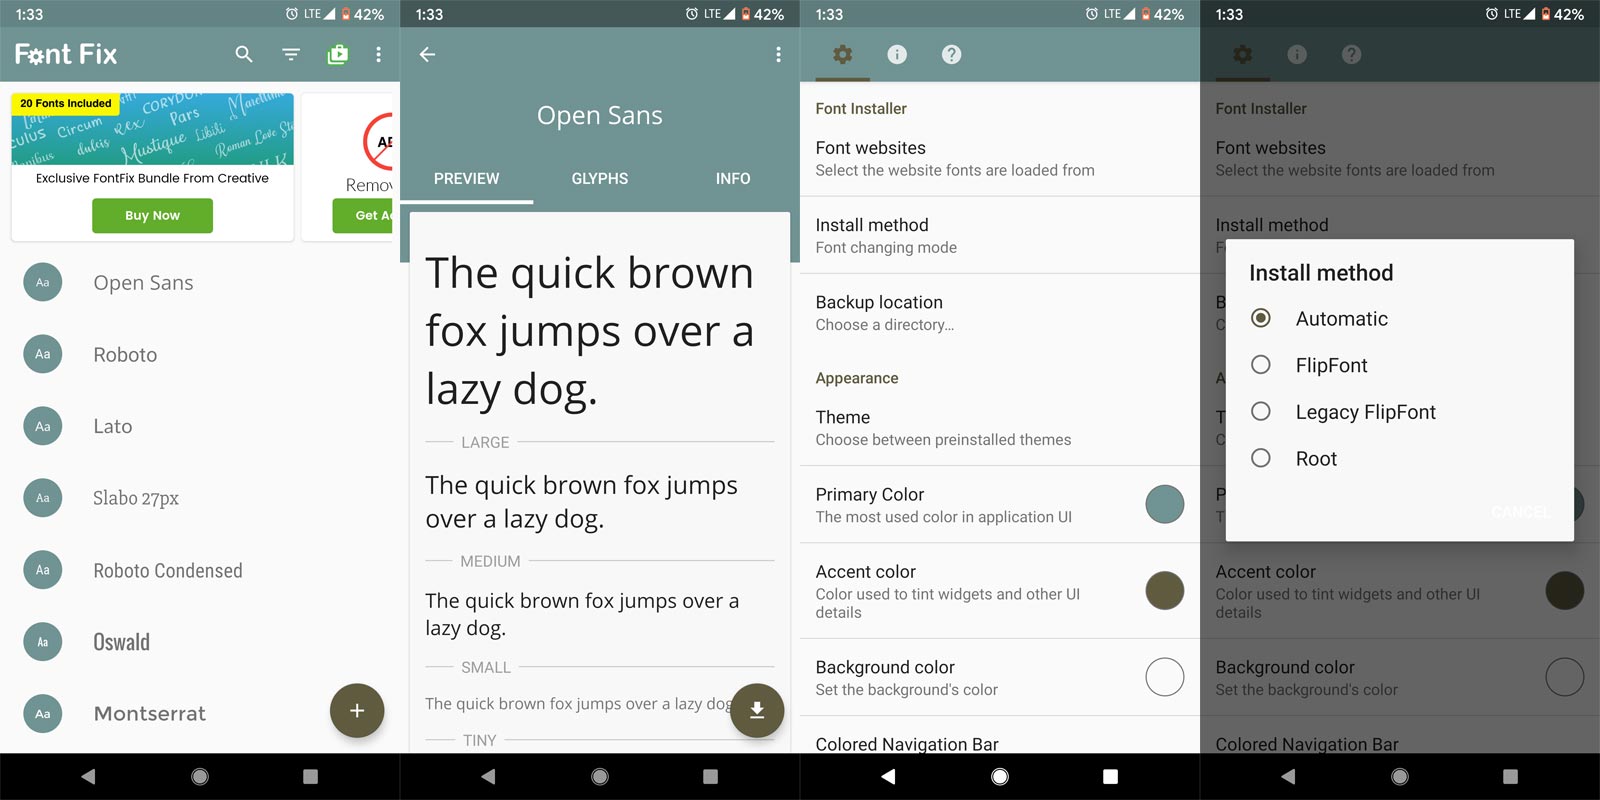
- Go to Playstore or any other apps store
- Search for FontFix and install the app
- Launch the app and grant permissions
- Open the app, and you will see lots of custom fonts that you can download and install on your device
- Select the font that you like and click on “Install.”
- After installing the fonts, click on “Set” to activate
- Reboot your device
- That’s all; your device will now be using the custom fonts you downloaded from FonFix’s server
- If you can’t install the font, Go to Settings>Installation method>Change it to Root.
Custom Download method on FontFix
In the Fontfix app, you will get all the fonts available in Google fonts. However, if you didn’t see the custom font of your choice on the list of available fonts on FontFix’s server, then you can search the internet and download the .tff font file of the font. This is where you may need a PC to move the .tff file to a specific folder on your rooted device.
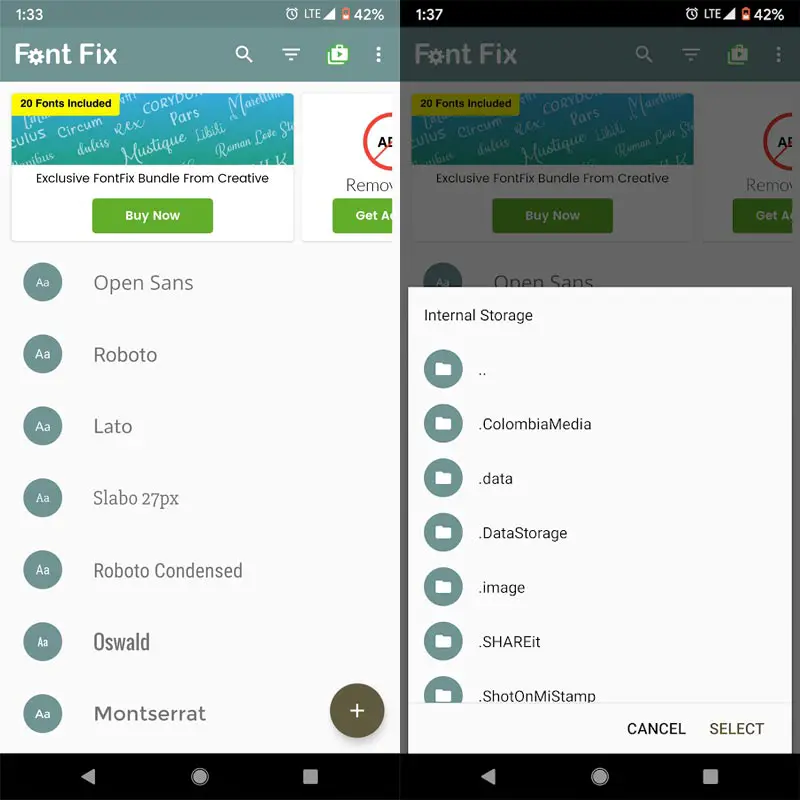
- Download the .tff file on your PC and transfer it to SDcard directory on the rooted device
- Launch FontFix and click on the “+” icon
- Tap on “Select,” then look for the .tff file on your SDcard directory
- Select the .tff file and install it on your device
- Grant the SuperSU permissions that may be required
- Reboot your device after the installation is complete
- That’s all; your phone will run with the font of your choice.
Using Custom Recovery- TWRP Method
If you have Custom Recovery like TWRP, you can flash the Custom font. Unlike the non-rooted method, the TWRP method doesn’t require any apps. So, It won’t consume additional RAM. So, you can use this method on Less RAM phones. Before the process, You should know what font your Manufacturer is using. If you can’t find the font, Take a complete backup. There are two steps involved in this process.
Creating Flashable font.zip file
- Download the .tff file on your PC or Mobile. The data should be in .tff format. There should be no internal folder.
- Download the Font Format.zip file.

- Extract the file in Single Folder. Don’t drag and drop the files. In the Downloaded format zip file, you can find the META-INF and System folder. In the System Folder, you can find the font folder. Copy your .tff file into that folder.
- Repack the Font Format.zip, including the two folders(META-INF and System.)
- The Flashable font file is ready. If you process the data using PC, copy the file to your OTG Pendrive or Mobile SD Card. When you used mobile apps, Copy the file to the Mobile Root Folder. Either Phone Memory or SD Card. Move to the flash instructions.
Flash font.zip file
- Insert Your Pendrive with OTG Cable. If you have SD Card, We don’t need Pendrive because we saved the files in SD Card.
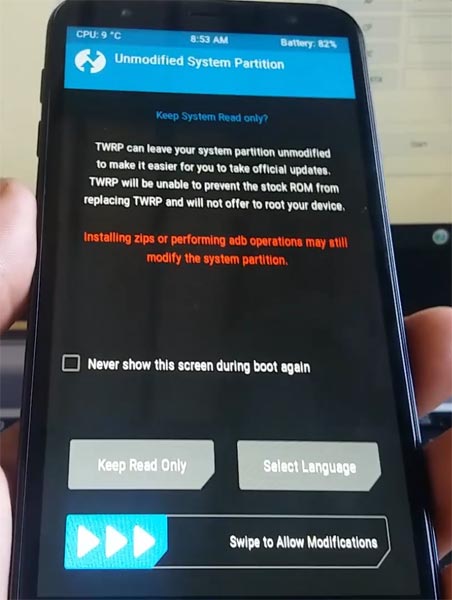
- If you didn’t reboot to recovery using the menu, You could use physical keys. Boot it into recovery mode->Volume Up + Power Button. Based on your mobile, the combination may vary.
- Now it Will Boot into TWRP Recovery Mode.
- Select Wipe->Advance Wipe->Select Cache Data.
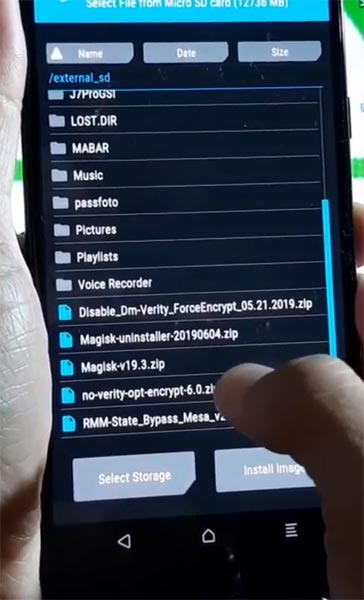
- Return to Home of TWRP select Install.
- Select Font Format.zip.
- After the Installation Reboot Your Mobile.
- Now you can find the font on your mobile. If you didn’t like the font format, you could flash the stock font, which you already noted. Or Restore your mobile from backup.
Wrap Up
If your device allows you to install custom fonts from a server, you’re among the few lucky lads. Many devices don’t support installing new fonts. However, some devices come with up to 5 system fonts; so, you can choose anyone from the 5. But if your favorite font is not there, follow our guides to install the font using third-party apps. Most of the users want to make their mobile more customized from Launcher, Themes, Fonts, ROMs. So, If you are a One in this group, you can use this method. In real life, I saw a person, Who uses Assasin Creed Font, Theme, and Mobile Skin. It looks like, a Custom Piece phone from both outside and inside. Samsung also released Star Wars Special Samsung Galaxy Note 10 Plus. That has a Custom Theme, Body Design, and Back Case. You can also make your mobile more customized with these Custom Font methods. Did you have experience with Custom Fonts? Comment below.

Selva Ganesh is the Chief Editor of this Blog. He is a Computer Science Engineer, An experienced Android Developer, Professional Blogger with 8+ years in the field. He completed courses about Google News Initiative. He runs Android Infotech which offers Problem Solving Articles around the globe.


Leave a Reply