User views are slowly moving to Stock Android UI. In the early stage, they believe it looks simple and empty. But since mobile companions begin to pout many customizations and make the UI heavy, It consumes lots of hardware resources. Thus, People have started to pay interest on Stock Android more. Regarding Stock Android, the Pixel mobile experience is always great. Google is always the first one to roll out Major Android OS. In 2022, They began testing Android 13; Now, they have released Android 13 Beta versions for eligible mobiles. In this list, Google Pixel 4/XL got Android 13 Beta 4 Firmware. You can wait for the Stable version rollout when you are a regular user. But when you are a Developer, you can use the below manual method to flash the firmware on your mobile.
![]()
Download and Install Google Pixel 4/XL Android 13 Beta 4 Firmware Image
This article will be divided into two steps/parts; the first will treat how you can unlock the bootloader of Google Pixel and Nexus devices. Then, the second will handle how to flash the firmware to the devices you unlocked.
Nevertheless, there are things you should know before going on to do any of these actions.
Supporting Versions
- Google Pixel 4/XL.
Note
Deal of the Day
-
The battery level of the proposed Pixel/Nexus device should be above 80 percent
-
Please ensure you backup the device in case of data loss, so you can quickly restore the previous files and settings of the device.
-
This method is purely for Google Pixel or Nexus devices only.
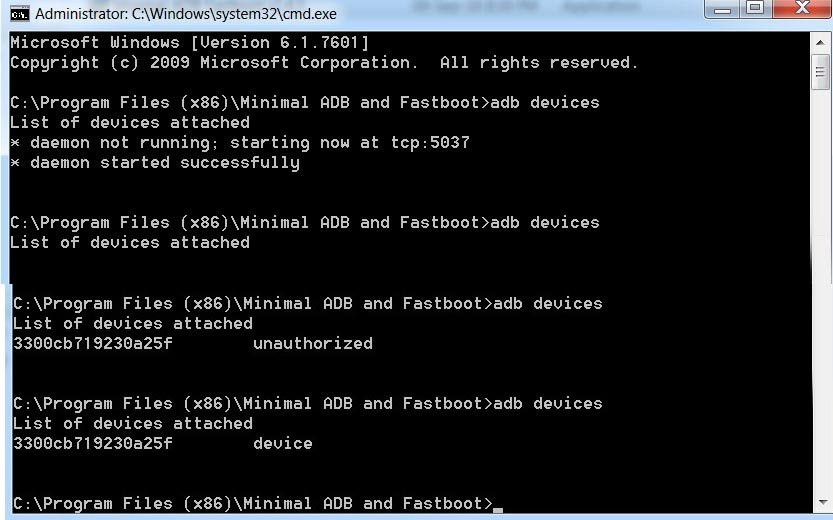
Install ADB Drivers- Essential Step
- You can simply use minimal adb and fastboot drivers when using Windows OS.
Part One (1): Unlocking Bootloader in Google Pixel 4/XL
Before firmware can be flashed to any device, the device’s bootloader must be unlocked. Unless you unlock a device’s bootloader, you cannot flash the firmware to that device. However, do not worry, as we also included how to unlock the bootloader in Google Pixel/Nexus mobile devices.
Interestingly, unlocking the bootloader in Google Nexus and Pixel smartphones is quite comfortable. This also implies that it is easy to flash the firmware or install custom kernels/ROM on these Google devices. So, if you’ve got a Google device, either Pixel or Nexus, irrespective of the model, you can unlock the bootloader and flash a new firmware to the device.
First, you must unlock the device’s bootloader (i.e., if the device has not been previously unlocked). On the other hand, if the device has been unlocked, go ahead to flash it following the procedures listed in part two of this article.
Note: This will automatically factory reset your device, so that is why we advised you to run a backup before engaging in this action
Steps
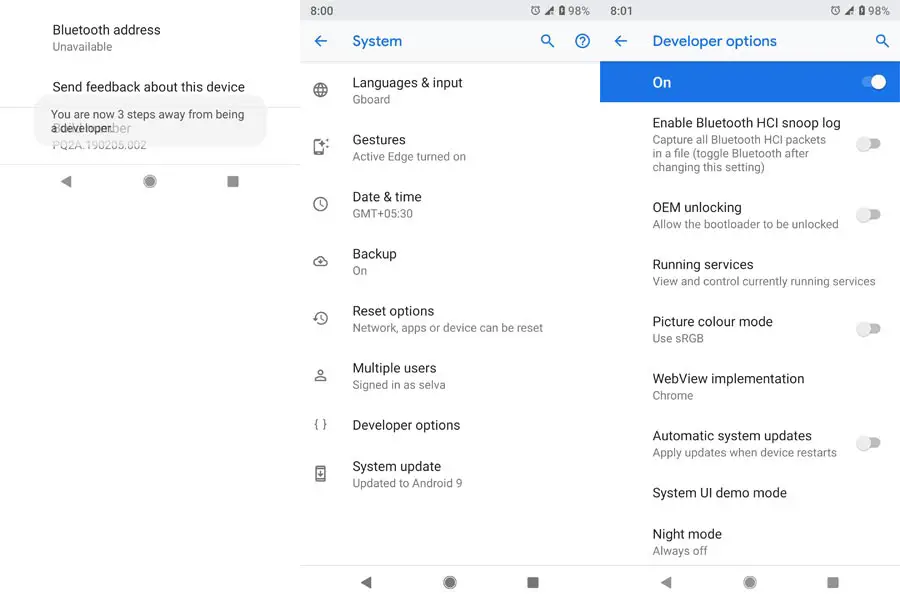
- On your Mobile, Go to Setting>>About>>Tap 7-10 times on Build number to enable the developer options>>Developer options>Enable Oem Unlock.
- Attach your mobile device to your laptop using USB.
- The device should be started in fastboot mode.
![]()
- Switch off your device. Then, enter into Bootloader mode. To do this, press and hold down the Volume Down + Power buttons simultaneously for some time.
-
Press the Volume Up button to continue when you see the warning message.
-
Connect the Pixel 4/XL Mobile to the computer via USB cable.
-
Launch the fastboot on your computer. Next, open a Command prompt on your PC and type the below command.
- fastboot devices
- If you didn’t get the mobile phone, restart the command prompt and Disconnect and Connect your Pixel 6a. It should display the connected devices. If you are detected, type the below commands.
- When the fastboot devices command doesn’t work, You can use the adb devices command.

- Utilizing the adb tools, If the device is switched on, perform:
- flashing fastboot unlock
- Wait for the process to complete. After the process is complete, Your mobile will restart.
Part Two (2): Flash Google Pixel 4/XL Android 13 Beta 4 Firmware Image (Coral, Flame)
After unlocking the bootloader, here are the steps to flash the firmware on Google Pixels or Nexus devices.
Steps
-
Download the respective ADB drivers and install them on your system. (Windows / Mac )
-
Download the Google Pixel 4/XL Android 13 Beta 4 Firmware file/ AFH Mirror and copy the files to your Desktop Google folder (Create one folder in the Desktop). Extract the firmware file. All the extracted files should be on the Desktop/Google folder. Please don’t put it in the Separate folder inside the Google Folder.
- Pixel 4 Android 13 Beta Firmware.zip/ AFH Mirror
![]()
-
Launch the Command prompt in the folder and enter the following code – cd/Username/Desktop/Google.
-
Now, connect the Android mobile using a suitable USB cable.

-
On the Pixel 6a device, turn on USB Debugging and OEM Unlocking; go to device settings >>> developer options >>> enable OEM unlocking. After allowing OEM Unlocking, power off the device.
-
Make sure your mobile is detected by the system you’re using for this action, then type the following command
-
fastboot -(Windows)
-
./fastboot-(Mac)
-
You’d see the device ID if the system detected the mobile device. However, if you didn’t get the device IS, retry again.
- Power the device into bootloader mode, and follow the guide below.
![]()
-
Press and hold down the Volume Down button for about 2 – 3 seconds
-
While holding the “volume down” button, press the “Power key” and hold on to it for some seconds.
-
Now, release all the keys/buttons.
-
Use any Volume keys to switch from START to Fastboot Option. You’ll receive a warning message, but you have to ignore the warning and continue below.
-
Press and hold the Power Key, then, Volume Up button. The mobile device will load to Fastboot mode.
-
After that, enter the below comments in Command Prompt.
-
flash-all.bat-(Windows)
-
./flash-all.sh-(Mac)
After entering the above command, the new firmware will be flashed on your Pixel 6a device. Reboot and start using.
Wrap Up
Since the Stable Android 13 comes only after September 2022, You can use the Beta versions if you wish. You have just learned to unlock the bootloader on Google Pixel 4/XL devices and flash the Android 13 Beta 4 firmware. Ensure you observe the warning we shared to avoid bricking the device due to carelessness. Also, this tutorial is only for Google Pixels devices; other Android devices have their ways to unlock their bootloader. Furthermore, ensure you use the tools listed here and download the correct firmware for the specified device. If you think you cannot do these independently, visit an Android technician to handle them. Your comments are appreciated; hence, we hope to see what you say about this tutorial; share them below.

Selva Ganesh is the Chief Editor of this Blog. He is a Computer Science Engineer, An experienced Android Developer, Professional Blogger with 8+ years in the field. He completed courses about Google News Initiative. He runs Android Infotech which offers Problem Solving Articles around the globe.


Leave a Reply