Compared with regular mobiles, Maintaining better battery backup in the Tablets is quite challenging due to its massive display. Even we try our best to optimize a few things; when an update or app consumes a high battery than usual, it is an issue. Samsung Galaxy Tab A7 Lite comes with a 5100 mAh battery. With its 8.7-Inch display, It may consume a high battery based on the apps we are using. But, when you notice any drastic battery drain, you can fix your mobile using one of the below methods. Start from the primary process. Based on your mobile feedback, You can move to another Advanced way.
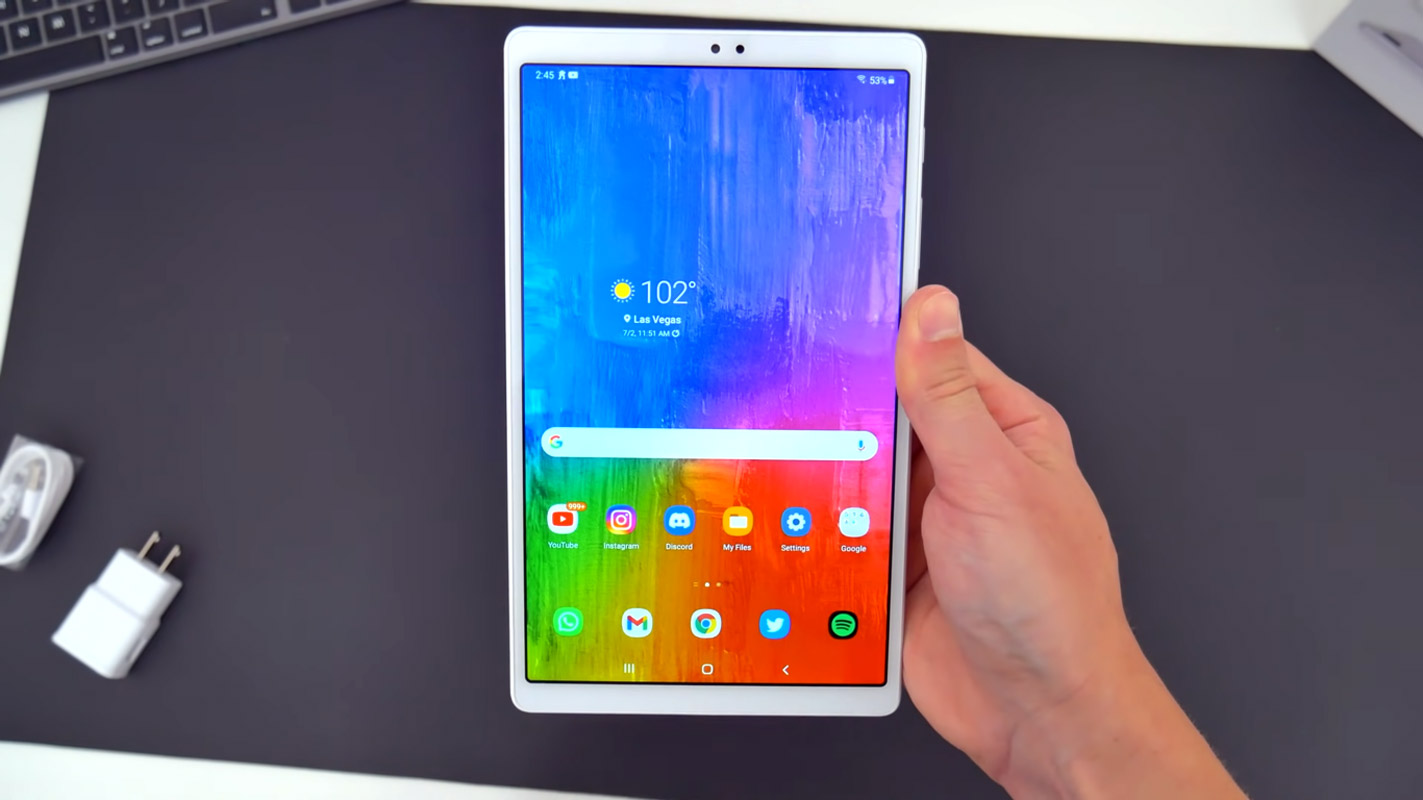
Why does the battery drain happen after the Samsung Galaxy Tab A7 Lite update?
However, before we continue, you may want to know a few things about Samsung and its regular OS updates available for the Galaxy series mobiles, as well as the flagship-level series. Samsung has rolled out an OTA update for these models to fix the various bugs reported by users. However, while this update is supposed to fix the previous bugs experienced by the users of these Samsung device models, it also tends to come with a bug that makes the devices consume a lot of Battery. Not all Galaxy mobile users reported about this battery drain issue, anyway. But, if you’re among the users who got affected, we have a solution here.
However, this battery drain issue seems to be associated with Galaxy devices running on One UI. Nevertheless, we have a couple of solutions, and none of them is hard to practice.
How to fix battery drain issues on Samsung Galaxy Tab A7 Lite after installing the update (SM-T220, SM-T225, SM-T225C, SM-T225N, SM-T227, SM-T227U)?
Whenever a successor version of Android is released, they always focus on Battery improvement. Most of the time, we notice battery drain issues after the latest security patch update or major upgrades like Android 10. But sometimes, due to some glitch or issues, It can happen on the opposite side. When you face the battery drain issue in your Samsung Galaxy Tab A7 Lite, You can use the below fix methods.
1. Install the latest software
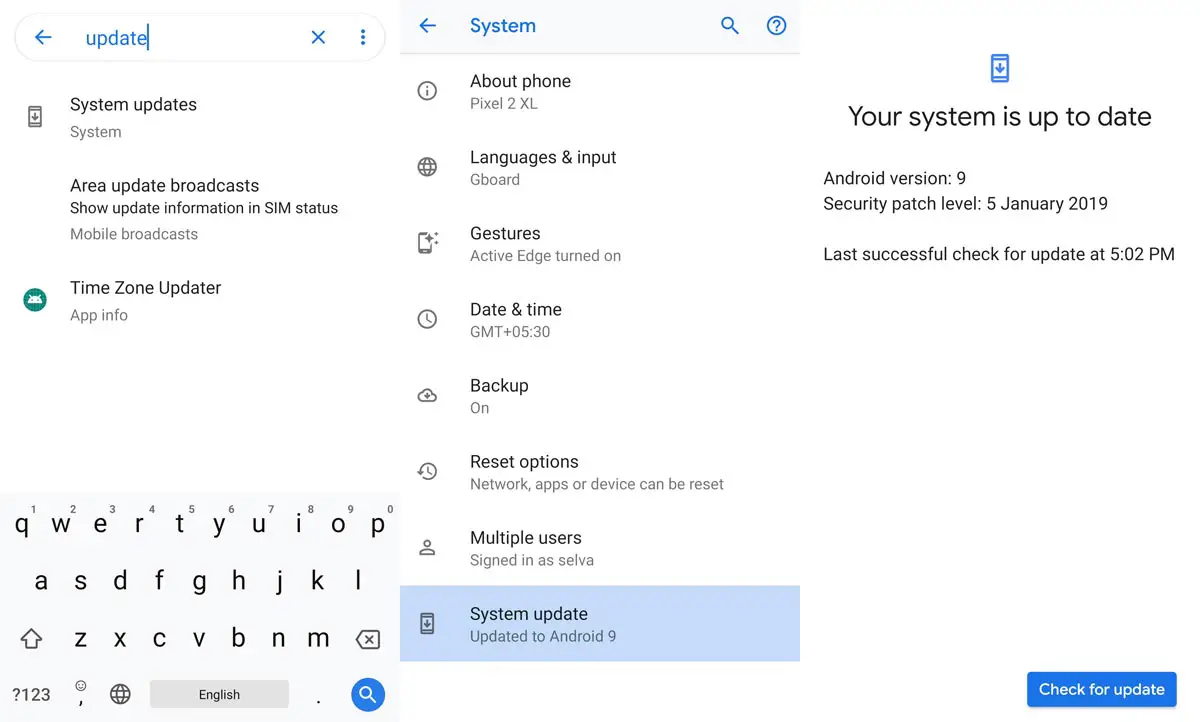
You may need to check out a newer software update available for your device. To check out this, follow the steps below. The bug causing your Galaxy device to consume much Battery has likely been fixed in a newer software version; thus, upgrading to the most recent version of your device. It is wise to take a complete backup before updating your mobile.
-
Go to your mobile device settings.
-
Scroll down to the About Section and click on the “Software update” option
-
Tap the “Download and install” option
-
Wait for the searching to complete to see if any new updates are available.
-
If there’s an updated version, click on the download option to update your device software.
However, if there is no more original version, kindly try other solutions below.
2. Sleep most power-consuming apps
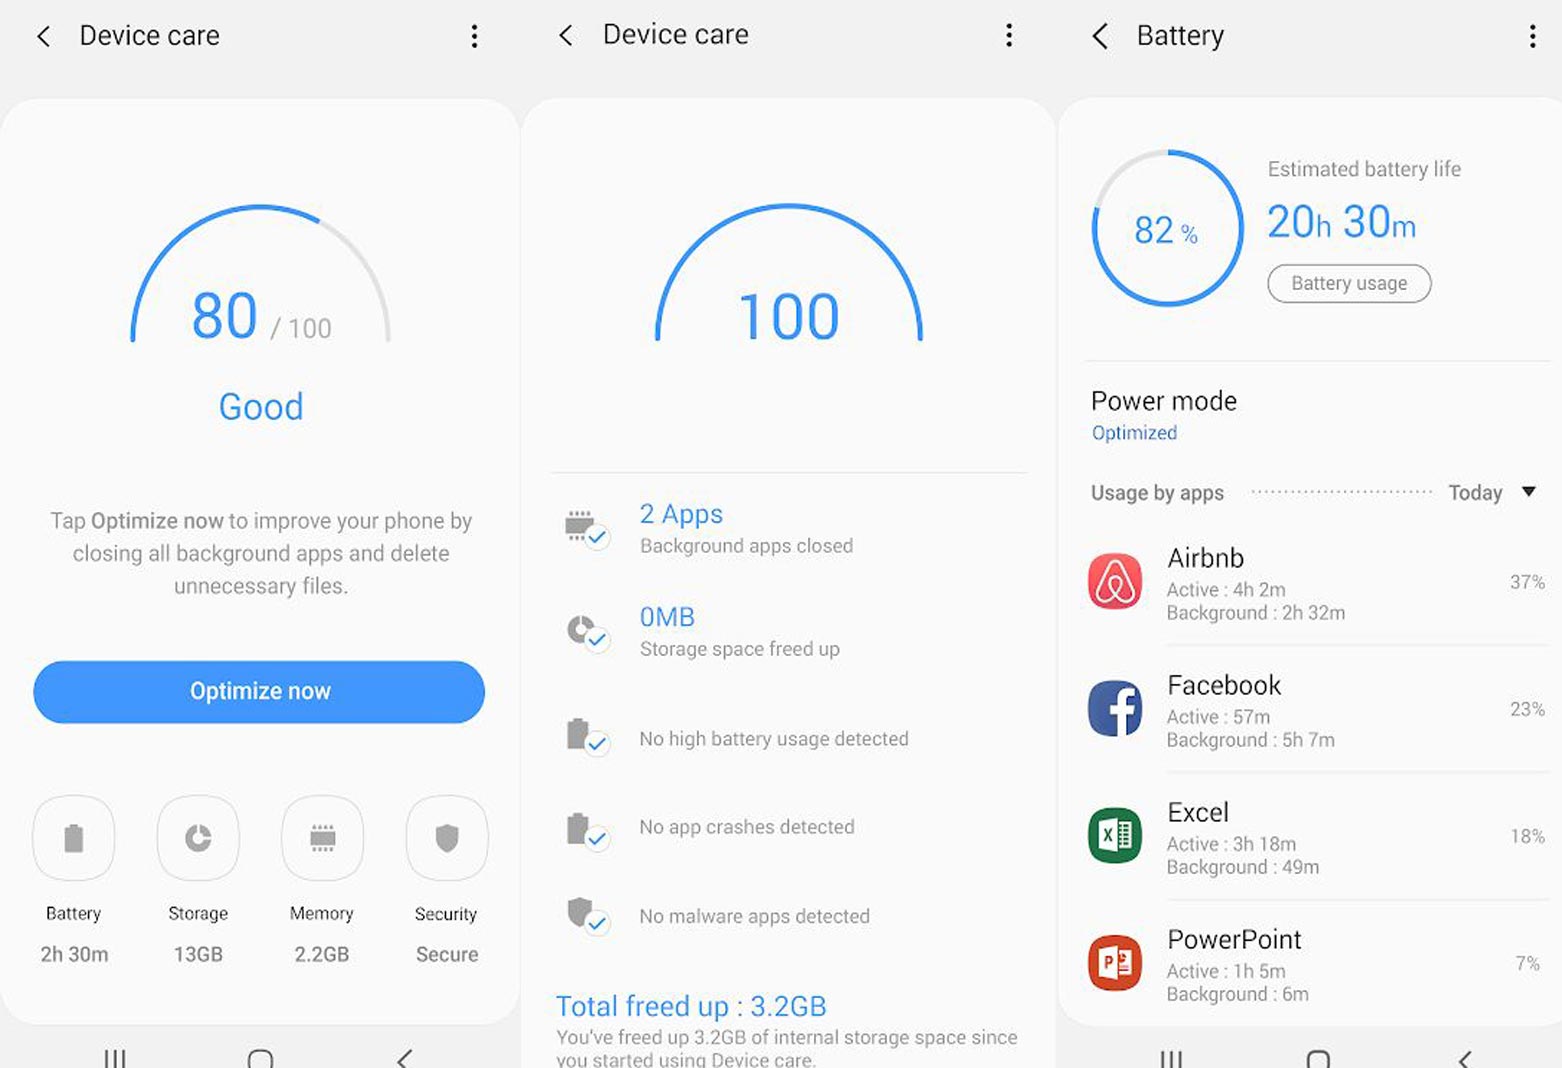
It is merely disabling most auto-run and irrelevant apps that run in the background and drain your battery quicker. The option to sleep the apps that make more use of your Battery is also available in the device care option. Follow the steps below to sleep most apps on your Galaxy device running on One UI. It may bring an end to this issue.
-
Go to your settings and select the “Device Care” option.
-
Look at the bottom; many icons are available there; click on the “Battery” icon.
-
You’ll see all the apps that are draining your Battery.
-
Click on them one after the other and toggle the switch beside “Put app to sleep” to be active.
-
It will prevent the app from running in the background, and We can improve your battery life.
You can even choose to uninstall the app if it is not essential. Finally, you may want to change the Power Mode to “High Power Saving Mode” if you wish. Click on the “More” icon at the top-right to access more battery optimization options.
3. Auto Optimization
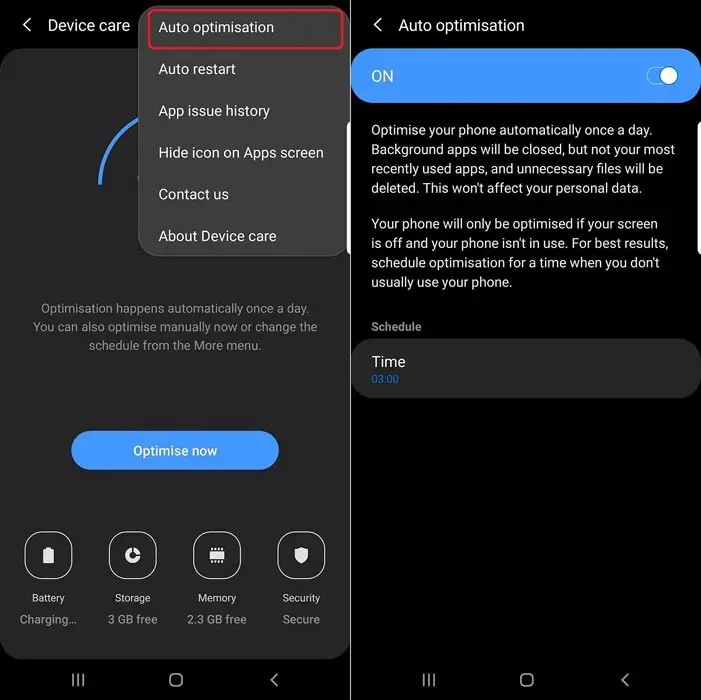
In some cases, optimizing the battery performance will help to make everything start to function well as supposed. Auto Optimizing your device battery performance is a feature built into Samsung’s new devices that allow you to delete cache files and stop irrelevant processes that automatically on the background and drain your device battery. It is one of the best ways to solve this battery drain issue.
-
Go to your Samsung Galaxy Tab A7 Lite device settings.
-
Scroll down until you see the Device care option; click on the Device Care.
-
Click on the three-dotted vertical lines at the top right corner and select “Auto-optimization.”
-
Set the time when the auto-optimization should always run.
You may need to set a time that you don’t often use your device, maybe during the nighttime.
4. Natural Battery Calibration
Generally, most mobile phone battery issues are merely by recalibrating the Battery. This action is simple but takes a lot of hours, and it is the best solution to fix battery drain issues on Galaxy devices running on One UI. Follow the steps below to recalibrate your Samsung Galaxy device battery.
-
Used up the Battery until it drains completely; i.e., make sure you use the device until the battery gets to 0% and the device powers off by itself. Do not attempt to charge the Battery in-between this period, ignore the low battery warning, and drain the battery completely.
-
Once the device powers off by itself, charge it back to 100% and do not attempt to boot the device or remove the charger until it reaches 100%.
Repeat the two steps; drain the Battery and charge it back to 100%
This process requires a steady power supply as the device is not supposed to be unplugged during the charge period until it reaches 100%.
After doing this two consecutive times, It will recalibrate your Battery, which might fight the issues you’ve been facing for a long time.
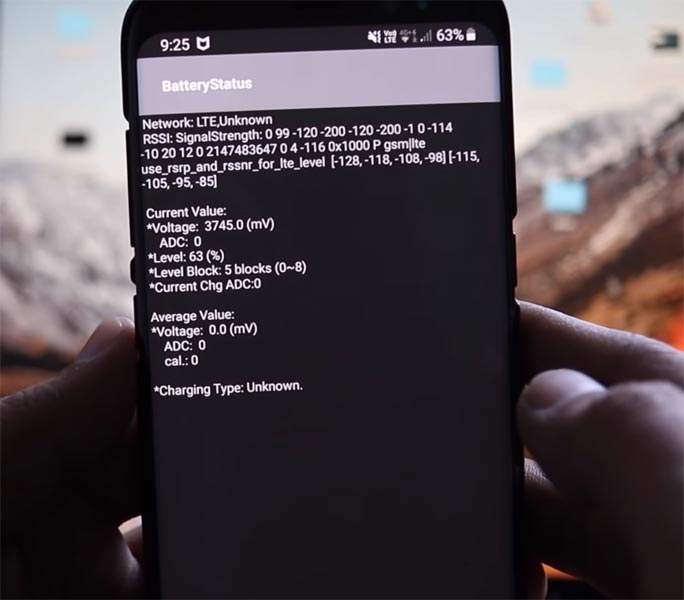
5. Recalibrate your Battery using USSD codes to deal with the Samsung Galaxy Tab A7 Lite battery drain issue
-
Launch your device dialer and dial this code – *#0228#
-
Follow on-screen Instructions
-
Restart the device
6. Diagnose apps using Safe Mode
Safe mode allows us to disable third-party apps. When you didn’t face any issues in Safe Mode, the problem for the battery drain is non-system apps. So, you have to find which app to remove. Start with the last installed app. You can boot your mobile into Safe Mode by pressing the Volume Down button’s power button. The combination may vary depending on the manufacturer. Even in safe mode, you have to try other methods if you face the problem.
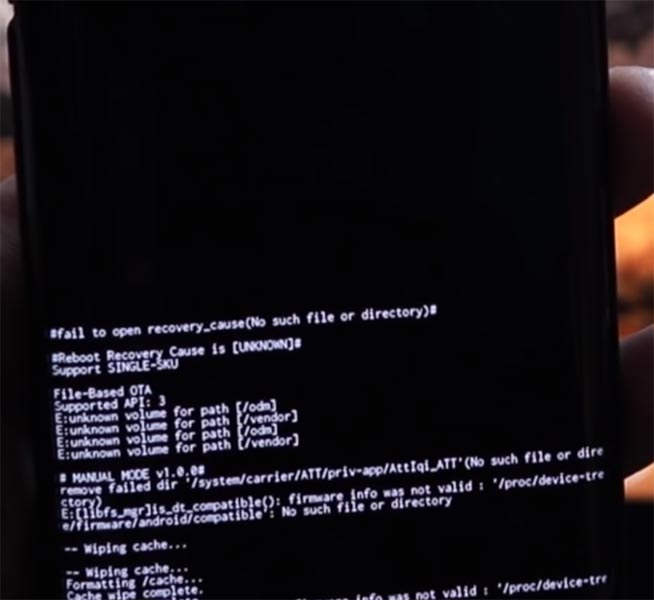
7. Clear partition cache
Another solution is the clearing of the cache. When caches build upon our mobile phone, they can result in quite a lot of malfunctioning. Thus, clearing all the caches on your device may help fix the battery issue you’re facing.
-
Before going to this option, take a complete backup. Start by powering off the device.
-
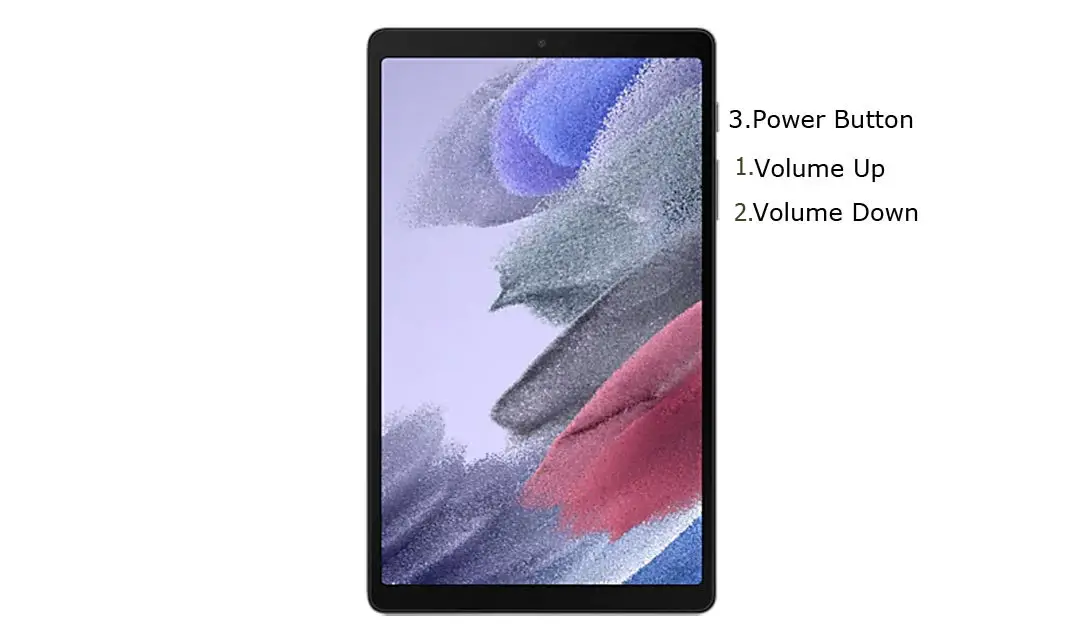
Boot into recovery mode pressing down the Volume Up key, the Volume Down Key, and Power key simultaneously.
-
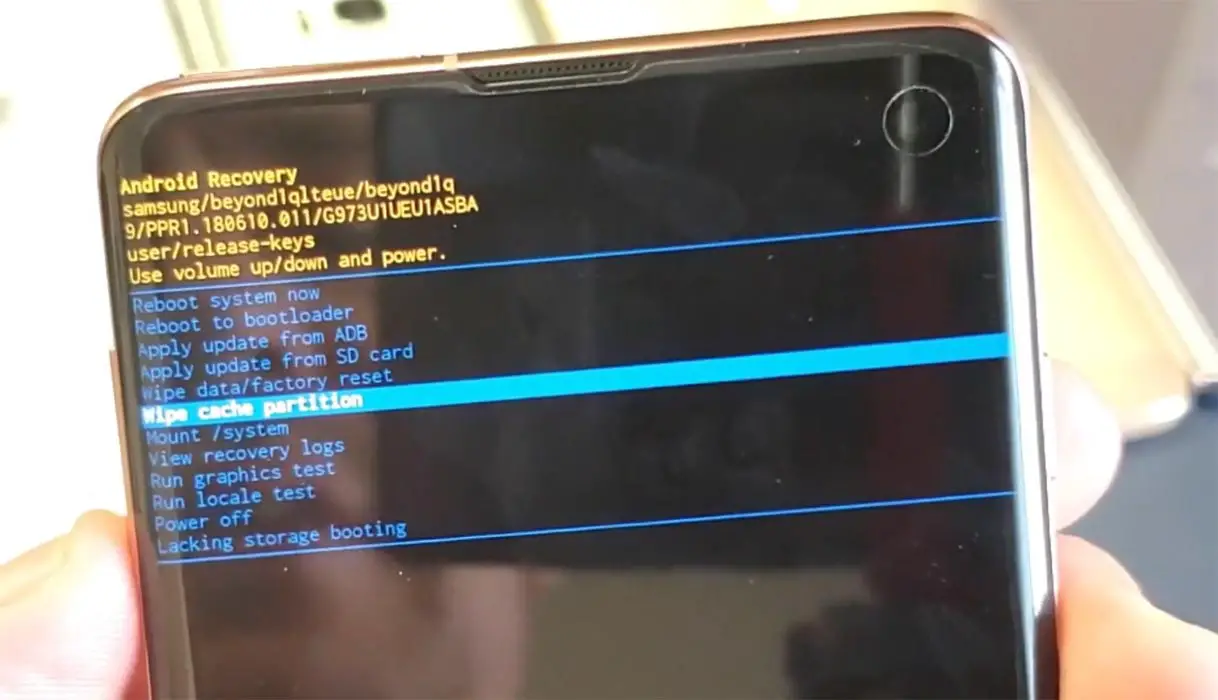
Use the volume keys to navigate and the Power key to launch an option; select “clean cache partition.”
-
Ignore the warning message that will appear on your screen and continue
-
Restart the device after these processes.
8. Disable unwanted apps using ADB to fix the Samsung Galaxy Tab A7 Lite battery drain issue
If you use Stock Android phones, most of the time, you can disable/remove the bloatware apps. But, If you are in Custom Skin OS, the chances of disabling the Bloatware apps are less. But, We can Disable the Apps using ADB without root. The methods may vary depending on the manufacturer. You have to find the particular Bloatware apps and disable them. I will give the overall idea about ADB steps and commands. But, the list of packages may vary depending on the manufacturers.
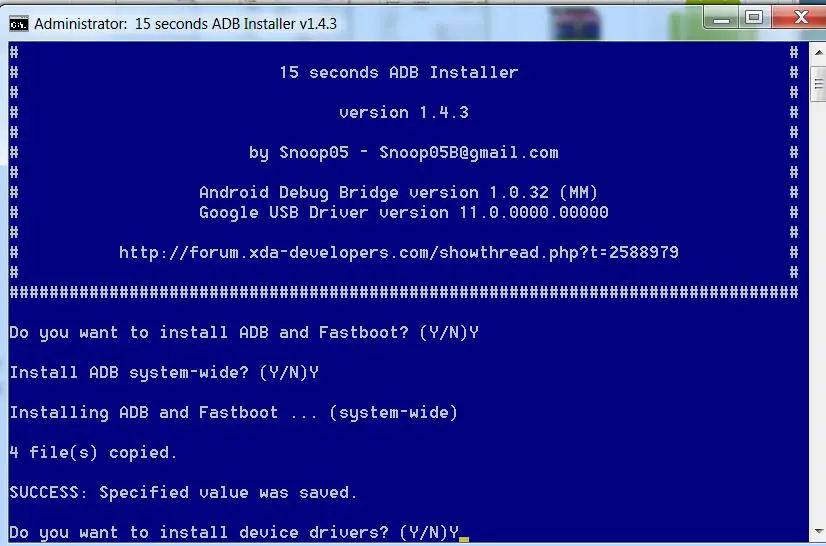
- Download the ADB drivers. Install it on your PC.
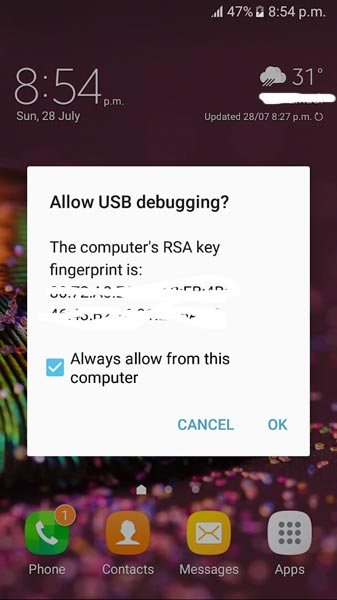
- Enable USB Debugging Mode and OEM Unlock; you’ll find these options at Settings >>> Developer options. If you didn’t see the developer options on your settings menu, then go to about >>> build number. Click on the “Build Number” row about ten times regularly to activate “Developer Option” on your device.
- Connect your mobile with a PC and unlock your mobile (Screen Lock).
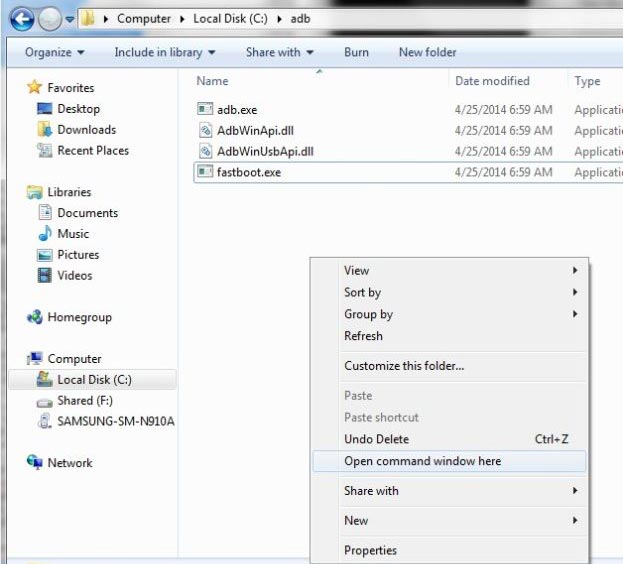
- Open a command prompt as Administrator and type the below command to check the ADB status.
- adb devices
- The above command will display some code for device detection. If you didn’t receive any response, Check with the USB Cable. If you get a response, move to the below commands.
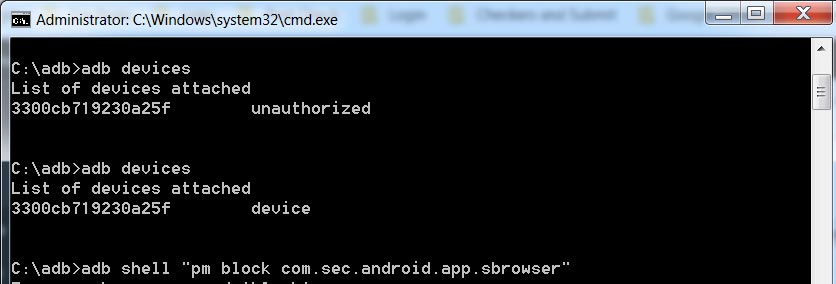
- You can disable the apps based on their adb package name. You can find these package names using the below command.
- adb shell pm list packages
- Based on the title, you can exclude unwanted apps. After that, use the am force-stop and pm disables commands with the Application package name.
- You can enter the commands one by one, Or All commands and Hit Enter. You can get the application package name in Play Store URL. It will start with com.instagram. Android like that.
- am force-stop package name(e.g: com.sprint.w.installer)
pm disable-user package name
- Restart your mobile when you are again stuck on boot logon on your Samsung Galaxy Tab A7 Lite mobile move to different methods.
9. Reset Your Mobile
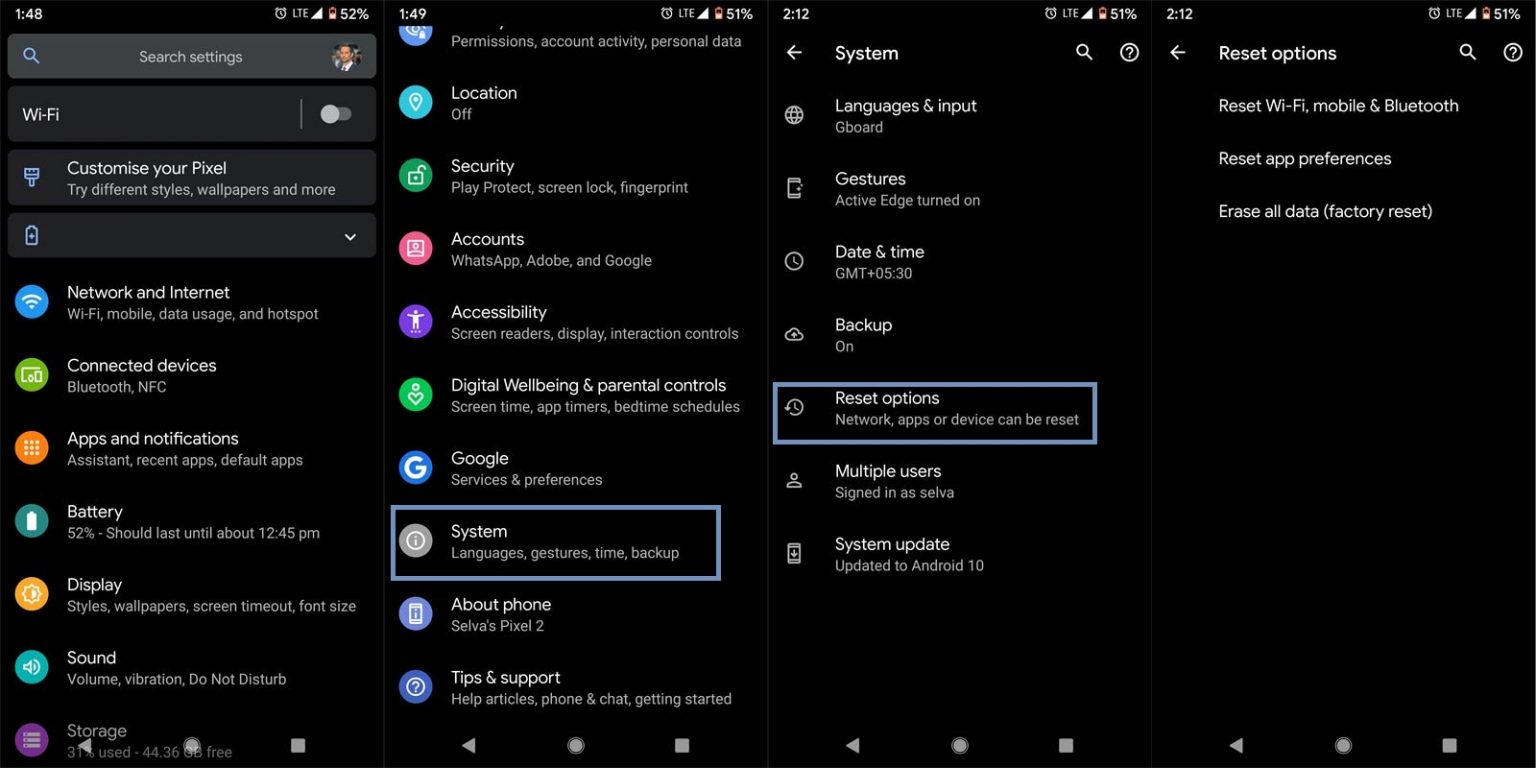
If you follow all the methods and still face issues, you can reset your Samsung Galaxy Tab A7 Lite. Take complete backup on your mobile. You can do a soft reset or hard reset. To Rest your mobile, Go to settings> System>Reset Options> Reset app preferences/ Factory Reset.
- Soft Reset/App Preference Reset– This option will remove all the custom settings we made and return to the default settings. It will not delete user data.
- Hard Reset/Factory Reset– It will remove all user data. Your mobile OS will become new, like when you purchased it, and you have to set up everything from the beginning.
You can also use your mobile recovery to reset when you can’t boot into your Mobile OS.
9.1 Stock Recovery method
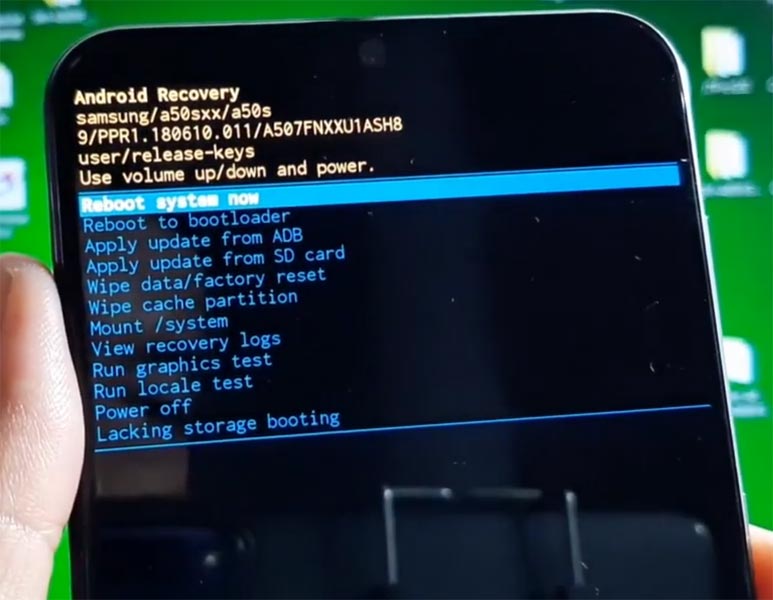
- Switch off your device. It will boot your mobile into Recovery mode. To do this, press and hold down the Volume Up + Power buttons simultaneously for some time. Then, enter into the Stock Recovery mode.
- If you don’t use Rooted mobiles, you have Stock Recovery, which your official mobile manufacturer provides most of the time. If you have stock recovery, you have the direct option as “Wipe Data/Factory Reset.” Navigate to this option and confirm it using the power key button. Remember, It will delete your entire mobile data. So, backup first before the process.
9.2 TWRP Recovery method
When using Rooted mobiles, you either use Stock Recovery or TWRP custom recovery. If you have Stock Recovery, you can use the above process. When you install TWRP on your mobile, follow the steps below.
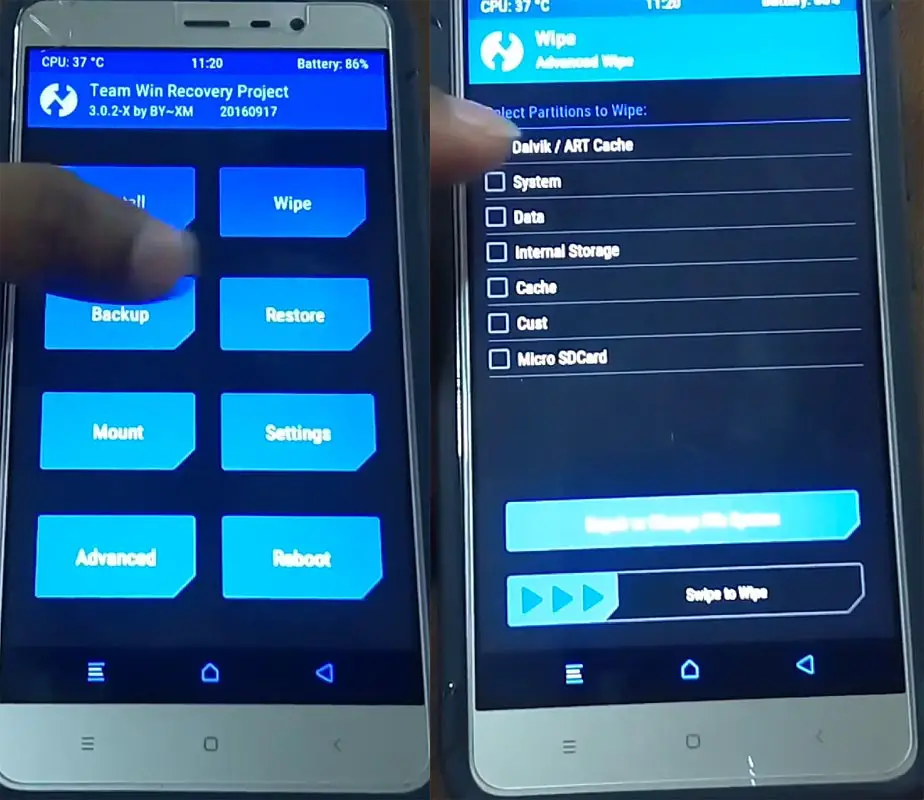
- The Keycombinations will boot your mobile into TWRP Recovery mode.
- On the Home screen, you can find the option “Wipe.” Select the wipe option; you will receive further details. Select “Dalvik, Data, and Internal Storage.” Don’t select the System, and it will wipe your OS. After selecting other choices, swipe to erase the data. When the process completes, return to home and boot into OS.
10. Flash Complete Firmware using ODIN
In this method, we are going full flash firmware in your boot logo stuck Samsung Galaxy Tab A7 Lite mobile. It is a Data loss process. So when you don’t have any choice, and none of the above methods don’t work for you, you can use them. Refer- Flash Samsung Galaxy Tab A7 lite Firmware using ODIN.
Wrap Up
People always face this kind of battery issue after the software update. Even if the software updates process looks simple, 5-10% of people always face problems making OTA updates. That’s why we suggest you always make a backup before making an update on your mobile. Always use cloud photo backup services like Google Photos. Compared with other mobile manufacturers, with the help of Samsung’s available tools, we can fix your Samsung Galaxy Tab A7 Lite battery drain issue.
If you are facing freeze and unresponsive issues on your mobile, You should try different methods than the above mentioned. It is always wise to run through that your previous energy savings options are turned on after the update. Based on your available storage and apps size, battery usage may vary. When you are confident that the settings are perfect for battery optimization, you can follow the above steps to fix your mobile. Comment below when you try different methods than above, and those techniques help you. We try to add if those methods work for everyone.

Selva Ganesh is the Chief Editor of this Blog. He is a Computer Science Engineer, An experienced Android Developer, Professional Blogger with 8+ years in the field. He completed courses about Google News Initiative. He runs Android Infotech which offers Problem Solving Articles around the globe.


Leave a Reply